So you now have a rooted phone. Maybe you have heard about custom recoveries or you already have one installed and want to take full advantage of it. This guide will go over some of the basics of what you can do with a custom recovery, in this case TWRP. (For CWM, see this guide: http://forums.androidcentral.com/am...-how-flash-custom-recovery-clockwork-mod.html)
[WARN]Before you make any changes to your phone, be it installing, deleting, or modifying files, make a NANDROID backup[/WARN]
[TIP]If you have an SD card in your phone, be sure to place any ROMs or other zips you want to flash, at the highest level. That is to say that you should make a new folder next to existing ones, and not within one as that will possibly make it harder to find.[/TIP]
For the first step, you'll have to boot into recovery mode. This varies from device to device, but on the majority of devices it is either volume up + power or on Samsung devices home + power + volume up. Hold this combo for a few seconds until it vibrates and you see small blue letters in the upper left-hand corner of your screen.
Now that we are in recovery, we will be taken to this home screen:
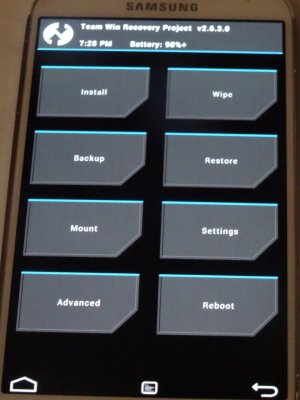
The first step before we start flashing anything (after the android backup of course), is to completely wipe the device. This will allow you to perform a clean install of whatever ROM you'd like. A clean install is recommended for any new ROM that isn't just an update to your existing one (ex: going from SlimKat to CM or from CM 10 to CM 11, as opposed to just going from Slim Kat 4.4.4 build 1 to 4.4.4 build 2) as not doing so can cause issues.
To do this, you will need to hit the wipe button on the screen shown above.
[NOTE]A clean install is essentially making your phone a blank slate for you to flash your ROM. It generally makes for a smoother installation and performance of your ROM (I have had my phone get stuck on the boot screen when I have done a "dirty install.") than you would with a dirty install, which would just be placing your ROM over the old one [/NOTE]
Tapping that will now take you to this screen:
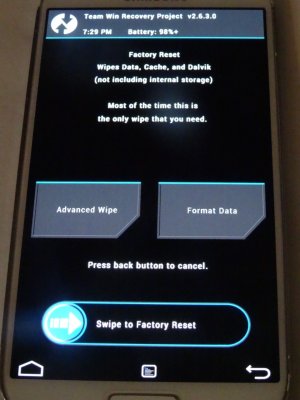
Here, by swiping the option shown, it will delete all of your current data, your cache and dalvik cache. It is the easiest way to get a clean install ready. This would also be the equivalent of a factory reset in your stock settings prior to being on a custom ROM.
You can also perform this method by hitting advanced wipe and selecting the options mentioned above, but it's just easier to do it this way. Another benefit of advanced wipe, however, is just wiping your device's cache partition. This operation is recommended after any software updates, or if your device feels generally sluggish.
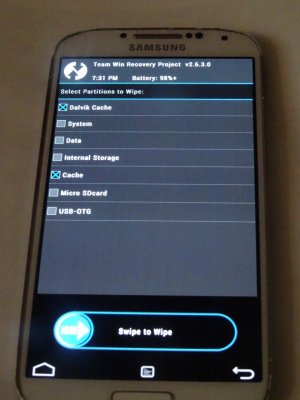
[WARN]When selecting the advanced wipe option, make sure you DO NOT select internal storage. Doing so will completely wipe your device (including the OS) and essentially brick it [/WARN]
OK. Now you're done with the pre-flashing steps. Now on to the fun part
To flash your ROM, go back to the main page, and tap on the "Install" option. That will take you to a folder on your device (either internal or external storage). Tap the "up a level" option near the top of the screen as show below:
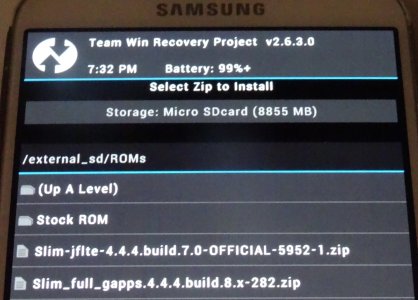
That will take you to the overview of all your folders on the current storage being accessed (also shown at the top of the screen). If you know that your ROM is in the current storage, find the folder and wait for the next step. If not, tap the "storage" button at the top to switch to the other available option as shown below:
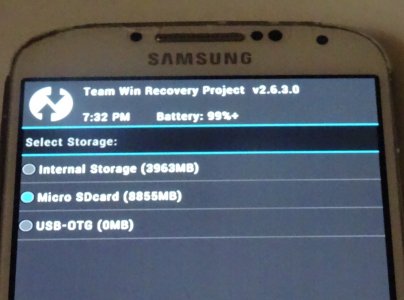
Now that you have found your ROM file, select it, and it will take you to yet another screen before completion
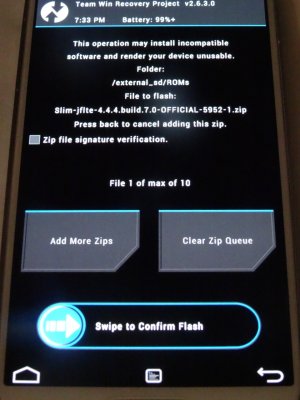
Usually, these ROMs do not have pre-installed GApps packages (this contains the Google services found on Android devices. Including YouTube, Chrome, Play Store, and occasionally some of Google's work suite). Check your ROM dev's site if they have one, or the thread where you got the ROM to see if there is also any GApps zips. If you have one available, tap on the "add more zips" near the bottom to flash them together with your new ROM.
Here I have SlimKat 4.4.4 stable build 7 and the accompanying Google services (GApps) package.
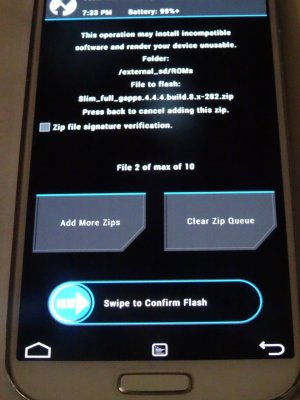
Now swipe to confirm the flash, and wait until the last screen. Once you are taken there, hit reboot and system to boot up your new ROM.
These are general steps that should work for most ROMs, but there are some that will have a completely different install method or at least a couple of extra steps. In those cases, check the thread where you found ROM and look for the step by step directions on flashing said ROM.
[WARN]Before you make any changes to your phone, be it installing, deleting, or modifying files, make a NANDROID backup[/WARN]
[TIP]If you have an SD card in your phone, be sure to place any ROMs or other zips you want to flash, at the highest level. That is to say that you should make a new folder next to existing ones, and not within one as that will possibly make it harder to find.[/TIP]
For the first step, you'll have to boot into recovery mode. This varies from device to device, but on the majority of devices it is either volume up + power or on Samsung devices home + power + volume up. Hold this combo for a few seconds until it vibrates and you see small blue letters in the upper left-hand corner of your screen.
Now that we are in recovery, we will be taken to this home screen:

The first step before we start flashing anything (after the android backup of course), is to completely wipe the device. This will allow you to perform a clean install of whatever ROM you'd like. A clean install is recommended for any new ROM that isn't just an update to your existing one (ex: going from SlimKat to CM or from CM 10 to CM 11, as opposed to just going from Slim Kat 4.4.4 build 1 to 4.4.4 build 2) as not doing so can cause issues.
To do this, you will need to hit the wipe button on the screen shown above.
[NOTE]A clean install is essentially making your phone a blank slate for you to flash your ROM. It generally makes for a smoother installation and performance of your ROM (I have had my phone get stuck on the boot screen when I have done a "dirty install.") than you would with a dirty install, which would just be placing your ROM over the old one [/NOTE]
Tapping that will now take you to this screen:

Here, by swiping the option shown, it will delete all of your current data, your cache and dalvik cache. It is the easiest way to get a clean install ready. This would also be the equivalent of a factory reset in your stock settings prior to being on a custom ROM.
You can also perform this method by hitting advanced wipe and selecting the options mentioned above, but it's just easier to do it this way. Another benefit of advanced wipe, however, is just wiping your device's cache partition. This operation is recommended after any software updates, or if your device feels generally sluggish.

[WARN]When selecting the advanced wipe option, make sure you DO NOT select internal storage. Doing so will completely wipe your device (including the OS) and essentially brick it [/WARN]
OK. Now you're done with the pre-flashing steps. Now on to the fun part
To flash your ROM, go back to the main page, and tap on the "Install" option. That will take you to a folder on your device (either internal or external storage). Tap the "up a level" option near the top of the screen as show below:

That will take you to the overview of all your folders on the current storage being accessed (also shown at the top of the screen). If you know that your ROM is in the current storage, find the folder and wait for the next step. If not, tap the "storage" button at the top to switch to the other available option as shown below:

Now that you have found your ROM file, select it, and it will take you to yet another screen before completion

Usually, these ROMs do not have pre-installed GApps packages (this contains the Google services found on Android devices. Including YouTube, Chrome, Play Store, and occasionally some of Google's work suite). Check your ROM dev's site if they have one, or the thread where you got the ROM to see if there is also any GApps zips. If you have one available, tap on the "add more zips" near the bottom to flash them together with your new ROM.
Here I have SlimKat 4.4.4 stable build 7 and the accompanying Google services (GApps) package.

Now swipe to confirm the flash, and wait until the last screen. Once you are taken there, hit reboot and system to boot up your new ROM.
These are general steps that should work for most ROMs, but there are some that will have a completely different install method or at least a couple of extra steps. In those cases, check the thread where you found ROM and look for the step by step directions on flashing said ROM.
Last edited:

