[GUIDE] Getting Started with Android (UPDATED 2016 for Nougat)

B. Diddy

Senior Ambassador
Moderator
Mar 9, 2012
167,032
7,123
113
Visit site
Welcome to Android Central!
You've come to the biggest and best Android forum around. Here you'll find over 2.8 million members discussing the whole gamut of Android issues and beyond, overseen by a crack team of Moderators, and assisted by your friendly neighborhood Ambassadors (a group of volunteers who share a pathologic urge to help those in need of Android assistance). Before you go any further, please be cool and review the Community Rules & Guidelines, which go a long way towards making this forum a fun and comfortable place in which to hang out. That's ok, I'll wait ...

All set? Then here we go! The purpose of this thread is to act as a launchpad for those of you who are completely new to Android, whether you've moved over from an iPhone, a Windows Phone, or a Blackberry, or you're a newbie to the whole world of smartphones. It is by no means a comprehensive guide, but I will suggest links here and there for further reading as well as links for apps that may expand your device's capabilities. To a certain extent, I will build upon the massive original Getting Started guide written by milominderbinde back in 2010, so he still deserves a lot of credit. I'll try to keep the terminology pretty basic, but if you start wondering what's meant by terms like RAM, GPU, kernel, or "phone call" (so, people actually talk to each other using these things?!?), then refer to The Android Dictionary.

To jump to specific sections of this guide, follow these links:
[NOTE]Keep in mind that there are hundreds of different Android devices in use today, with varying Android versions and manufacturer-specific tweaks to the interface, so a guide like this can't be one-size-fits-all. To make things easier (for me, at least), I will refer mostly to "stock" or "vanilla" Android, which is the pure unadulterated version of Android that Google has on its Nexus devices. Specifically, I have a Nexus 6P running Android 7.0, and a 2013 Nexus 7 running Android 6.0.1.[/NOTE]
What Is Android?
In case you just emerged from a time warp from the 1800s (I say, look at all of the horseless carriages!), Android is Google's mobile operating system based on Linux. Android is open source and free to use by developers, who can make modifications for specific devices and release them as "custom ROMs." The first Android phone was released in 2008, and since then its development and growth have accelerated exponentially. As of mid-2013, the rate of Android device activations worldwide was 1.5 million/day, and there were over 2.4 million apps available in the Google Play Store. As of 2016, Android's worldwide smartphone market share was a whopping 87%.

What's with the Names? You're Making Me Hungry.
Just as with other operating systems like Windows and Mac OS, Android continues to develop, ever advancing to higher versions. Android version 1.0 and 1.1 were very creatively named Android version 1.0 and 1.1. But each major version update starting with 1.5 has had a nickname based on a sweet treat, because why not?

  • Android 1.5 (Cupcake)
  • Android 1.6 (Donut)
  • Android 2.0-2.1 (Eclair)
  • Android 2.2 (Froyo)
  • Android 2.3 (Gingerbread)
  • Android 3.0-3.2 (Honeycomb)--for tablets only
  • Android 4.0 (Ice Cream Sandwich)
  • Android 4.1-4.3 (Jellybean)
  • Android 4.4 (KitKat, originally Key Lime Pie)
  • Android 5.0-5.1 (Lollipop)
  • Android 6.0 (Marshmallow)
  • Android 7.0 (Nougat)
  • ???Android 8.0 (Oreo? Orangesicle? Oh! Henry?)
Do you sense a pattern? Right, it's alphabetical, starting with C. Google, you cheeky rascals. (Not sure what happened to A and B -- perhaps they were considered alpha and beta test versions?)

These various versions of Android pose a bit of a fragmentation problem, because as more advanced versions of the OS are released by Google, older devices typically get left in the dust. Most devices get system updates for 18-24 months at the most, because after a while it isn't efficient for the phone's manufacturer or the wireless provider to modify the latest Android version to work on an outdated piece of hardware. As Android has matured, though, fragmentation has become less of an issue, since subsequent versions have been more evolutionary steps rather than quantum leaps, allowing more compatibility of apps across OS versions. In addition, Google has incorporated many of its system component updates into Google Play Services, which gets automatically updated independent of the major operating system updates. The upshot is that more people with devices running older versions of Android get to benefit from advances in Google services without the need for a system update.

Choosing a Wireless Carrier
There are, of course, the big carriers like Verizon, AT&T, Sprint, and T-Mobile, that require you to pay fairly hefty monthly fees based on 2 year contracts with early termination penalties, effectively locking you in (although in recent years, they have moved away from these kinds of contracts -- although their newer plans often still have some degree of lock-in). There are an increasing number of smaller wireless companies like Virgin Mobile and Straight Talk that offer cheaper plans, often in a pay-as-you-go fashion. These companies typically piggyback off the bigger carriers (e.g., Virgin Mobile uses the Sprint network), hence the term MVNO (mobile virtual network operator), but the tradeoff is that they usually don't carry the latest and greatest devices. As this kind of service has become increasingly popular, the big carriers are now offering similar plans (like AT&T's GoPhone or Sprint Prepaid). One innovative service, Republic Wireless, actually relies on available wi-fi signals to make calls over the web; if no wi-fi signal is available, the phone switches over to the Sprint network. This model was followed up by Google's own Project Fi, which can switch between T-Mobile, Sprint, US Cellular, and wi-fi (and is currently only available on the Nexus 5X/6P and Pixel phones).

Your choice of carrier and plan should be based on several factors, many of which will be unique to you (like financial situation, device preference, and local availability). One of the most important factors will be the quality of the network where you'll be using it most. To see how good voice and data reception are in a particular area, you can check the Sensorly.com online maps, a crowdsourced service which shows the coverage levels reported by users of their Sensorly app (Google Play Store link here). RootMetrics is a similar site (Google Play Store link here). And of course, Consumer Reports is always a good source of information, with their annual ratings of wireless companies both big and small (although I find their smartphone ratings less useful, since they're often a release cycle behind).

Which Device Is Right for You?
The huge variety of devices to choose from is one of Android's greatest advantages, but it can also be confusing and present you with too many decisions. There are high end phones, budget-friendly entry-level phones, and varying levels in between. There are different screen sizes, amounts of memory, and levels of processing power. Some allow you to expand your storage memory using a microSD card, although this has become less common, as cloud storage has become increasingly cheap, accessible, and reliable. Different manufacturers often make minor (or sometimes major) tweaks to the basic "vanilla" or "stock" Android interface in efforts to enhance the user experience as well as to make their devices stand out from others -- Samsung has TouchWiz, HTC has Sense, etc. These "skins" or "overlays," as they're often called, can be the source of great enjoyment or frustration, depending on factors like how well the hardware supports them and if the extra features are actually useful to a particular user. So as you can see, the choice of device will end up being very individualized.

However, there are some basic guidelines to follow, because there are quite a few devices out there that will only give you a subpar experience. If you're considering a particular device, look up its specifications on the web, and check for the following:

  1. RAM: This is where active apps reside. The way Android works, the system prefers to keep RAM mostly full of open apps, to allow for faster and more efficient app switching and opening (see this article). The more RAM a device has, the more apps can be active, and the device will thus run more smoothly. 1 GB of RAM should be the bare minimum these days, with higher end phones having at least 2-3 GB. Try to avoid devices with less then 1 GB of RAM. They'll be slow and clunky.
  2. ROM (also referred to as Internal Storage): This is where apps are installed, and where data generated by apps is stored. Part of this storage (anywhere from 3 to 6 GB) will be taken up by the OS and any preinstalled apps (i.e., nonremovable "bloatware"). So even though a device might be advertised as having 4 GB of Internal Storage, it may only have 1 GB available to the user. This can severely limit the number or size of apps you can install, and you can't fully install apps to external SD cards (unless your phone runs Marshmallow or above and supports Adoptable Storage), so don't expect that expanding the memory to 32 GB with a microSD card will help. External SD cards are mostly good for storing media files like music, videos, and photos. Look for devices with at least 8 GB of Internal Storage ROM, preferably at least 16 GB. For more discussion on memory, see this guide.
  3. CPU: It's hard to keep track of the different kinds of processors out there, but as a general rule of thumb, the more cores, the better the performance. Specs aren't always everything, but they still mean something. An octa-core CPU will almost always outperform a quad-core CPU, and no one should be settling for a dual or (gasp!) single-core CPU any more. As for clock speed (i.e., GHz), it's difficult to compare CPUs these days based on only those numbers.
 
Last edited:

B. Diddy

Senior Ambassador
Moderator
Mar 9, 2012
167,032
7,123
113
Visit site
Re: [GUIDE] Getting Started with Android (2014) [CONSOLIDATED]

Your Homescreen and Lockscreen
Homescreens

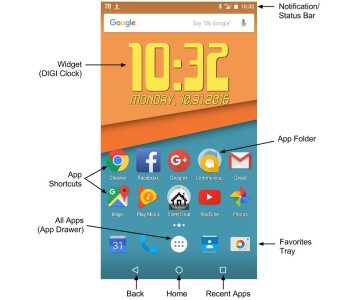
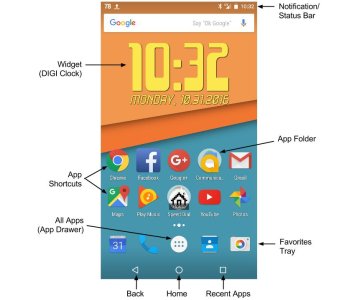
So you've gotten your happy shiny new Android device and just finished setting it up with your Google account. Now what do you do with that vast expanse of blank screen? This is one of the main ways you can make Android your very own. What you're seeing is a Homescreen, which is akin to the Desktop in Windows. On it, you can place shortcuts to your favorite apps, combine those shortcuts into folders, and set up widgets. You're not limited to just one homescreen -- depending on which launcher you use, you might have five homescreens to customize, or you might be able to add an unlimited number of homescreens, which can then be accessed by swiping left and right. (A launcher is the app that runs the homescreen interface, and can be changed easily to suit your preferences.) You can also choose your own wallpaper (either a static wallpaper or a live wallpaper). Let's start discussing these in more detail.

7 homescreen.jpg

App Shortcuts:
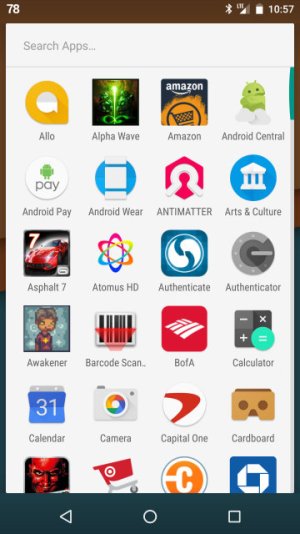
These are just like shortcuts on a Windows desktop, in that clicking on the shortcut will launch the app, but removing the shortcut will not uninstall the actual app (N.B., this is not the case for certain launchers that don't have an App Drawer -- see below). In order to place an app shortcut on your homescreen, you need to bring up the All Apps screen (also referred to as the App Drawer) by tapping that circular 6 dot grid icon as seen above. Extending the Windows analogy, consider the All Apps screen to be like the Windows Start menu, where you could bring up all installed programs (at least, until Windows 8 came along). The position and appearance of the All Apps icon may vary from device to device. The All Apps screen displays every app that is currently installed on your device, and looks like this:

app drawer (1).jpg

It's in alphabetical order, and if you have more apps installed than can fit on one screen, you can swipe left and right (or up and down) to see all pages of your apps. To create a shortcut, long-press the app icon (i.e., press and hold until you are able to manipulate it). The All Apps screen will disappear, and the homescreen will reappear. While still keeping your finger on the app icon, drag it somewhere on the homescreen, release your finger, and voila! You've created an app shortcut.

[INFO]If you don't like where you placed it, just long-press it again, drag it somewhere else, and release it. If you want to get rid of it, long-press it and drag it to the "Remove" area that appears at the top of the screen. (Some devices might show a garbage can icon instead.)[/INFO]
[NOTE]Some preinstalled launchers (notably Huawei's EMUI) and 3rd party launchers (like Action Launcher and MIUI Launcher) do not have App Drawers. This means that the homescreens essentially act as your App Drawer, showing all installed apps (similar to iOS). In this case, removing an app from the homescreen will uninstall the app.[/NOTE]
The Favorites Tray is where you can place shortcuts for frequently used apps. As you swipe between various homescreens, the Favorites Tray will remain unchanged. Placing or removing shortcuts there is done the same way as anywhere else on the homescreen. You can also create app folders there (see below).

App Folders: As you can imagine, homescreens can become cluttered pretty quickly. You can organize app shortcuts into folders by simply dragging one shortcut onto another. When you see a circle appear around the shortcut, release your finger, and you will now see a circle that contains a smaller version of the shortcuts you just combined, which is your new app folder. If you tap the folder, a window will appear with all of the app shortcuts contained within. You can also name the app folder by tapping where it says "Unnamed Folder," and then typing a new name. You can easily drag a shortcut out of a folder back onto the homescreen, and if there is only one shortcut left, the folder disappears.

[TIP]It can be a little difficult to get one shortcut onto another without the other one moving out of the way. The trick is to move the shortcut fairly quickly -- this signals to the system that you're trying to create a folder. If you just want to bump something out of the way, drag the shortcut slowly.[/TIP]
On Samsung devices, the process may be slightly different. First, long-press an app shortcut on your homescreen, then drag it up to the "New Folder" area at the top of the screen. After you name the new folder, you can then drag other app shortcuts into it.

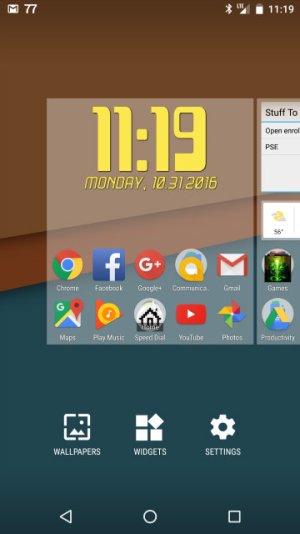
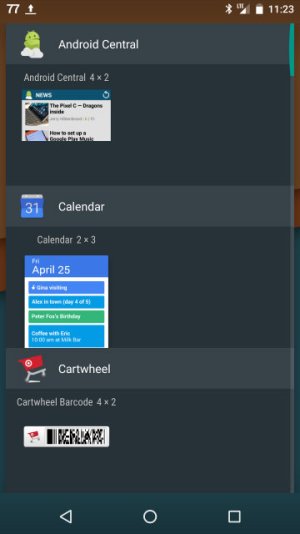
What the Heck's a Widget?: A widget is something you can place on a homescreen that actively displays dynamic information (like a news or weather widget) or allows you to perform a certain function by simply tapping it (like a wi-fi toggle). To see your list of available widgets, long-press any empty part of your homescreen, then tap the Widgets option. (On older Android devices, widgets may be listed under the Widgets tab of the App Drawer.)

add widget.jpg widget list.jpg

Just as with app shortcuts, you can swipe left/right or up/down to see more pages of widgets, and long-press the widget you want to drag to a homescreen. Keep in mind that widgets may require a certain amount of real estate on the homescreen, so if there isn't enough room, you may not be able to place the widget successfully. The numbers to the right of the widget name tell you how many spaces on the homescreen are needed (e.g., Calendar requires a 2 x 3 grid of spaces).

Widgets are often a component of an app that you may have installed, but sometimes an app you see on Google Play might only be comprised of a widget. This can potentially lead to confusion if you install something and then can't find it in your All Apps list. Make sure you read the app description carefully on Google Play -- the developer will often specify if something is a widget only, and remind the user where to find it.

[NOTE]On certain devices with older Android versions, a widget might not show up as available in the Widgets list immediately after installing it. You may need to restart the phone for the Widgets list to populate correctly.[/NOTE]
Wallpapers: There are two kinds of wallpapers -- static and live (i.e., animated). Static wallpapers can be chosen from the preloaded selection of wallpapers, from photos that you took with your device's camera, or from images you downloaded from the web. Live wallpapers can be chosen from the preloaded selection, or can be installed from the Google Play Store (many of them are free). As you might imagine, live wallpapers tend to use a little more battery than static wallpapers, due to the increased processing power needed for animation and other features. But the effect can be quite striking, and is a unique feature of Android.

[INFO]The degree of battery usage by a live wallpaper depends on factors like the complexity of animation, interactive features, and the need to access the web (e.g., to update and display weather information).[/INFO]
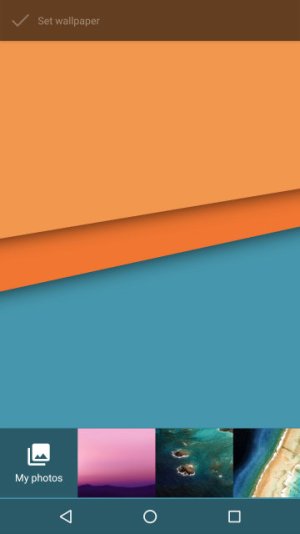
To select a wallpaper, long-press any blank part of the homescreen as described above, then tap the Wallpapers option, which leads to this:

wallpaper.jpg

If you scroll the bottom row of images left and right, you can see all of the preloaded static wallpapers. Tapping My photos will allow you to create a custom wallpaper using your own photos on your device. Simply select one of your photos, adjust the framing to your liking, and accept it. If you download an image from the web for use as a static wallpaper, you will find it here as well (typically in the Download gallery).

Scrolling the bottom row of images all the way to the right shows the list of live wallpapers. Selecting any will give you a preview of the live wallpaper. Tap the Settings button to adjust its appearance and behavior; tap Set Wallpaper when you're done. Here's a list of some of my favorite live wallpapers, all of which are easy on the battery:

ATOMium 3D
Blox Pro
Circulux
Colorful Cubes 3D
Digital Flux
Digital Hive
GPU Maze
Light Grid Pro
Minima Pro
Mystic Clockwork FULL
Mystic Halo
Neon Microcosm
Retro Contours
SwampWater

[NOTE]You may notice that some of these are the full paid versions. Although they all have free "lite" versions, it's always good karma to pay for the full apps if you like them (or to donate money, if solicited). It supports the developers, encourages them to create more apps, and is rarely more than a buck or two.[/NOTE]
Lockscreens

The lockscreen is very important -- it's your first (and sometimes only) line of defense if your phone falls into the wrong hands. This is what you see when you first turn on your device, or wake it from sleep, and typically requires a password, PIN, fingerprint scan, or some other secure unlock method that you selected, in order to get to the homescreens. On any version of Android, it will have some basic information like the date and time, but starting with Jellybean, more features were added to the lockscreen, which will be discussed below. Be aware that this is an area where different manufacturer skins often throw in their own modifications, so remember that the following is based on vanilla Android from Nexus devices, and won't necessarily look like yours.

[TIP]I strongly recommend that everyone have a screen lock set up. If you don't do this, and if somebody steals your phone, much of your personal data (like photos, contacts, emails, Facebook posts, tweets, etc.) will be easily accessible by the thief.[/TIP]
To set up your screen lock, go to Settings>Security>Screen Lock, and choose your method:
  • None: No lockscreen at all. When you power on or wake the phone, it goes straight to the homescreen. Not recommended.
  • Swipe: Lockscreen present, but all you have to do is swipe the screen (or an onscreen slider) to unlock. Mostly helpful to prevent inadvertent calls or app launches if the phone accidentally wakes while in your pocket or purse, but still not secure, and not recommended.
  • Pattern: Trace a pattern on the 3 x 3 grid of dots. The more complex it is, the more secure, but don't make it so hard that you have trouble remembering it, or that it's a big hassle to enter each time you have to unlock the screen. Remember also that your fingers leave marks on the screen, so a simple pattern might be easily decipherable by someone else if you haven't cleaned the screen and they can see your fingerprint trail. So make sure it isn't something like a basic "L" pattern.
  • PIN: Numeric only. Fight the urge to use significant dates, like the year of your birth or wedding. If a thief knows that information about you, those will be the first PINs they try.
  • Password: Alphanumeric. Again, don't make it obvious. A completely random combination of letters (both lowercase and capital), numbers, and symbols will be the most secure, but of course also harder to remember. If you have to pick a word or phrase that means something to you, then try scattering capital letters in the middle of the word, or substitute a symbol for a letter (like @ for a). Another effective strategy is to think of a sentence that is meaningful to you, and take the first letter of each word to create your password.
A big reason why people don't use screen locks is because it becomes a hassle to have to unlock the screen so often. But there are ways to adjust how quickly the screen locks again, which can make it a little less inconvenient, and Lollipop introduced Smart Lock, which is a way of keeping the device unlocked when it is connected to a "Trusted Device" or is in a "Trusted Place" -- see the System Settings II section of this guide, under "Security," for more information.

[WARN]A special note about fingerprint scanners: When you select Fingerprint Unlock, you will be asked to create a backup password, to be used in case the fingerprint scan fails. Do not forget this password. It will be different from any other password you may have created for Password or PIN Unlock. If the fingerprint scan fails and you don't remember your backup password, then you might have to do a factory reset (which, of course, wipes the phone) to gain access again.

You may also be required to enter your backup PIN/password/pattern periodically for extra security, even if the fingerprint scanner is working normally. According to Google's support page for Nexus devices, this may be required:

  • When your fingerprint isn't recognized after a few tries
  • After restarting (rebooting) your device
  • After switching to a different user on the device
  • After more than 48 hours have passed since you last unlocked using your backup method
[/WARN][TIP]We see a lot of posts here from users who have forgotten their unlock pattern, PIN, or password. A LOT of posts. If you are the type who is prone to forgetting important information like this, please do yourself a favor and write your pattern/PIN/password on a piece of paper and keep it safe somewhere at home.[/TIP]
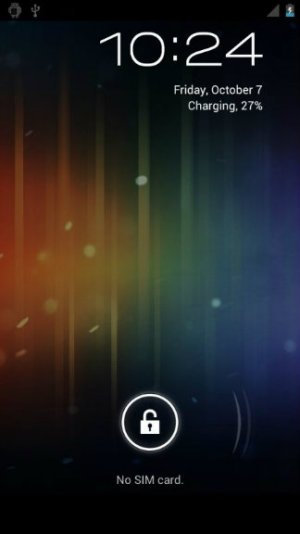
As mentioned previously, the lockscreen itself has evolved over time. Lockscreens from Ice Cream Sandwich (4.0) and earlier were pretty basic affairs:

android-40-ics-lockscreen.jpg

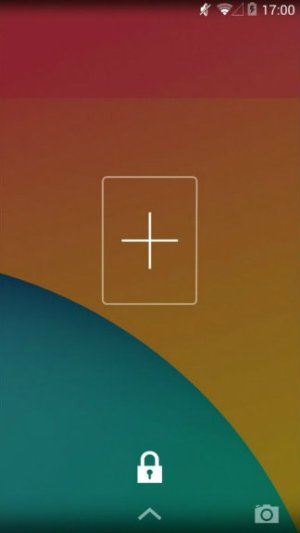
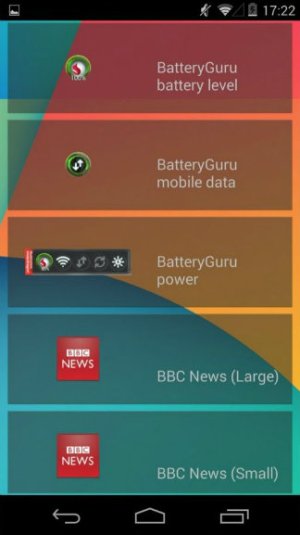
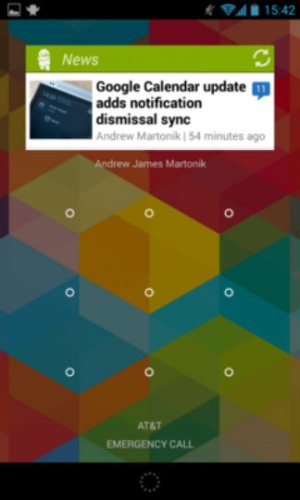
Jellybean and KitKat gave us lockscreen widgets. These widgets are similar to the ones you can place on the homescreen, but you won't have the entire complement of homescreen widgets available for the lockscreen--it depends on the app, and if the developers decided to make a lockscreen widget available. You can imagine that you wouldn't want certain widgets on your lockscreen, since you wouldn't want to display sensitive information there for everyone and anyone to see. In order to add a lockscreen widget, start from the main lockscreen and swipe from left to right. Tap the big [+] symbol (below left), then enter your password/PIN/pattern (to let the phone know that it's you who is modifying the lockscreen), and then select the lockscreen widget from the subsequent list (below center). To add more lockscreen widgets, repeat this process. An example of a lockscreen widget in action is below right (with the pattern unlock grid also visible).

KK lock add.jpg KK lock widget.jpg JB lock.jpg

If you are unable to add widgets, you might have to go to Settings>Security>Enable Lockscreen Widgets. You can only have one lockscreen widget per lockscreen. Swipe left and right on the lockscreen to get to the other lockscreens. To remove a lockscreen widget, long-press it, then drag it to the Remove area at the top of the screen.

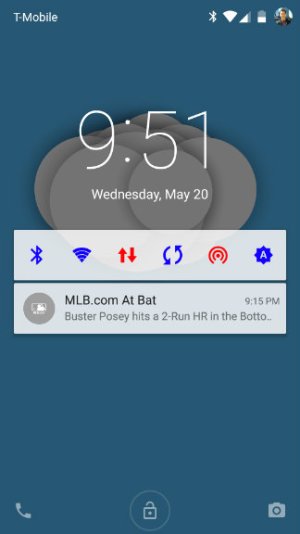
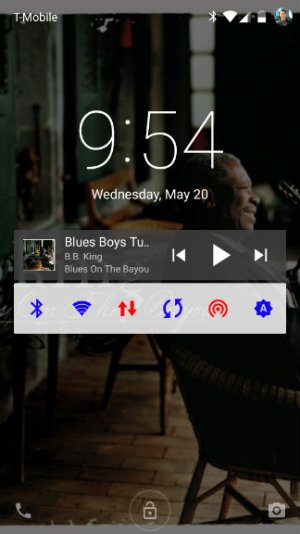
Starting with Lollipop, Google got rid of lockscreen widgets in favor of lockscreen notifications. These are essentially the app notifications you would see on your homescreen if you pulled down the notification panel (see the next section of this guide for more details), placed on your lockscreen for easier viewing without having to unlock the phone. Double-tapping a notification will open directly to that app, after you unlock the screen. Certain apps have interactive lockscreen notifications, essentially acting like a widget--an example is the Google Play Music lockscreen notification, which becomes available if you're actively playing music. (The toggle bar is from Power Toggles.)

Lp lock1.jpg Lp lock2.jpg

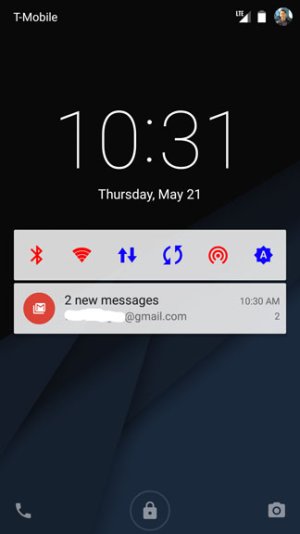
You can expand the lockscreen notification screen by swiping down anywhere. The lockscreen will change from below left to below right. If you have a multi-notification like that Gmail notification, then swiping down on it will expand it further.

Lp lock3.jpg Lp lock5.jpg

You can dismiss any lockscreen notification by swiping it away. In the expanded screen, you can clear all notifications by tapping that button that looks like 3 offset horizontal lines (which, on different launchers, might be represented by an "X" icon or a "Clear All" button).

Notice also the phone and camera icons at the bottom corners of the lockscreen. You can open the device directly to the phone app or the camera app directly from the lockscreen by swiping in from either icon. Opening the phone app will require you to use your unlock method, but opening the camera doesn't--it allows you to take photos, but you won't be able to access the photos that are already saved to the phone, because there was no unlock requirement. This allows you (or anyone else) quick access to the camera to take a picture, but prevents unauthorized people from viewing your gallery.

Just as with lockscreen widgets in Jellybean or Kitkat, you need to be conscious of how much personal or sensitive information you're comfortable having in your lockscreen notifications, since anyone who picked up your phone would be able to see them. You can adjust the visibility of lockscreen notifications in the Settings>Sound & Notification>When Device Is Locked menu. The options there include Show All Notification Content; Don't Show Notifications At All; and Hide Sensitive Notification Content. The first two are self-explanatory; the third depends on the App Notification settings. Go to Settings>Sound & Notification>App Notifications, where you can choose individual apps and designate them as Sensitive. If you're set to Hide Sensitive Notification Content, then lockscreen notifications from these apps will not show up.

[NOTE]Remember that the organization of the system settings menu can vary depending on the device manufacturer and the Android version. For example, the above instructions are based on a Nexus 5 running Android 6.0.1. But on a Nexus 6P running 7.0, the lockscreen notification visibility setting is in Settings>Notifications, then tap the gear icon at the upper right, then "On the lock screen." To designate an app as being sensitive, go to Settings>Notifications, select an app, then "On the lock screen."

If you can't find a setting exactly where I mention, then look around your device's system settings to see if it's in a different location, or if it's called something slightly different. Whenever I get a new device, I regularly look through every inch of the system settings to familiarize myself where things are.[/NOTE]
 
Last edited:

B. Diddy

Senior Ambassador
Moderator
Mar 9, 2012
167,032
7,123
113
Visit site
Re: [GUIDE] Getting Started with Android (2014) [CONSOLIDATED]

Buttons and the Notification Bar

Let's look at this figure again:

7 homescreen.jpg
The Back, Home, and Recent Apps buttons are collectively known as the Navigation Bar.

Back button: This is pretty self-explanatory. Pressing it will go back to the previous screen within an app (or, if you're in the browser, the previous webpage). If you're already back to the initial app screen, pressing Back again will dump you to the homescreen.

Home button:
Pressing Home will immediately get you from whatever you were doing back to the homescreen. The app you were just using will often remain open in the background (i.e., paused but still in memory), but not always -- it depends on the app. The homescreen you get sent to is the last homescreen you were on; if you press Home again, you will then jump to the primary homescreen (which might be the leftmost one or the middle one, depending on the launcher).

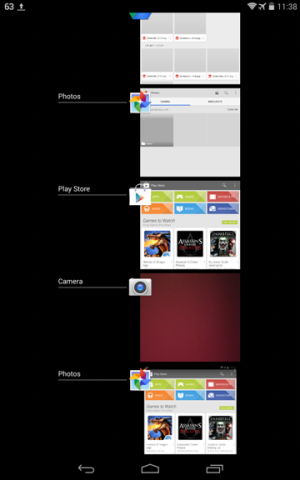
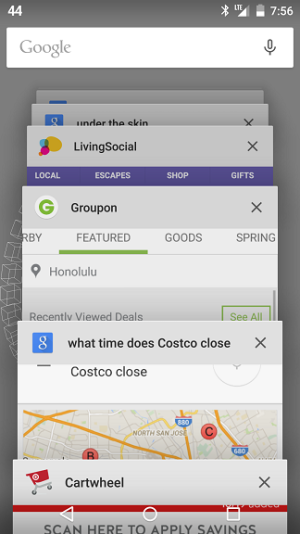
Recent Apps button: This brings up a list of apps that you recently used in thumbnail form. Android 4.x on the left, 5.x and higher on the right:

Recent.png L recent.png

You can switch quickly between apps by tapping them, and you can remove apps from this list by swiping them away (or by tapping the X). It is important to note, however, that this is not a task killer. For example, if you're playing a song on Google Play Music, then go to the Recent Apps list and swipe it away, the music won't stop. But swiping certain apps away can actually close them--once again, it depends on the app. See this article where a Google engineer discusses the issue in more detail. To exit the Recent Apps list, press the Home or Back button.

The Navigation Bar will occasionally change to 3 innocuous dots while certain apps are running, so as not to be too intrusive. To bring the buttons back, just tap anywhere along that lower bar. If you tap one of the dots, it will still correspond to the appropriate button press, though.

[INFO]In addition, in some apps, the Navigation Bar might disappear altogether (which is called Immersive Mode). Watching YouTube in fullscreen landscape orientation is a good example. To bring back the Navigation Bar briefly, swipe down from the top of the screen or in from the right edge.[/INFO]
Menu buttons:
There are two main kinds of Menu buttons -- the Navigation Drawer "hamburger" button (so named because it's 3 stacked horizontal lines, like a sandwich), and the overflow menu button (which looks like 3 dots, usually in a vertical line but sometimes horizontal).

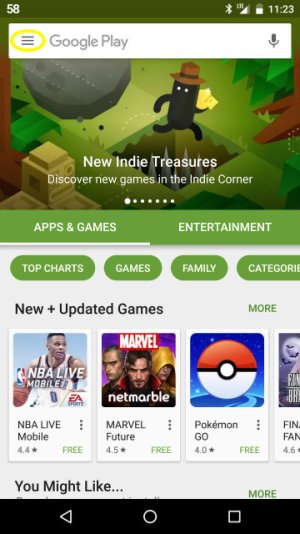
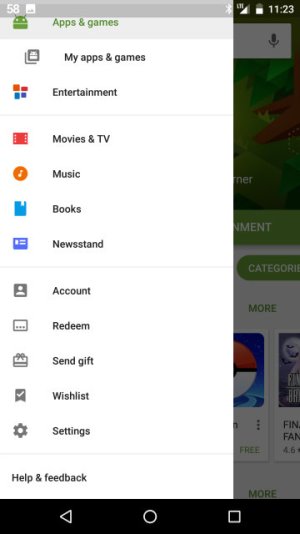
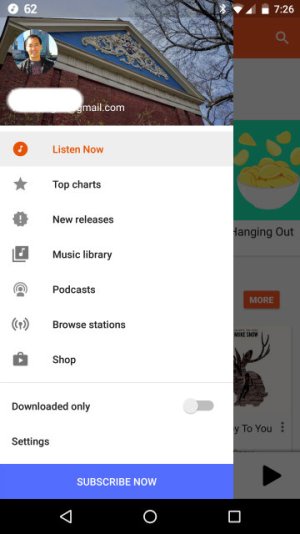
The hamburger button is typically at the upper left of an app's main screen (highlighted in yellow below left), and tapping it slides out the Navigation Drawer (a sidebar menu with the app's main areas to navigate to, as well as access to the app's settings, seen below right). You can also achieve the same thing by swiping in from the left edge of the screen.

menu1 (1).jpg menu2.jpg

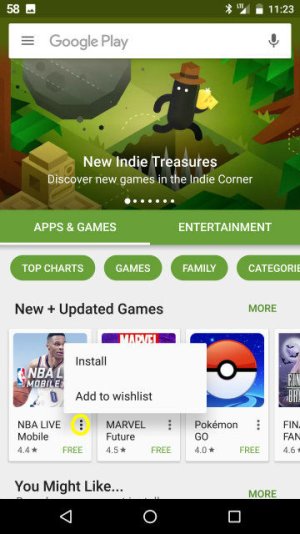
The overflow menu button brings up menu options specific to the screen or item that the button is associated with. For example, the overflow menu button associated with the NBA LIVE Mobile listing in Google Play Store brings up this menu:

menu3 (1).jpg

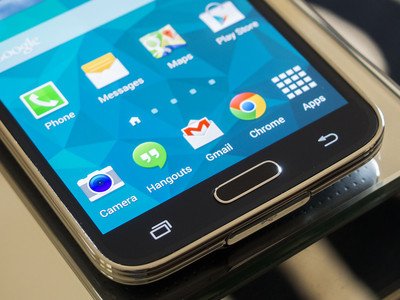
The Back, Home, and Recent Apps buttons on most Android devices are "soft" on-screen buttons -- i.e., the device itself doesn't have any physical hardware buttons for these functions, so the buttons appear on screen. The main exception these days is Samsung, which almost always has a physical Home button and a capacitative button on either side (Menu and Back on older phones, Recent Apps and Back on newer ones):

samsung buttons.jpg

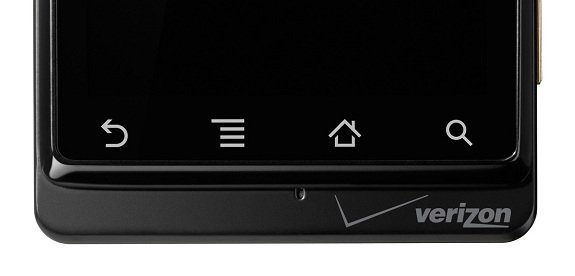
Older phones often had a row of capacitative buttons below the screen:

Capacitative-buttons.jpg
The 2nd icon is the Menu button while the 4th icon is the Search button. On these devices, you may not see the "soft" Menu button onscreen, since the system knows you have a hardware Menu button.

[TIP]On devices with hardware buttons, long-pressing the Home button usually brings up the Recent Apps list, and long-pressing the Search button brings up Google Now.[/TIP]
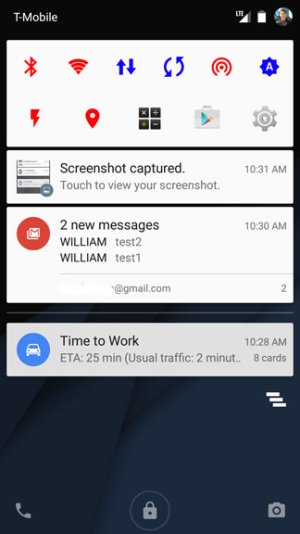
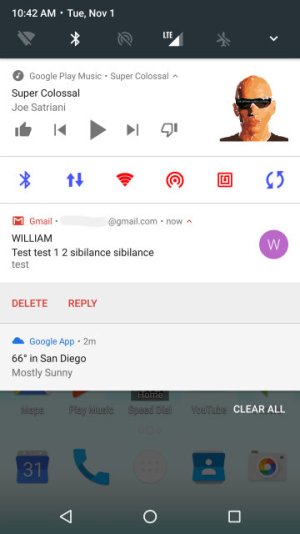
Notification Bar: Also known as the Status Bar, this shows you various icons like the battery indicator, wireless signal strength, etc. If you see an icon that you don't recognize, check your manual or the web for a list of all commonly used icons. Notification messages from apps will also appear in this area, typically one line of text at a time. To see the full notifications, simply swipe down from the top of the screen, and you will drag down the entire Notification Shade. The Notification Shade in earlier versions of Android was pretty basic, only showing the notification message from various apps. It has become increasingly functional with successive Android versions, and this is an example of what it looks like in Nougat:

notif panel.jpg

  • Starting from the top, the first thing you see is the Quick Settings bar -- more on that later.
  • Next is the Google Play Music notification widget, which tells you what's playing and allows you to control playback while in the background. The toggles under Google Play Music are the notification widget from Power Toggles (which is like the native Quick Settings, but allows more customization).
  • The Gmail notification includes the ability to delete or reply right from the notification. I skipped a step in this screenshot, because at first, the Delete and Reply options don't show up -- you have to swipe down slightly over the Gmail notification to make the options appear. You can also tap the arrowhead to the right of your email address, which will toggle back and forth between showing and hiding the options. In general, when you see an arrowhead associated with a notification, a down arrow expands the notification, and an up arrow compresses it.
  • Finally, the last notification is from the Google app (previously known as Google Now), and tapping it opens up the Google app's Weather page for San Diego.

[TIP]Although Nougat shows you which app is responsible for each notification, older Android versions don't. In that case, you can find out which app is responsible for a notification by long-pressing the notification and tapping "App Info."[/TIP]
You can dismiss individual notifications by swiping them to the side -- this will only remove the notification, not delete the event or email. You can remove all notifications at once by tapping the Clear All button (which sometimes is represented by 3 stacked horizontal lines that are offset). Swiping the Notification Shade back up or pressing the Back button will close it again.

[NOTE]Keep in mind that on tablets with older Android versions, you may have to swipe down from the upper left half of the screen, because swiping down from the upper right half may open the Quick Settings shade (more on that later).[/NOTE]
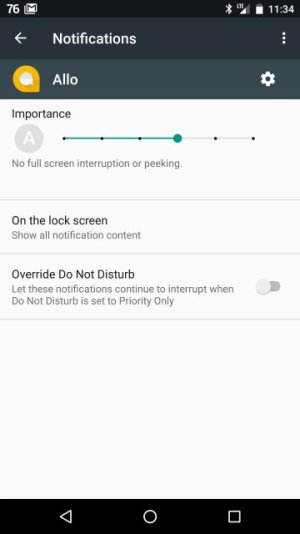
Notifications are usually controlled in an app's settings, so if you're getting bombarded by too many notifications, you can turn some of them off by opening a given app, going to its menu, and seeing if there is an option to turn notifications off (or sometimes, to limit the types of notifications you get). If the app doesn't give you that option, you can still turn them off by going to System Settings>Apps, selecting the app in question, and turning off notifications there. Older Android versions have a simple checkbox for "Show notifications" in this menu which turns them on or off, but Marshmallow and Nougat offer finer control. In Nougat, if you go to Settings>Apps and select an app, there is a Notifications menu that looks like this:

notify importance.jpg

The slider gives you many more levels of control over how aggressive or hidden you want the app's notifications to be. Or you can tap the "A" button, which lets the app decide how important the notifications should be.

[TIP]The Notification Importance slider can also be accessed directly within the Notification Shade by long-pressing any of the notifications.[/TIP]

Lollipop introduced the ability to manage interruptions (from app notifications, phone calls, or text messages), and in Nougat it's called Do Not Disturb. Below is what you see if you tap the Do Not Disturb button in the Quick Settings bar:

dnd1.jpg

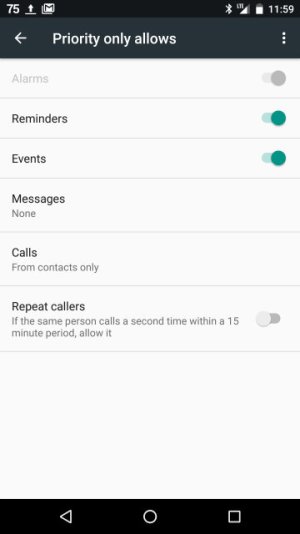
The Total Silence and Alarms Only options are self-explanatory. Priority Only gives you more control over what notifications you may want to allow. You can access this in the Settings>Sound>Do Not Disturb menu, which has the following 3 submenus:

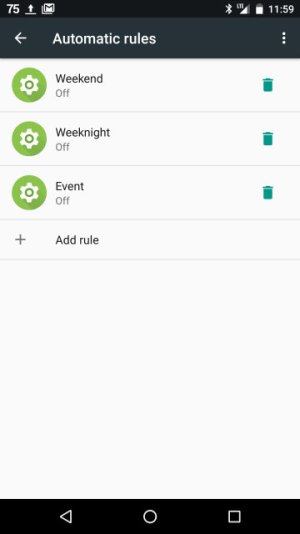
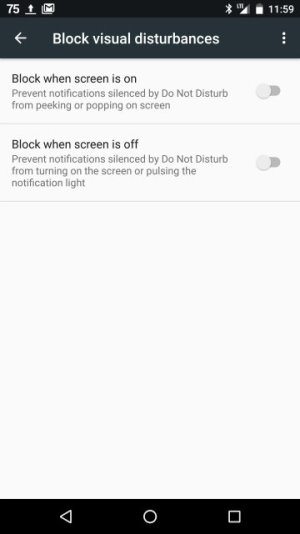
dnd2.jpg dnd3.jpg dnd4.jpg

  • In the "Priority Only Allows" menu, you can decide which notifications Priority Mode will allow from reminders, calendar events, text messages, and calls. You can further specify if you want message/call notifications from anyone, from people in your contact list, or only from Starred Contacts.
  • The "Automatic Rules" menu allows you to set up a regular Do Not Disturb schedule, while "Block Visual Disturbances" can turn off popup/peek notifications, the LED notification light, or automatic screen wake (since the other Do Not Disturb settings deal with audio or vibratory alerts).
  • If you still want certain apps to give notifications in Priority Mode, go to Settings>Apps, select the app, tap Notifications, then turn on the Override Do Not Disturb toggle (see the previous image for Allo above).
  • When Do Not Disturb is turned on, the status bar will show an icon that looks like a solid white circle with a horizontal black line in the middle.
[NOTE]In Lollipop, when Priority Mode is turned on, you'll see a star in the status bar. When the device is set to No Interruptions, it's a universal "no" symbol in the status bar (i.e., a circle with a diagonal line in it).[/NOTE]
 
Last edited:

B. Diddy

Senior Ambassador
Moderator
Mar 9, 2012
167,032
7,123
113
Visit site
Re: [GUIDE] Getting Started with Android (2014) [CONSOLIDATED]

System Settings, Part I

[NOTE]Remember again that the organization of the System Settings menu can vary depending on the device manufacturer and the Android version. If you can't find a setting exactly where I mention, then look around to see if it's in a different location, or if it's called something slightly different. If present, you can also search for a setting by tapping the search icon at the top of the menu. Whenever I get a new device, I regularly look through every inch of the System Settings to familiarize myself where things are.[/NOTE]
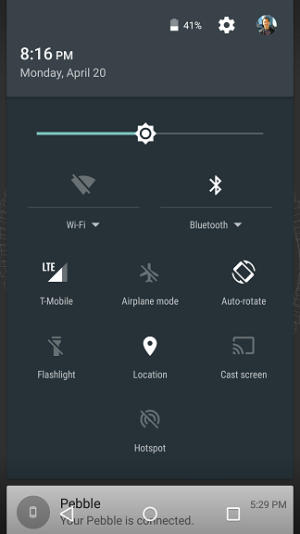
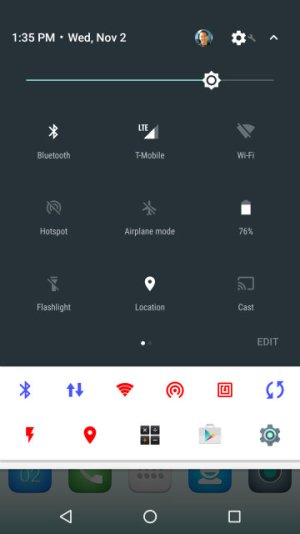
The System Settings menu is where you can adjust a lot of the nuts and bolts of your Android device. There are two main ways to access System Settings -- from the Quick Settings menu and from the App Drawer. The more convenient way is to open the Quick Settings menu (available in Android 4.2 and up) by swiping down from the top of the screen with two fingers (or swiping down twice with one finger). Android 5.x on the left, 7.0 on the right (the toggles on the white background are from the 3rd party Power Toggles notification widget, not the native Quick Settings):

L quick.png quick settings.jpg

Tapping the Settings button (the gear icon) will bring you to the main System Settings menu. The buttons that are present in the Quick Settings menu either act as toggles or quick access to that particular menu. Tapping or long-pressing these buttons will usually have different effects, depending on your device and Android version (e.g., tapping a button might toggle it, while long-pressing it might bring you to that part of the main System Settings menu). In Nougat, you can choose which buttons to show and how they're ordered by tapping the Edit button as seen above.

[NOTE]The ability to organize the Quick Settings actually started with Marshmallow via the System UI Tuner -- read more here: Inside Marshmallow: The System UI Tuner | Android Central[/NOTE]
The other way to access the System Settings menu is to open the App Drawer and tap the Settings app (which usually has a gear or slider control icon). If you'd prefer to have the Settings available with only one touch, you could create a Settings shortcut on your homescreen (the same way you would for an app shortcut).

The following is a quick overview of the important System Settings to be familiar with:

Wireless & Networks
  • Wi-Fi: You can turn wi-fi on or off by toggling the onscreen switch. When wi-fi is on, you'll see all available networks; to connect to a particular network, just tap it. To modify or forget the network settings, long-press it, and then select the appropriate choice. Modifying the network settings will allow you to change the password in case it was entered incorrectly. Forgetting the network will clear its settings from your system, and if you try to reconnect, any password that is required will have to be reentered. Tapping the menu button at the upper right brings up more advanced settings.
[TIP]Forgetting a network and then reconnecting to it can sometimes clear up wi-fi connectivity problems, as can some of the advanced wi-fi settings. For more information and tips, see this guide: http://forums.androidcentral.com/am...roubleshooting-wi-fi-connection-problems.html[/TIP]
  • Bluetooth: Just like with wi-fi, you can turn Bluetooth on or off by sliding the switch. If you tap on Bluetooth, you'll see all paired devices. Tapping on a device will activate the connection (if it's not already connected), and tapping the gear icon next to the device will show you more details of how it can connect. For example, "Phone Audio" means you can use it for phone calls, while "Media Audio" means you can use it to stream music and other media. Tapping the overflow menu button at the upper right shows other options (like giving your phone a new Bluetooth name).
  • Data Usage: Shows how much data you've used over a user-adjustable time period (you can adjust it to match your billing cycle), sorted by app, starting with the one that has used the most data. Tapping on an app will give you a further breakdown of foreground vs background data usage (foreground refers to when the app is open on the screen and actively being used, while background is when it's not on the screen but still periodically accessing data, like with background data refreshing). Data usage over mobile data vs wi-fi can be reviewed separately.
[TIP]If you have a limited mobile data plan and find that some apps are using too much data, you can Restrict Background Data (in Nougat, it's called Data Saver), either globally or just for specific apps. This can decrease overall mobile data usage, but it might also impede some of the apps' functionality. See here for more details. The analogous setting for wi-fi is in the Network Restrictions section, where you can designate specific wi-fi networks as Metered.[/TIP]

  • Airplane Mode: Turns off all radios (wi-fi, Bluetooth, and mobile data/voice). Once in Airplane Mode, you can toggle wi-fi and Bluetooth back on, but the cell radio will stay off until you turn off Airplane Mode.
  • NFC: Toggles Near Field Communications, which allows for data transfer by simply bringing your device into close proximity with another device with the same capability. Also used for Android Pay. This option is only available if your device has an NFC chip, and the ability to transmit data with it is app-dependent.
  • Tethering & Portable Hotspot: You can use your mobile data-connected device to broadcast a wi-fi signal that other devices can use as a hotspot. The ability to do this depends on your mobile data plan.
[WARN]Since most data plans are not unlimited, it's important to be aware of how much data might be used by tethering. If you're tethering a laptop to your phone and watching a ton of YouTube, you'll use a lot of data very quickly.[/WARN]
Device
  • Sound: You can separately adjust volumes for Alarms, Ringtones/Notifications, and all other Media. Options for screen touch and screen lock sounds, and vibration options may be found here. You can also select a systemwide Default Ringtone and Default Notification Sound, but these can be overridden by an app if there is a separate Notification option in that app's Settings (e.g., if you open Gmail, then tap Menu>Settings>[your Gmail account]>Inbox Sound, you can specify a different notification sound for each of your inboxes). The Do Not Disturb feature that was discussed in a previous section has its main menu here.
[TIP]When you press the physical Volume buttons, the volume that is adjusted depends on what you're doing at the time. If media is actively playing (e.g., music, video with audio, game sound effects), the Volume buttons will adjust the Media volume. If you're within a call, they will adjust the Call volume. Otherwise, they will adjust the Ringtone/Notifications volume.[/TIP]

  • Notifications: This is sometimes combined with the Sound menu. It shows you a list of all of your apps, and selecting one of them gives you the notification options shown in the previous Notification Bar section of this guide, allowing you to decide how aggressive or hidden an individual app's notifications should be. By default, system apps aren't shown in the list; to see them, tap the overflow menu button at the upper right, then Show System.
  • Display:
    [*=1]Brightness: Adjust manually with the slider, or turn on Adaptive Brightness -- you manually select the general brightness level you'd like, and the system will adjust the brightness automatically, depending on the ambient light. This is regulated by the ambient light sensor, typically located right next to the front-facing camera. If the sensor detects low light, the screen will dim; if it detects bright light, it will increase screen brightness accordingly. Anything that blocks the light sensor (like an ill-fitting case or your finger) may lead to inadvertent screen-dimming.
    [*=1]Wallpaper: This is essentially the same as long-pressing a blank area of the homescreen to bring up wallpaper options, as discussed previously.
    [*=1]Sleep: Select how long the device will idle before the screen turns off.
    [*=1]Screen Saver: Previously known as Daydream. You can choose from a few preinstalled screen savers, and others can be added (typically as a component of a live wallpaper). You can select for the screen saver to display while charging, while in a dock, or either, by selecting the "When to start screen saver" option in the overflow menu at the upper right.
    [*=1]Cast Screen: Depending on your device, this will mirror your screen to a TV using Chromecast or some wireless standard like DLNA, Miracast, or WiDi.
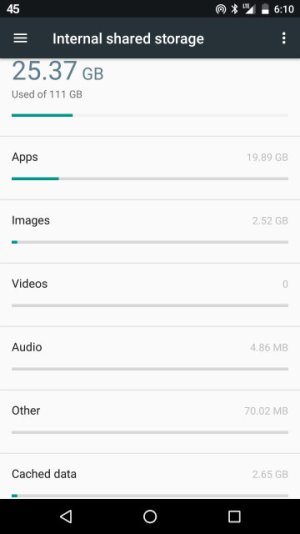
  • Storage: A graphical representation of the general categories of stuff stored on your device. You can tap each category to explore them further. On certain devices, this may be where you can access the system's native file manager, if present (on the Nexus 6P, scrolling down on the below screen would reveal the Explore option):
storage.jpg
[TIP]Tapping Cached data will give you the option to clear all app caches, which can temporarily clear up some storage.[/TIP]
Depending on your device, if you tap the overflow menu button on this screen, you can also select what kind of USB Computer Connection your device will use when you plug it into your computer. (This option should also appear in the Notification Panel when connected via USB.) Most newer devices will only offer MTP (Media Transfer Protocol, sometimes called "File Transfer" instead) and PTP (Picture Transfer Protocol). MTP is the main one you'll use, but neither will allow your computer to see every single folder on your device (because protected system directories will remain hidden). Older devices will have a selection for USB Mass Storage (sometimes called "Disk Drive"), which allows the device to mount as an external hard drive on a computer. This allows the computer to see all folders in Internal Storage and the external SD card. However, in order to accomplish this, these older devices need a separate App Storage partition that is inaccessible to the computer (otherwise, apps would crash if the partition they were in was suddenly mounted to a computer). App Storage is typically small, and limits the number of apps those older devices can have installed at a time, which is part of the reason why most Android device makers have abandoned that practice.

[NOTE]A Short Digression on Adoptable Storage

In the past, microSD cards in Android devices were primarily intended for storage of media files (i.e., photos, videos, music) and documents. Apps could not be downloaded and installed directly to microSD storage; instead, after installing an app to Internal Storage, the user could only try to use the "Move to SD" function in the Settings>Apps menu, which (a) isn't supported by all devices, (b) doesn't work for certain apps, and (c) if supported, still only moves a relatively small portion of the app to the microSD, leaving a substantial portion on Internal Storage.

Marshmallow introduced Adoptable Storage, which allows the device to format the microSD card in such a way that it gets incorporated into Internal Storage (thereby increasing the space available to install apps). This sounds good in theory, but there are a few caveats:

  1. Performance may suffer, because even if the microSD card is high speed, read/write will still be slower than with onboard eMMC flash memory.
  2. MicroSD cards are generally less reliable than onboard eMMC flash, so failure of a microSD card that is acting as Internal Storage can lead to significant system crashes.
  3. Once a microSD card is formatted as Internal Storage, it is encrypted for use with that device only. In other words, you can't remove the card and have another device read it.
  4. Ultimately, the decision to implement Adoptable Storage is up to the device manufacturer -- and both Samsung and LG have declined to make it officially available (although there are tricks to get it to work).
Read more about it here: Inside Marshmallow: Adoptable storage | Android Central[/NOTE]
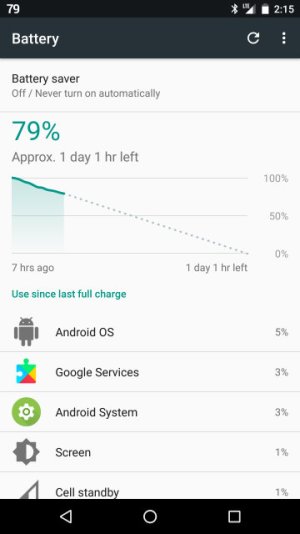
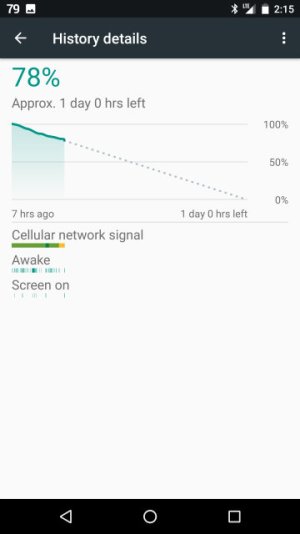
  • Battery: A graph of your battery stats. Tapping on the graph will give you a fullscreen version with additional information along the bottom letting you know when you had wi-fi on, when the device was awake, when the screen was on, and when it was charging. Tapping on the app or process in the list will give you more details for that particular item. Most devices will have some sort of Battery Saver function or app, but these often vary with the device, so I won't go into any detail.
batt1.jpg batt2.jpg
[INFO]For tips on how to prolong your battery life, see this guide: http://forums.androidcentral.com/ambassador-guides-tips-how-s/298919-guide-battery-saving-tips.html[/INFO]
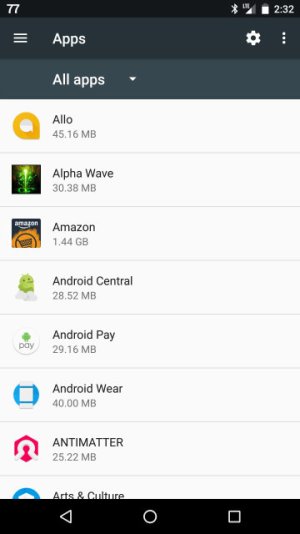
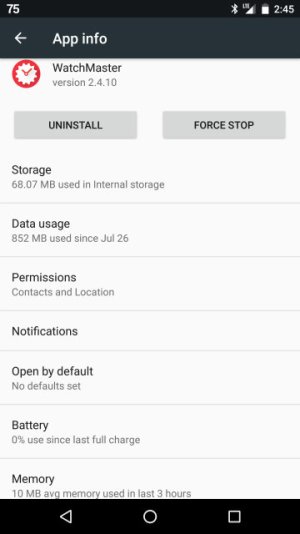
  • Apps: The installed apps list defaults to showing non-system apps only. Tapping the overflow menu button gives you the option to Show System apps. Tapping an app shows more detailed information and options.
appmgr.jpg appmgr3.jpg

  • Force Stop: If the app is misbehaving and seems to be bogging the system down, you can force it to close.
  • Uninstall/Disable: The Uninstall option is the same as uninstalling via the Google Play Store app. System apps and preinstalled apps ("bloatware") can't be completely uninstalled, but you might see a Disable button instead -- this essentially deactivates it and makes it dormant, disappearing from the App Drawer. You won't free up the storage space taken up by the factory version of the app, but the space taken up by any updates to the app will be reclaimed, since Disabling uninstalls those updates. Disabled apps also won't compete for system RAM. To re-enable the app, select it again and tap Enable.
[WARN]Be cautious about which apps you disable. As you might imagine, some system apps are very important for normal functioning. For example, disabling the Download Manager will interfere with accessing the Downloads folder, as well as installing apps.[/WARN]
Tapping each section in the App Info will give you more options for each:

  • [*=1]Storage:
    • Clear Data: This will erase important app-associated data like passwords, saved games, preferences, etc. It can be helpful if an app is malfunctioning, but it's worth trying the Clear Cache option first, as described below.
    • Clear Cache: The cache is where temporary app data is stored that is not crucial to its operation, but can make the app run more efficiently (e.g., recent webpages visited by a browser). Caches can increase in size over time and take up storage space, so clearing app caches can reclaim some of that space. It may also correct glitchy behavior, if there's some bad piece of data stuck in the cache. You can clear individual app caches here, or you can clear all of them at once as described above, by going to Settings>Storage>Cached Data. (There are plenty of 3rd party apps that can do this with one touch, like App Cache Cleaner.)

    [*=1]Data Usage: Previously discussed in this section. This will show only the data usage for the app you selected, and allow you to turn off Background Data for that app.
    [*=1]Permissions: In Marshmallow and above, you can allow or deny an app's individual permissions to various aspects of your device and account, like your Contacts and Location. (Before Marshmallow, there was no granularity -- in order to install an app, you had to grant all permissions that it required en masse.) All of an app's permissions will initially be off, but as you start to use it, the app will then prompt you to grant certain permissions as they are needed. Once they are granted, you won't be asked again (but you can always go back to this section to turn a permission off again).
[INFO]Permissions can be confusing, because a given permission category can encompass multiple aspects of that functionality. For example, a 3rd party flashlight app will always ask for Camera permission -- not because they all want to invade your privacy and hijack your camera to take pictures, but because the LED flash (which acts as the flashlight) is part of the camera module. But then again, an app that has absolutely no business with certain permissions (like a simple live wallpaper asking for permission to access your Contacts) shouldn't be granted those permissions (or should be uninstalled).[/INFO]

  • Notifications: This was covered in the previous section.
  • Open By Default: If a given app is directly related to a link or activity in another app, you can set it as the default to open that link or activity. For example, the first time you tap a link to an Android Central article somewhere in your browser, the system will ask you to choose an app to open that article (typically a choice between the browser and the Android Central app), and also ask if you want this to happen Just Once or Always. If you select Always, that app will become the default whenever you tap a link for an Android Central article. This section shows what defaults have been set, and also allows you to clear the defaults.
[TIP]You can clear all app defaults by going to the Settings>Apps menu, tapping the overflow menu button at the upper right, and selecting Reset App Preferences. This will clear all app defaults, as well as re-enabling any disabled system or bloatware app.[/TIP]
  • Battery: Information on how much power the individual app has used.
  • Memory: Shows the average and maximum RAM usage by the app. RAM is where open apps reside while they're actively being used, or cached and ready to be switched to quickly. Android likes to keep apps open in RAM to allow for faster and more efficient app switching and multitasking. The system manages this on its own, and will open apps automatically, based on usage patterns and other functions inherent to those apps. Manually closing apps using a "task killer" typically does not help battery life over the long term, and in fact may worsen battery life, because those apps will probably open again soon, which takes CPU and therefore battery. For a more detailed explanation, see this excellent article.
[NOTE]There is also a Memory menu in the Device section of the System Settings. This shows average systemwide RAM usage over a user-definable period of time. In Marshmallow and Nougat, the information here is significantly less detailed than in previous Android versions, for unclear reasons -- although I'd hazard a guess that Google was trying to discourage ineffective obsession with RAM management!;)[/NOTE]

  • Users: You can add additional users if your Android version supports it (on 4.2 and above). If you press the settings button next to the owner, you can enter Owner Info and choose to show it on the lock screen.
 
Last edited:

B. Diddy

Senior Ambassador
Moderator
Mar 9, 2012
167,032
7,123
113
Visit site
Re: [GUIDE] Getting Started with Android (2014) [CONSOLIDATED]

System Settings, Part II

Personal

  • Location: This is where you can select how your device checks its location and whether or not apps can access your location. This menu may vary in appearance and options, since there were some changes in terminology with Android 4.4, so I won't go into much detail about how the menu is laid out.
    • ​The device can use GPS, wi-fi, and/or cellular signal to determine your location. GPS is the most precise, but uses more battery (depending on how often location is being checked by apps), so unless you need this precision, it's best to keep GPS off until you need it. Determining location using wi-fi (by using the router's MAC address) and/or cellular signal (by triangulating from your nearest cell towers) is less precise, but still reasonably accurate (typically within about 1000 feet or so).
    • Google Location History allows your device to keep track of where you've been and periodically send your location data to Google for use by its various location based apps like Google Maps, Google+, and Google Opinion Rewards, and the main Google app. For example, if you have Location History on and you regularly drive between two locations, the Google app will learn this and offer to report traffic conditions along that route at the usual time that you drive it. Here's more explanation from Google.
[TIP]Having Location History turned on might contribute to battery drain, since it may increase the number of partial wakelocks (where the device is awakened from sleep to perform a task--in this case, checking location and reporting it). So if you're noticing a battery drain problem, try turning Location History off temporarily.[/TIP]
  • Security:
    • Screen Lock: Choose how to unlock your device. People love stealing gadgets, so do yourself a favor and pick something besides "None" or "Slide." But please do pick a code or pattern that you know you won't forget. A person who posts about having forgotten the lock pattern/code and wanting to figure out how to bypass it is sure to arouse suspicion. If you're prone to forgetting important information like your phone's password, write it down and keep it somewhere safe at home.
    • Fingerprint Sensor: If your device has a fingerprint sensor, this is where you can set it up. The process will differ slightly with each device, but one of the most important steps to be aware of is creating the BACKUP PASSWORD (usually different from the regular screen lock password). This password is extremely important in case the fingerprint sensor malfunctions -- but even if the sensor is working normally, you will be prompted to enter it on occasion, so do not forget it! According to Google, these are instances when you may need to enter the backup password:
      • When your fingerprint isn't recognized after a few tries
      • After restarting (rebooting) your device
      • After switching to a different user on the device
      • After more than 48 hours have passed since you last unlocked using your backup method
    • Automatically Lock: Choose how long to wait after the device goes to sleep before the device locks and you have to enter your PIN/password/pattern again. (You can set how long the device idles before going to sleep in Settings>Display>Sleep).
    • Power Button Instantly Locks: Overrides the Automatically Lock interval and immediately locks the phone when you press Power to turn the screen off.
    • Owner Info: You can put your name and contact info here, and choose whether or not to display it on your lock screen. I suggest listing only your name and a contact phone number, but not your home address, unless you want a thief to know where you live.
    • Encrypt Device: This will add a layer of encryption for your entire device, which may be important or even required if your device is used at work for sensitive data. However, for the average user, it is unnecessary, and might cause more problems than it's worth. It may slow down your device somewhat, and it's an irreversible process, unless you factory reset it. Read more here.
    • Device Administrators: This lists apps that can be granted increased access to certain core system functions. For example, you should see Android Device Manager listed here, with the function "Allow Android Device Manager to lock or erase a lost device." Checking the box will allow Android Device Manager to do a remote wipe if you were to lose your device. Apps that require Device Administrator privilege will usually let you know and prompt you to go to this menu.
[TIP]Some apps can't be uninstalled while they are designated as Device Administrators. If you have difficulty uninstalling an app, go to this menu and see if it's listed there and checked on. If so, uncheck it, and then uninstall it.[/TIP]

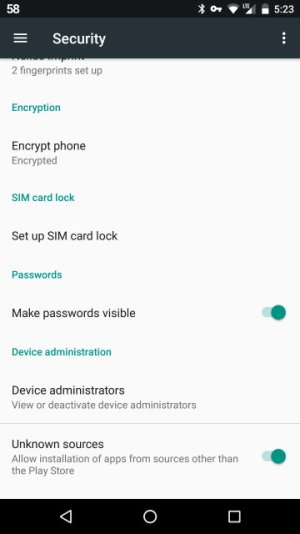
  • Unknown Sources: Very important to check this on if you want to install apps from anywhere else besides the Google Play Store (for most people, this means Amazon Underground). This also allows you to install apps manually (aka sideloading) from .apk installer files, but please be aware that downloading .apk files from random filesharing sites may increase your chances of malware, since there will be little or no vetting of files on those sites. In addition, if those .apk files are for apps that are not free, then it's piracy, which is illegal and totally not excellent.
  • Verify Apps: If turned on, then any app you install will be checked by Google. If it is known to be malicious, then installation will be blocked. According to this support page, "When you verify applications, Google receives log information, URLs related to the app, and general information about the device, such as the Device ID, version of the operating system, and IP address." In Android 5.x and above, this setting has been moved to the Google Settings (which might be shown as an app in the App Drawer, or might be within the main System Settings).
  • Smart Lock: Introduced in Lollipop, this is a great security feature that will keep your device unlocked as long as a Trust Agent is present. To utilize Smart Lock, first go to Settings>Security>Trust Agents, and make sure Smart Lock is switched on. Then go to Settings>Security>Smart Lock.
    • Trusted Devices: These can be any Bluetooth device that is connected to the phone. Ideal Trusted Devices include Bluetooth headsets, car Bluetooth systems, and wearables.
    • Trusted Places: Choose locations where it would be very unlikely for you to lose your phone or have someone else steal it. I would suggest that your Trusted Places only be your home and that of family and friends. Remember that Trusted Places relies on your Location Services, and if you're not using GPS (i.e., you're only using wi-fi/mobile signal for location), the phone might not locate you accurately within range of your Trusted Place while you're there.
    • Trusted Face: Uses the front-facing camera for facial recognition. Not recommended, since this is relatively easy to duplicate (with a photo, for example). Not available on all devices.
    • Trusted Voice: Also not recommended, since this can also be easily duplicated using a recording. Also not available on all devices.
    • On-Body Detection: Uses the device's accelerometer to determine if the phone has been motionless for a significant duration, then locks the phone. The idea here is that if the phone is on you, it is likely in some sort of constant motion, even if relatively subtle. If you accidentally leave it somewhere, it will be completely still. Not foolproof if someone steals it soon after you set it down and then is in constant motion themselves.
    • If Smart Lock is on, then the Automatically Lock and Power Button Instantly Locks features will be temporarily suspended.

  • Language & Input: Change language, adjust the Spell Checker, and edit your Personal Dictionary here. Also, you can adjust the settings of your keyboard, and choose which one should be the default keyboard, if you have more than one installed. To adjust the keyboard settings, tap the settings icon to the right of the keyboard in question. You can adjust things like auto-capitalization, keypress sound or vibration, auto-correct, etc.
  • Backup & Reset: Be vewwwy vewwwy careful here, since this is where you find the Factory Data Reset option, which will wipe your device clean. (Don't worry too much, though--if you accidentally tap it, you'll be prompted with warnings and asked if you really want to do it.)
    • Back Up My Data: Turning this on will keep certain data backed up on the Google servers. Information from your Google apps (e.g., Gmail, Contacts, Drive) normally sync with Google anyway, so this feature has more to do with other information, like your wi-fi settings, the list of all apps installed from Google Play, and some 3rd party app data (although there's no clear way to know which 3rd party apps will backup to Google). This article explains in more detail.
    • Backup Account: Select which Google account to backup to.
    • Automatic Restore: If you reinstall an app that was able to backup data to the Google servers, then this feature will restore the settings and data. Again, there's no clear way to know which apps can do this.

Accounts
  • This is a list of any user accounts that are connected to your device, like Google, Facebook, Yahoo, etc. Non-Google accounts like Facebook will only appear here if you have the respective app installed, so if you only access Facebook using the browser and don't have the app installed, you won't see it in this list. You can also add a new account here.
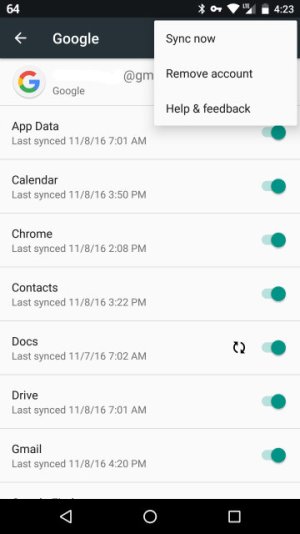
  • Tapping on your Google account will give you the screen below. This is a breakdown of all Google apps that can be synced, along with the time of last sync. If the sync switch is on, the app will automatically sync, so switching it off will prevent that app from syncing. Tapping the Menu button at the upper right (shown in the image) will give you the option to do a global Sync Now, as well as an option to Remove Account.
accounts.jpg

System

  • Date & Time:
    • Automatic Date & Time: When checked, the device obtains the current date and time from one of various network servers. If your device is a phone, there should also be an option for Automatic Time Zone, but this option isn't available on wi-fi only devices (like my Nexus 7), because time zone information for Android devices is taken from the cell signal. On wi-fi only devices, you need to use the option for Select Time Zone.
    • Use 24-Hour Format and Choose Date Format: Self-explanatory.
  • Accessibility: Various options for the hearing or visually impaired, including Captions, Magnification Gestures, Large Text, and Text-to-Speech Output. A couple of things to note:
    • ​If you uncheck Auto-rotate Screen here, then the Quick Setting Auto-rotate button will disappear. So if you ever find that the Auto-rotate button is missing, then look at this menu.
    • Adjusting the Touch & Hold Delay might be useful if you find that long-pressing activates too quickly for your preference.
    • TalkBack is Google's screen reader feature, and can be confusing if you unwittingly turned it on. See this page for details on how to use it.
  • Printing: Settings for Google Cloud Print, or any other print services you may have installed. Learn more here.
  • Developer Options: Since this guide is intended for beginners, I won't discuss this menu. Because there are advanced settings that can really mess with your device's performance, Google usually hides this menu to begin with. In order to reveal it, you need to go to Settings>About Device, then tap the Build Number 7 times in a row, after which you will be told you are now a Developer, and this menu will be accessible.
  • About Device: You can find various information like the official model number of your device, which Android version it's running, etc. You can also tap System Updates to check for any official updates to the operating system that might be pushed over the air ("OTA") by the device manufacturer and/or wireless carrier.
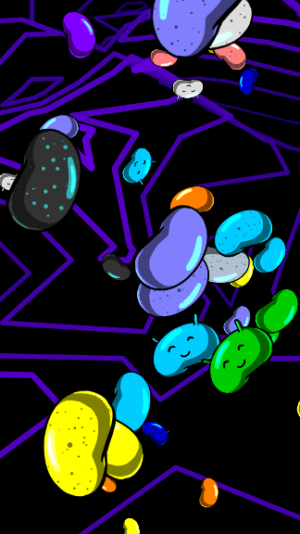
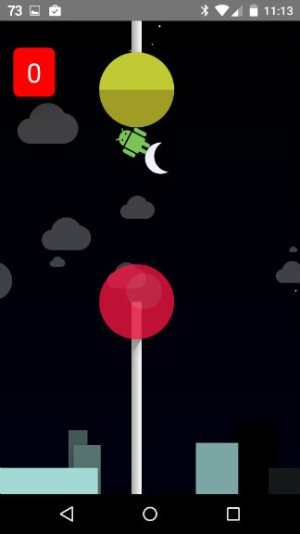
[TIP]To see something fun, tap rapidly on the Android Version until you see something pop up that is related to the nickname of your version (i.e., KitKat, Jellybean, etc). If you have Jellybean, long-pressing it will bring up the "Beanflinger" interactive animation that can then be used as a Daydream. If you have KitKat, long-pressing it will bring up the Android KitKat logo, and long-pressing that will bring up a cool interactive mosaic called the "Dessert Case," representing the history of Android. If you have Lollipop, tap the circle that appears multiple times until you see the Lollipop, then long-press it, and you'll have a chance to play the most irritating game ever.:-\ (Marshmallow's easter egg is the essentially the same as Lollipop's.) Nougat's easter egg is a silly little cat collection game.[/TIP]
beanflinger.png dessertcase.png Lolli bird small.jpg
 
Last edited:

B. Diddy

Senior Ambassador
Moderator
Mar 9, 2012
167,032
7,123
113
Visit site
Re: [GUIDE] Getting Started with Android (2014) [CONSOLIDATED]

Installing and Uninstalling Apps

Ok, so now you have your Homescreens set up and your Settings tweaked to your heart's content. Time to start installing apps! There are 3 basic ways to install an app:

  • From the Google Play Store, originally known as the Android Market. This is the biggest, safest, and most reliable place for apps. It comes preinstalled on most Android devices from major manufacturers, but some devices don't have it (primarily the ones from no-name or little-known companies), since devices have to be certified by Google to be compatible with the Play Store. On top of that, the Play Store still isn't fully accessible in some corners of the world -- here's the list of country availability, which is growing all the time.
  • From alternative 3rd party app stores, most notably Amazon Underground. Others include GetJar and SlideME. Amazon Underground is very reliable, but as you get to more obscure app stores, the risk of malware goes up.
  • As a directly downloaded .apk installer file (also known as "sideloading"). This is the riskiest and potentially shadiest method, since an installer file is usually downloaded from a file sharing site that has no vetting for security, and therefore could be chock full of malware. In addition to that, if the installer file is for an app that is supposed to be paid for but was downloaded for free, that is piracy and plain ol' d-baggery.
Let's go over these three options in more detail.

Google Play Store
There are two ways to install an app from the Google Play Store -- from the Play Store app on your device, or from the Play Store website on your computer.

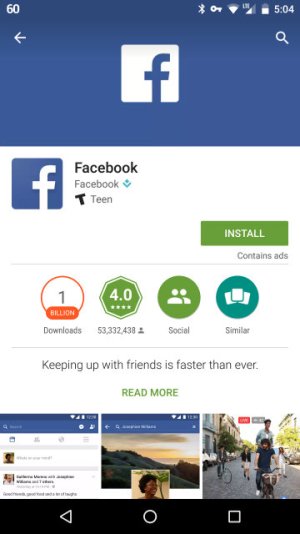
  • Installing from the Play Store app is straightforward -- just select an app, read the description to make sure it's what you're looking for, read through some of the reviews to make sure it isn't terrible or glitchy or potentially unsafe, and then tap the Install button. Let me say again that the reviews can be quite helpful in alerting you to an app that might come with annoying ads or other sneaky unwanted behaviors. Google will also let you know under the Install button if the app includes ads of any kind, as well as in-app purchases.
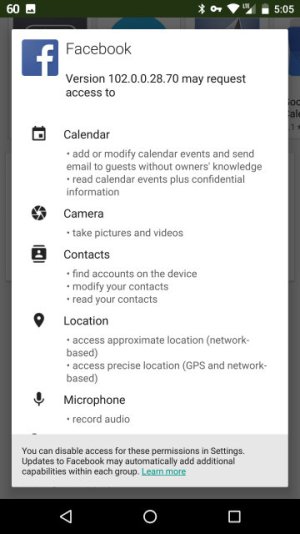
  • Near the bottom of the page, you can review the permission list -- as discussed in the previous section, these are various functions and accessibilities that the app may request once it is installed. Most apps that connect to the web and provide personalized information for you will require a large number of permissions, which can seem suspicious sometimes, but for the most part, apps that are from well-established companies, have been installed tens of thousands of times, and have many 4-5 star reviews will be legitimate and safe. If you're interested in installing an app that doesn't have as much of a track record, then it's worth looking at the requested permissions more closely, and asking yourself if they make sense for what the app does. A good developer will often explain in the app description why certain permissions are necessary. Although a thorough discussion of all Android permissions is beyond the scope of this beginner's guide, here is a good article about some of the scarier sounding permissions.
  • Once you tap Install, the app will install automatically (on versions before Marshmallow, you'll be asked to accept all app permissions first). There is no need to find a downloaded file or to delete an installer file afterwards.
play1.jpg play2.jpg

  • If the app isn't free and you need to purchase it, you will need a credit card registered with your Google Play account or a Google Play Gift Card. For extra security, I recommend going to the Play Store's settings, and turning on the "Require authentication for purchases" option. This will prevent other people (like your kids) from going on an app shopping spree.
[INFO]Another plug to consider purchasing the full paid version of free apps that you enjoy. You'll get more functionality, and you'll help support developers, encouraging them to improve their current apps and write more. If there is no premium version, I often use the "donate" option if available. It's usually just $1-2, which is less than the latte you get every day![/INFO]
  • Also make note of the other options seen in the screen above:
    • Auto-Update Apps does what it says -- you can select whether or not to auto-update at all, to do so on Wi-Fi only, or even when on mobile data. If you're concerned about mobile data usage, select Wi-Fi only or turn off Auto-update completely.
    • Add Icon to Home Screen will automatically add an app shortcut to your homescreen upon installing a new app. If you don't want to clutter up your homescreen, turn this off.
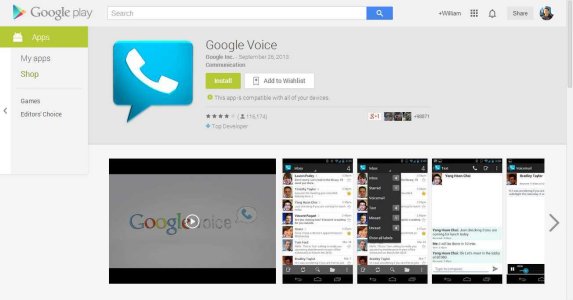
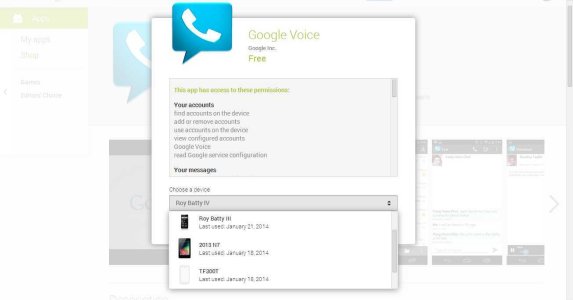
  • If you want to install an app from the Google Play Store website (play.google.com) on your computer browser, you can select which of your devices should be the target. Click on Install, then click on the dropdown "Choose a Device" menu. (The following screenshots are from slightly older versions of the Play Store website, but the process is still the same.)
webplay.jpg

webplayinstall.jpg
  • Once you select a device, the next time that device is connected to the web, the app will install automatically.
[NOTE]If you have ever installed a given app, it will display as "Installed" on the Play Store website, even if you subsequently uninstall it. Clicking on the "Installed" button will still give you the option to install the app on any of your compatible devices. This behavior does not occur on the Play Store app on your mobile device.[/NOTE]
  • Keep in mind that not all apps are compatible with all devices. Compatibility can depend on factors like Android version, screen resolution, internal hardware specs, etc. If the app in question isn't compatible with your device, it simply won't show up if you search for it on the Play Store app on your mobile device. On the website, you'll be able to find the app, but it will tell you that it isn't compatible with some or all of your devices -- you can find out which ones by clicking that dropdown menu.
  • Also remember that some apps are widgets only or live wallpapers only. Therefore, when you install them, you won't always find them in the App Drawer under apps. If it's a widget only, then you'll find it in the Widgets list, and if it's a live wallpaper, you might only find it in the Live Wallpaper selection list.

Amazon Appstore
For 3rd party app stores, I'll concentrate on the Amazon Appstore, since it's the most popular one (in the US, at least).

  • Assuming you don't have a Kindle (which should already have it preinstalled), you will need to allow your device to install apps from Unknown Sources in order to install the Appstore. Go to Settings>Security, and check on "Unknown Sources" under Device Administration.
unknown.jpg amazoninstall.jpg

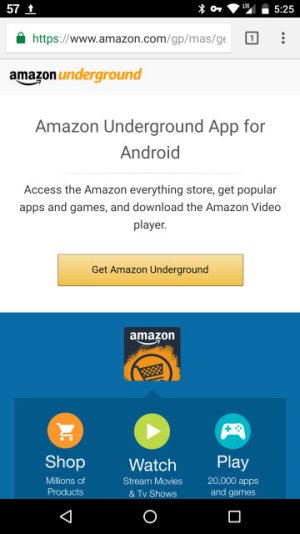
  • Next, on your device's browser, go to amazon.com/underground, and follow the instructions. You will need to locate the downloaded .apk installer file in your Downloads. To do so, you can either swipe your Notification Shade down and tap the download notification, or you can open your App Drawer and select Downloads. When you find it, tap it to start the installation.
  • Once it is installed, you will need to log into Amazon Underground using your Amazon account. No Amazon account, no entry.
  • Amazon Underground has a number of "Underground Apps" that are described as "Actually Free," which means that not only is the app free to install, but all of the typical in-app purchases are free as well. The downside of Amazon Underground is that the selection is much more limited than the Google Play Store, and Amazon apps are usually updated more slowly by the developers than in the Play Store.
[WARN]If you use a screen-dimming app like Twilight or Screen Filter, you might find that the Install button is inaccessible (greyed out). Deactivate your screen-dimming app, and the Install button should become accessible again. I know, weird, right?[/WARN]
Sideloading
As mentioned above, sideloading is the process of installing an app manually by downloading its .apk installer file directly to your device, or downloading it to your computer and then transferring it to your device to install. Just as with installing Amazon Underground, you have to make sure "Unknown Sources" is checked on, and the installation process is the same (see above). There certainly are legitimate sites where you can download legitimate .apk files for apps that the developer intended to distribute in this way. But still, as mentioned above, you run a higher risk of malware, and are you really sure that's how the developer intended the app to be distributed?

App Updates
  • The Play Store will let you know in the "My Apps" section when updates are available for apps you installed. App updates can sometimes come with new permission requests, so it's worthwhile to select the app and review the "What's New" section before accepting the update. If there are new permission requests, you will be able to review them, too.
    • As you can see in the Play Store settings screen earlier in this section, there is a Notifications checkbox. If it's checked, you'll receive notifications of available updates in your Notification Bar.
    • With certain updates (typically major ones), you may notice that the app shortcut disappears from your homescreen. Just add it back again from the App Drawer.
  • In Amazon Underground, go to the "Updates" section of "Your Apps." You may have to tap the refresh button at the upper right, and be aware that on some devices, the refresh process can take a few minutes. Unfortunately, there is no "What's New" section, so it can be difficult to determine what's in the update. You will still have a chance to review any new permissions.
    • Amazon can also notify you of app updates. Tap the menu button at the upper left, then scroll down to Settings, then Notifications.

Uninstalling Apps
You can uninstall apps that you installed a couple of ways -- either directly from the Settings>Apps menu, or via the app store from which they were installed.
  • In the Settings>Apps menu, find the app in the Downloaded list, tap it, and then tap Uninstall.
  • In the Play Store app, swipe in from the left (or tap the 3 line menu button at the upper left), then tap "My apps." You should see a list all of your Installed apps. Select one, then tap Uninstall. You can also see a list of all apps you've ever installed from the Play Store under "All."
    • Remember that for preinstalled apps that have been updated, you will only be able to Uninstall Updates, which will revert the app back to its factory version. You can't completely remove most preinstalled apps unless you're rooted (although you can always Disable them).
  • In Amazon Underground, tap the hamburger menu button at the upper left, then tap the "Underground Apps" dropdown arrow, and then "Your Apps." You will see 3 categories: "Cloud," which contains all apps you've ever installed from Amazon (and can subsequently reinstall); "Device," which shows all apps from Amazon currently installed; and "Updates," which shows apps that have updates available. To uninstall an app, go to the Device list, long-press on the app, and agree to the uninstall.
[INFO]Remember, you can always reinstall an app easily after uninstalling it. If you already paid for it, you don't have to pay again.[/INFO]
Miscellaneous Tips
  • The Play Store and the Amazon Appstore will usually only list apps that you installed from the respective app store; however, sometimes one store will show an app in its Installed list that was actually installed from the other app store. This can be confusing--for example, I installed the paid ad-free version of Angry Birds from Amazon, but then Angry Birds showed up in the Installed list in the Google Play Store as well, but not as the ad-free version. Since Play Store apps usually get updated more quickly than Amazon apps, I might get a notification for an update through the Play Store. But if I accept that update, then what installs is the free Play Store version with ads, not the ad-free version from Amazon. So it can be useful to keep track of which apps were installed from where.
  • Update alerts don't always show up for preinstalled Google apps, unless you've updated them at least once already. For example, if your device came preinstalled with Google Keyboard, and it has never been updated, then go to the Play Store, and search for Google Keyboard. You will probably see an Update button on the app page. Once it has been updated, the Play Store will start notifying you of further updates down the road.
 
Last edited:

B. Diddy

Senior Ambassador
Moderator
Mar 9, 2012
167,032
7,123
113
Visit site
Re: [GUIDE] Getting Started with Android (2014) [CONSOLIDATED]

Managing Media -- Photos & Videos

Mobile devices have become one of the main driving forces in multimedia creation and consumption, be it photos, music, movies/videos, or traditional print media. Your Android device is, of course, no exception, offering a myriad of ways to create, share, purchase, or rent media. I won't be able to discuss all of the various 3rd party media sources and apps in this guide; instead, I will concentrate on the apps that come preinstalled on most every Android device. Let's start with Photos and Videos.

There are two main gallery apps that come preinstalled on most current Android devices--the stock Gallery app (below left) and the Google Photos app (below right).
ic_launcher_gallery.png photos_icon.png

Gallery

  • The stock Gallery app is one of the basic AOSP (Android Open Source Project) apps that has been present on devices since the time of the dinosaurs, and it hasn't changed a whole lot either (which is not necessarily a bad thing). It displays all images, photos, and videos stored locally, as well as photos and videos from your Google Photos/Picasa albums in the cloud. (I got the following image from the web--yes, I know, the person spelled Sydney wrong. All you Aussies out there, please don't hate me!)
Android-4.0-Gallery.jpg

  • The Gallery's database gets periodically updated by the Mediaserver, aka Media Scanner (a system app), most notably whenever you power on your device from an off state, or when you insert an external SD card. Mediaserver will scan all folders looking for various media files (photos, music, videos), and populate the appropriate databases.
[INFO]Keep in mind that the Gallery is not a storage location, and is not where the photo files themselves are saved. It creates a database of all locally stored images and displays them. Photos taken by the Camera app are typically saved to the /DCIM/Camera directory.[/INFO]
[TIP]Sometimes, Mediaserver can get hung up on a corrupt file, typically on an external SD card. This can cause it to run constantly, and use up battery. If you notice Mediaserver using an excessive amount of battery, consider unmounting and removing your external SD card, and checking the integrity of the card or its files using chkdsk.[/TIP]
[TIP]Mediaserver will skip folders that contain a file titled ".nomedia". So if you notice that your Gallery is showing a number of unwanted images related to an app (e.g., icons used as onscreen buttons, etc.), you can find that folder and add a blank .nomedia file using any file manager app.[/TIP]
  • If you have photos or videos stored in Google Photos in the cloud (formerly Picasa), you will also see them in the Gallery, assuming you're connected to the web, and you have the sync function on.
    • After Google acquired Picasa, they gradually integrated it into Google+, and then made it the standalone Google Photos, so that now if you try to go to picasaweb.com, you are automatically redirected to the Google Album Archive. The main remnants of Picasa are the photo editor/organizer software for your computer, and the Picasa logo on the cloud albums displayed in the stock Gallery app.
    • To sync your Google Photos/Picasa cloud photos and videos with your Gallery, go to Settings/Accounts-Google, select your Google account, then make sure the Gallery sync switch is turned on (on older devices, it might actually be listed as Picasa).

  • The Gallery app has some decent basic photo editing features. Just select a photo, tap the Menu button, then Edit. There are options for Filters, Frames, Crop, and Contrast. The Menu button will also give you options for rotation and setting the photo as a wallpaper or contact photo. (By the way, that's Grace Cathedral in San Francisco, with no special effects, taken with my Nexus 5. The rays of "light" are actually multicolored ribbons hanging from the ceiling.)
cathedral.jpg
  • To delete a photo, simply long press it in the album view, and tap the garbage can icon at the top of the screen.
  • Note that there is usually no Download option for cloud photos when using Gallery--that function is available for the Photos app (see below).
Photos

  • The Google Photos app performs the same functions as Gallery, with a number of additional features. Below left is the main Photos screen that greets you when you open the app, which includes all of your photos and videos that are stored locally and in your Google Photos cloud. Your entire photostream is organized by date, and you can adjust the thumbnail size and grouping (i.e., by day, month, or year) with the Layout option in the overflow menu at the upper right. Tapping a thumbnail brings up the fullscreen photo, and long-pressing a thumbnail initiates multi-select.
photos 1.jpg photos4.jpg photos8.jpg
  • Tapping the hamburger menu button at upper left (or swiping in from the left) brings up the Navigation Drawer. The Device Folders option groups your photos based on storage location or app association. In the 3rd screenshot above, you see Camera (which is all photos taken by your Camera app, which are usually stored in the /DCIM/Camera directory), Screenshots (which are stored in the /Pictures/Screenshots directory), and Allo Media (which are photos shared with me via Allo, stored in its own directory called /Allo Media). If you like to organize your photos by creating different directories for each album, this is where you'd see that organization -- but this isn't very convenient when using the Google Photos app, since the display will always default to the main Photos screen. (Read more about Albums below.)
  • You can search for specific photo subjects, below left. It's possible to search for people as well, but this requires the Face Grouping option to be turned on in the Google Photos settings.
photos6.jpg photos2.jpg

  • You can create your own Albums on the Albums screen by tapping the overflow button at the upper right. (Alternatively, you can multi-select photos from the main Photos screen, then tap the "+" sign at the top to create a new album, or add the photos to an existing album).
[NOTE]Creating an album does not create a new corresponding directory on the device's storage. Google Photos keeps track of which photos go in which albums, so it's best not to rearrange the photo storage location yourself after creating an album.[/NOTE]

  • If you turn Assistant on in the Google Photos settings, it will periodically offer photo creations based on your collection and history. For example, it might recognize that you took a bunch of pictures in San Francisco from April 23 to May 3, and suggest a new album (as seen above). Or it might modify a photo with a filter, or create a short movie (with music) out of a number of your photos and videos. You'll see these creations on the Assistant screen, and can either dismiss them if you're not interested, or save them to your library. You can create things as well on your own -- no need to wait for Google to do it! (By the way, "Rediscover this day," as seen below, is another feature that somewhat randomly picks photos from the past, as sort of a nostalgia machine.)
photos3.jpg photos5.jpg photos7.jpg
  • Back on the main Photos screen (2nd screenshot above), tapping on any thumbnail will make the photo fullscreen, and gives you several options. (By the way, the photo was taken at the Ghibli Museum in Tokyo with my Nexus 6P.)
    • The Share button (at the lower left) gives you multiple options to share or upload (e.g., email, messaging, or via Google Photos itself).
    • The Edit button brings up the options seen in the 3rd screenshot above. Google's Auto adjustment can be pretty effective if you're not satisfied with a photo's lighting or color range. Remember, though, that these photo editing functions are fairly basic, so if you want more extensive editing options, there are plenty of free and paid apps to try out!
    • The Info button gives details about the photo itself, like when it was taken, where on the phone's storage the file is located, etc. It also shows the estimated geographic location of where the photo was taken. If you don't want your location attached to a photo, you can remove it here (but if you don't want to attach location to any photo by default, you need to turn off Location History, as described in System Settings, Part II.)
    • The Delete button is a little tricky. If you tap the trashcan Delete button, all instances of the photo (both locally saved and in your Google Photos cloud) will be put in the Trash for 60 days, after which it will be permanently deleted. Up until then, you can restore it by going to the Trash section in the Navigation Drawer, selecting the photo, tapping the overflow menu, then Restore. On the other hand, if you tap the overflow menu button and select Delete Device Copy, only the photo file saved on the phone will be deleted (permanently, without being able to restore from Trash), while the backed up photo in the cloud will remain intact.
  • Unless you have objections to Google cloud storage, I strongly recommend taking advantage of Google Photos Backup & Sync, which can be turned on in the Google Photos app settings. This will automatically backup photos and videos to your Google Photos in the cloud -- you can adjust when backups should occur (e.g., on wi-fi only, or when charging only).
    • You can choose between uploading the photos in Original Quality (which counts against your Google Drive allotment, unless you have a Pixel phone) and High Quality. High Quality is good for up to 16 megapixels, with a small amount of image file compression (virtually unnoticeable for the vast majority of users) -- and most importantly gives you unlimited storage.
    • Once photos have been backed up, you can free up local storage by deleting the original photo file. Google Photos can do this en masse if you select the Free Up Space option in the Navigation Drawer. Google Photos will then go through all of your locally stored photos and determine if they've been backed up to the Google Photos cloud -- if so, the original photo files will be deleted from local storage. (Remember, you can always download a photo from the cloud back to the phone's storage.)
[NOTE]Google Photos Backup & Sync can use a lot of data if you take a lot of photos and videos, so if you don't have unlimited mobile data, turn off the Cellular Data Backup switch in the Google Photos app settings to limit backup to wi-fi only. Also, the backup/sync process can increase battery usage, so limiting it to wi-fi only or when charging only may help.[/NOTE]
[WARN]Remember that saving important data (like precious photos) ONLY to your phone or an SD card, without any backups, is risky. Bad things can happen to phones (phone, meet toilet :'(), and SD cards typically have a shorter lifespan than onboard memory (and are also more prone to data corruption). Make sure you backup your important photos (and other data) on a regular basis, either to cloud storage like Google Photos or Flickr, or to some external hard drive.[/WARN]
A common question on these forums is how to arrange photos in a folder structure similar to a PC or Mac. Unfortunately, there is no simple way to do this using the Gallery or Photos apps, but it can be done. You need to have a good file manager app installed (if your device doesn't come with one, a couple of suggestions would be Total Commander and X-plore File Manager).
  • First, use the file manager to create a new folder for your photos. It can be anywhere, but a good place to create it would be in the standard Pictures directory (/storage/emulated/0/Pictures).
  • Next, go to the Camera folder (/storage/emulated/0/DCIM/Camera), where the photos you took are located. You can then copy or move a photo to the folder you just created.
  • When you go back to the Gallery or Photos app, you should see the new folder containing that photo.
  • If you want to move photos to a different folder, you will need to do so using the file manager app, not the Gallery or Photos app.
  • Alternatively, if you have a PC, you can connect the device via USB and use Windows Explorer to move the files around.
 
Last edited:

B. Diddy

Senior Ambassador
Moderator
Mar 9, 2012
167,032
7,123
113
Visit site
Re: [GUIDE] Getting Started with Android (2014) [CONSOLIDATED]

Managing Media -- Music

Because of the many varieties of music file formats, music players, and streaming music services that are currently available (and considering that this is a Getting Started guide, not an in-depth treatise), I will focus on managing music locally and in the cloud using Google Play Music, with a few side notes about other solutions like Amazon MP3 and various 3rd party players.

Google Play Music comes preinstalled on virtually every Android device these days, and may be the default music player on your device. Some manufacturers also install their own music player app (which is often fairly sparse in terms of features), and older devices might still have the very basic AOSP-based Android Music Player (which, like the stock Gallery app, has been around forever and hasn't changed much). My experience with the latter was never very good--I recall that it tended to list album tracks in alphabetical order rather than track order, which makes no sense, especially if you're listening to classical music! Needless to say, Google Play Music is a huge improvement over the Android Music Player, and although it may not have the most comprehensive feature list, it is still a solid piece of software.

There are 3 ways to listen to music on the Google Play Music app:
  • Streaming your own music that you uploaded into your Google Music Library or that you purchased from the Google Play Store.
  • Playing music files that are stored locally on your phone (either transferred there from your computer by you, or downloaded from your Google Music Library).
  • Subscribing to Google Play Music, which gives you unlimited streaming access to their entire library for a monthly fee. I won't cover this (mostly because I don't have direct experience with it), but you can learn more here.

Uploading Your Own Music to Google Play Music

  • One of the most awesome aspects of Google Play Music is the ability to upload up to 50,000 songs (max of 300 MB/track) from your personal library. Unless you're a total audiophile who insists on lossless tracks, the average pop song with CD quality sound runs around 5-10 MB. If we make a conservative estimate, that means you can store around 500,000 MB of music, or 500 GB, absolutely free--and it doesn't count toward your overall Google Drive storage limit (which is 15 GB for free, more if you pay).
  • Supported file formats include the usual suspects -- MP3, AAC (i.e. iTunes), and WMA, as well as a few others (see this support page). So yes, this means you can upload your iTunes library to Google Music, with the exception of any older DRM-protected iTunes tracks you might still have. iTunes playlists will also be uploaded, but further editing of the playlists needs to be done on Google Music, not iTunes.
  • There are two ways to upload your music. The first is with the Google Music Manager program on your PC or Mac. Once installed, open it by clicking on the headphone icon in your Windows desktop notification area, which will bring up this window.
Screenshot (12).png

  • Click Add folder and select the main folder where all of your music is located (for me, it's "Music") -- this will also include all subfolders. You can add multiple folders if your music is spread around your hard drive.
  • Then click Upload, and leave your computer alone and powered on. The upload process can take a long time depending on how much music you're uploading -- maybe even upwards of 2 straight days (so adjust your Power Settings to prevent the computer from going to sleep). The process is sped up a bit when Google recognizes one of your music tracks as also available in its online library, in which case it will simply match it rather than upload it. (All music tracks from Google's own library are at a bitrate of 320 kbps, so the sound quality is as good if not better than CD.)
  • Once your music library is uploaded, you can now access it on any computer browser or any device that has the Google Play Music app.
  • Whenever you add any new music to your computer's hard drive, you can open Music Manager and click Upload again--it will automatically detect the new music and upload those tracks only.
[NOTE]Keep in mind that this is not a sync program. So any changes you make to your computer's locally stored music library or playlists will not be automatically reflected in your online Google Music library. If you make changes in your computer's library, you won't be able to upload those changes using Music Manager -- you'll need to make the same edits in Google Play Music on the web.[/NOTE]

  • The other way to upload music is from the Google Play Music website on your computer browser. Click on the hamburger menu at the upper left and select Upload Music. You can then drag and drop music files into the subsequent Upload window, or use the file explorer to select music. Unlike the Music Manager, this option is completely manual (i.e., it can't automatically discover any new music on your computer and upload it).
GPMupload.jpg

Purchasing Music from Google Play
  • This is straightforward, whether on the Play Store website or app. There are usually good discounts on selected music each week, as well as a number of free tracks or even free albums, so it pays to visit frequently.
  • Once you purchase a track, it automatically gets added to your Google Music Library, and can be streamed or downloaded using the Google Play Music app. You can see which songs were purchased or downloaded free from Google Play Music by selecting the "Free and purchased" auto-playlist.
Transferring Music to Local Storage

  • Although Google highly touts the cloud for music storage and streaming, it clearly isn't always the best option. Streaming requires an internet connection, which means somewhat increased battery usage by the wi-fi or cell radio, as well as the potential for high mobile data usage, which is always important to watch if you don't have an unlimited plan.
  • Storing your music locally can therefore be more efficient -- the main limitation being, of course, how much storage you have available. This is where external SD cards can be extremely useful, especially for devices that come with less Internal Storage, since the average 16 GB device only has anywhere from 8 to 12 GB of actual onboard storage available to the user.
  • Copying or moving music tracks to your device's internal storage or SD card is best achieved by plugging the device into your computer via USB (making sure the device's USB connection mode is set to MTP, or Media Transfer Protocol). Using Windows Explorer, click on the mobile device icon to display its folders -- MTP only allows access to certain folders for media transfer, but one of those should be the Music folder. (On a Mac, use Android File Transfer.)
  • You can now drag and drop music files to the device's Music folder. I suggest keeping the standard folder hierarchy of Artist>Album>Song.
  • If you have trouble accessing the SD card via USB connection, it'll be easier if you remove the SD card from your device (making sure to Unmount it first in Settings>Storage!), then insert it into your computer.
[TIP]If you're having difficulty transferring music via USB, consider a wireless file transfer app like WiFi File Explorer or AirDroid.[/TIP]
Editing Music Information
  • If you want to edit album or track information, or change the album art, the best place to do it is on the Google Music website on your computer, not on your mobile device. The app doesn't really have any of that functionality.
  • On the Google Music website, if you place the cursor over any album, you should see the familiar 3 vertical dot overflow menu button appear to the right of the album name. Clicking on it will give you a number of options, including "Edit Album Info."
GPMedit1.jpg

  • Clicking on "Edit Album Info" will bring up a self-explanatory dialog box, which also allows you to change album art.
GPMedit2.jpg

  • You can also edit individual track information by bringing up the song list of a given album, and clicking on the overflow menu button to the right of the track name.
GPMedit3.jpg

  • Once you have finished your editing, the changes should sync over to your mobile Google Play Music app. (If you don't see the changes immediately on the app, you can tap the menu button, then Refresh.)
Playing Music
  • Upon opening the Google Play Music app, you'll see the Listen Now screen (below left), which shows your recently uploaded or purchased music, as well as music suggestions based on your activity or preference. These suggestions will lead you to choose a genre-specific Radio Station (see below). Scrolling down farther on the Listen Now screen will show you various Radio Station recommendations by Google, based on your listening patterns.
GPM1.jpg GPM2.jpg GPM3.jpg

  • The 2nd screenshot above shows the options in the Navigation Drawer:
    • Music Library takes you to the 3rd screenshot above, with options to view your Playlists, preferred Radio Stations, and your own music sorted by Artist, Album, Song, or Genre.
    • Browse Stations lets you explore the many genre-specific Radio Stations, which continuously stream music (with ads thrown in every few songs if you don't have a Google Play Music Subscription). You can also create a custom Radio Station based on a song, artist, or genre (see below).
    • In the Settings, you can find an option for Equalizer, which allows you to tailor the sound to your own personal taste. Keep in mind that this feature might not be available on all devices. There is also a Refresh option, which forces the app to re-sync with your Google Play Music library in the cloud.
    • The Downloaded Only switch lets you view just the music that has been downloaded to the device. This could be music that you chose to download (see below), or music that was cached by the app while streaming.
    • Subscribe Now is only intended as a reminder if you haven't signed up to access Google's entire streaming library (for a monthly fee). You don't need to subscribe in order to use the app for your own music (or to listen to the free ad-supported Radio Stations).
      • The Top Charts and New Releases options are only useful if you're a subscriber.
GPM4.jpg

  • Above is the Music Library sorted by Album, also showing the overflow menu for an album.
    • Start Radio will create a Radio Station based on that album. (If you're sorting by Artist, then this will base the Radio Station on the artist you select.) Start Instant Mix is similar, but will generate a mix of songs from your own library only, rather than Google's.
    • Add to queue will tack on the album or song to the currently playing list of songs (see below).
    • Add to playlist will allow you to create a new playlist or add the music to an existing one.
    • Download will temporarily download the album or song to your device's internal storage. Downloaded music will have a red circular icon with a check in it (which you can see on that deadmau5 album). Tapping on that icon will give you the option to remove the download from storage. See below for further discussion on downloading or caching music.
  • The bar at the bottom shows the track that is Now Playing. Tap it or swipe it up to expand it to full screen, which reveals more playback options. Tap it again or swipe it down to minimize it again.
GPM1.jpg GPM5.jpg GPM6.jpg

  • Tap the Queue button at the upper right to see all of the tracks that are scheduled to play, which usually means the track list for the album. You can add more tracks to the Queue by using the "Add to queue" option discussed earlier.
  • The Queue can be cleared either by selecting a new album to play now, or by tapping the menu button while in the Queue screen, and selecting "Clear queue."
Downloading Music

  • As mentioned above, you can use the Download option to download an album to your local storage. This option only works for albums, not for individual songs, and it is important to understand that you probably won't be able to manipulate those song files. These downloaded files have coded numeric filenames instead of the actual song names, and they may or may not be stored in the obscure directory /storage/emulated/0/Android/data/com.google.android.music (or /mnt/sdcard/Android/data/com.google.android.music). I have seen these files on my old Razr Maxx, but cannot see them on my Nexus 5 or later devices. So the downloads are not intended for users to subsequently transfer to other devices; instead, they are meant to allow users to listen to selected music without having to stream over wi-fi or mobile data.
  • If you want to download your music and transfer it more freely, there are two better options:
    • Use the Music Manager on your computer and click on the Download tab. You have the choice of downloading your entire music library (which can be ridiculously unfeasible if your library is gigantic) or downloading only your free & purchased music.
    • Download from your Google Play Music Library website. If you press the overflow menu button of any album or song, you'll see a Download option.
[INFO]Why does Google make it so hard to access downloaded music? Not being a Google employee, I can only speculate, but I believe it is Google's way of gently discouraging music piracy. If a user were able to download music to a mobile device and transfer it very easily, then there might be more chance of "sharing" the track with a friend, who could then "share" it with someone else, etc. Granted, you can download those tracks and transfer them easily using your desktop or laptop, but it just isn't as convenient to "share" music when a big computer is involved. In my opinion, this setup is far better than DRM![/INFO]
Other Players
  • Amazon Music is a decent alternative, especially given Amazon's large MP3 library and frequent good deals on music. Amazon also allows you to store music in their cloud, but you can only store up to 250 of your own tracks for free; you can pay $25/year to increase that limit to 250,000 tracks. Any music you buy from the Amazon MP3 store doesn't count toward that limit.
  • There are dozens of 3rd party music players available in the Google Play Store and elsewhere. Some notable ones include:
    • PowerAmp, widely regarded as one of the best and most fully-featured. There's a free trial version, but afterwards it's $4.
    • MortPlayer Music, which is a little different from conventional music players in that it organizes and displays music based on folder hierarchy rather than ID3 tag. So if you're having a lot of problems with displaying the correct artist or album related to a song, and you're not having any luck with ID3 tag editors, then this might be a good solution. (PowerAmp can also use folder hierarchy, but MortPlayer is free.)
    • doubleTwist can actually sync with iTunes or Windows Media Player, although from what I've read, results are a bit variable. It's free, but the paid app unlocks other features, including AirSync, which allows you to sync with iTunes over wi-fi.
 
Last edited:

B. Diddy

Senior Ambassador
Moderator
Mar 9, 2012
167,032
7,123
113
Visit site
Re: [GUIDE] Getting Started with Android (2014) [CONSOLIDATED]

Managing Contacts

Entering contact information is pretty straightforward with Android, but there are a couple of pitfalls worth knowing about. Importing contacts from other platforms or programs can be a little more challenging, but the general process is still straightforward as well. Syncing contact information from a non-Google program (i.e., having changes in your Android device reflected in the non-Google program and vice-versa on an ongoing basis) is considerably more challenging, but this is often the case with any platform. In this section, we'll discuss all of these methods, focusing mostly on the first two. As with earlier sections of the Getting Started guide, it's important to keep in mind that different phone manufacturers may have slightly to radically different Contact (aka People) apps, and that for our purposes here, I will be referring to the Contacts app on the Nexus 6P running Nougat.

Entering Contacts

You can enter new contacts directly on your device, or on the Google Contacts website using your computer browser (which will then sync with your device).
  • To enter a new contact directly on your device, open the Contacts app and tap the Add New Contact button (usually some kind of icon with a big "+" sign). You'll then see a screen like this:
cont1.jpg

  • Most of the fields to fill out are self-explanatory, but probably the most important option on this screen is the account selector (where it says "Saving to." This is where you specify which account the new contact belongs to. It will most likely be your default Google account, but you may have multiple other accounts associated with your device, so make sure you pick the right one. To pick an account, simply tap the selector and choose.
    • Some phones can store contacts into a "Phone Account," which is separate from your Google account. These Phone Account contacts do not sync with your Google account. They are typically meant to sync using 3rd party or proprietary software (like Verizon's Backup Assistant Plus, HTC Sync, or Samsung Kies) to a non-Google cloud service or a desktop program like Outlook. But if you don't sync Phone Account contacts in this way and your phone gets wiped for some reason, then those contacts are lost forever.
[TIP]As a general rule of thumb, avoid entering contacts into the Phone Account. If you do, make sure you sync or back them up frequently![/TIP]

  • To enter a new contact on the Google Contacts website, go to contacts.google.com (or go to the Gmail page, click on the dropdown right under the main Google logo at the upper left, and then select Contacts).
gmailcontact.png

  • Then click on the New Contact button. Once you have entered the new contact on the Google Contacts website, it will automatically sync to the same account on any of your devices.
newcontactweb.png
[TIP]If you are entering a lot of new contacts, it will be easier to do so from your computer, rather than on your mobile device (unless, of course, you're a champion touchscreen typist).[/TIP]
  • When entering a new contact, you can assign it to a particular Group. Google starts you off with "Personal" and "Professional" Groups, but you can create any number of new Groups, and these will also be synced over to any device that is logged into the same account.
group.png

  • A contact can belong to multiple groups.
  • Starred is a system Group -- these contacts will show up in the separate Starred (or Favorites) section of your device's Contacts or Dialer app. You can quickly mark a contact as Starred by clicking on the star icon wherever you see it (e.g., in the screen above, just under the Name field).

Importing Contacts

This is where it starts to get a little trickier. Importing contacts from one program or platform to another is usually a slightly imperfect process, due to differing data fields and other compatibility issues. But for the most part, you can import all of the key information pretty easily from almost any platform. The main steps are:

  1. Export the contacts from the source program into a .CSV or multiple .VCF (vCard) file.
  2. Import that file directly into the Google Contacts website, which will then sync to all of your devices, OR
  3. Transfer that exported file to your device, and then import it using the Contacts app.
  4. You can now manage these contacts from the Contacts app as well as Google Contacts on the web.
Exporting Contacts from the Source
Here are links to instructions on how to export your contacts from

[TIP]When exporting as a .VCF file, make sure you do so as a multiple vCard .VCF file, not as a whole lot of separate single vCard files.[/TIP]
Import Option #1: Google Contacts on the Web
  • You can import .CSV or .VCF files into Google Contacts on the web. Go to contacts.google.com, then click on the "More" dropdown menu, then "Import."
importweb.png

  • You will then be prompted to pick a .CSV or .VCF file to import. Once the file is imported, the contacts should all sync to your connected Android devices with the next auto-sync.
Import Option #2: The Contacts App

  • Importing contacts directly into the Contacts app requires the contacts file to be in vCard (.VCF) format.
  • You'll need to get that file on your device first. Here are a few methods:
    • Connect the device to your computer via USB, and use your computer's file explorer to drag and drop the contacts file into any directory on your device -- just remember where you put it. I suggest creating a folder on the root directory called "Miscellaneous" and putting it there, just so that it's easy to find.
    • If your device has an external microSD card, unmount it (in Settings>Storage), remove it, and then insert it into your computer using a full-sized SD card adapter. Then drag and drop the contacts file into the microSD card, remove it from your computer, and reinsert it into your device.
    • Upload the contacts file to a cloud service like Google Drive or Dropbox, then download it to your device.
    • Use a wireless file transfer solution like AirDroid or WiFi File Explorer.
  • Once the contacts file is available in the device's internal storage or external microSD card, open the Contacts app, tap Menu>Settings>Import/Export>Import From .vcf File.

Syncing Contacts

Remember that syncing is different from what we just discussed above (i.e., importing contacts). Importing is a one-time action, and any subsequent additions or changes to the source will not be reflected in the target. Syncing means real-time synchronization, where any change you make on a given device will be made on any other synchronized device. There aren't any stock or native apps on Android devices that allow you to sync with other platforms. You can set up those other devices to sync with your Google account, but this will only bring your Google contacts into your non-Android device, and will not sync your existing contacts on that device with Google. In order to achieve the latter, you'll still need to export and then import as discussed above.

There are also a number of third-party sync solutions out there. Keep in mind that many (if not all) may be imperfect, at least at times. CompanionLink (for Outlook/WP, iOS, Blackberry) is one of the more popular ones.
 
Last edited:
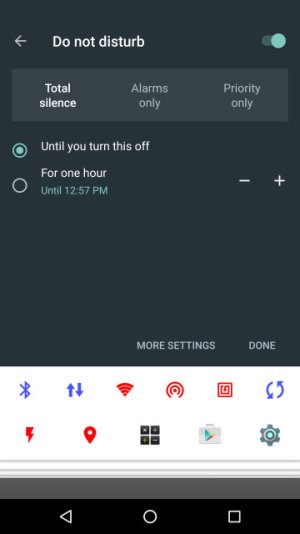
Paul627g

AC Moderator All-Star
Moderator
Nov 25, 2010
15,958
2,752
0
Visit site
Re: [GUIDE] Getting Started with Android (2014) [CONSOLIDATED]

Bravo! Awesome guide here B. Diddy!
 

James Falconer

Former Community Manager
Nov 1, 2012
1,573
5
0
Visit site
Re: [GUIDE] Getting Started with Android (2014) [CONSOLIDATED]

B. Diddy,

What a comprehensive guide... members are going to love this! Great stuff.
 

hondaf17

Member
Nov 5, 2013
14
0
0
Visit site
Re: [GUIDE] Getting Started with Android 2014, Part I

This is a very good thread, thank you. I have been on a BB for 8 years and my Moto X just arrived. I love my BB and am only switching because my company is making me. However, I am impressed with the hardware of the Moto X and am trying to keep a very open mind about moving to Android. I have read this thread, and a lot of others, and have a few questions:

1) How do I "mark prior read" in the e-mail app? When I first synced my personal email accounts (live.com and comcast.net) I have 100 messages that show up as unread. How do I simply tell the device to mark them all as read? I hope I don't have to go through one by one.
2) On my home screen, how do I get rid of the big box that says "google" with a microphone? The Moto X is always listening so I don't need that box there.
3) How do I change my default search to Bing?
4) Does amazon instant video not have an Android app?
5) I've already disabled Google + (do not have an account). I would also like to disable Google Play Music, Movies, Books, Newstand, etc. These are all "stock" apps or whatever but I consider them bloatware. Basically I have zero google accounts (besdies a gmail I never use but had to set up) and don't want all this stuff. Will disabling all of these negatively impact my experience?
6) Any way I can set my default map software to Bing instead of Google?
7) Can I get internet explorer loaded and set as my default web browser as opposed to Chrome?
8) Why do I have 5 "homescreens"? I only have enough icons taking up 1, but can scroll left and right to empty screens.

I am a total rookie, but trying to learn, and am keeping an open mind. I realize it will be different from BB and I'll deal with it. Help on these items will be greatly appreciated.
 

Golfdriver97

Trusted Member Team Leader
Moderator
Dec 4, 2012
35,522
419
83
Visit site
Re: [GUIDE] Getting Started with Android 2014, Part I

This is a very good thread, thank you. I have been on a BB for 8 years and my Moto X just arrived. I love my BB and am only switching because my company is making me. However, I am impressed with the hardware of the Moto X and am trying to keep a very open mind about moving to Android. I have read this thread, and a lot of others, and have a few questions:

1) How do I "mark prior read" in the e-mail app? When I first synced my personal email accounts (live.com and comcast.net) I have 100 messages that show up as unread. How do I simply tell the device to mark them all as read? I hope I don't have to go through one by one.
2) On my home screen, how do I get rid of the big box that says "google" with a microphone? The Moto X is always listening so I don't need that box there.
3) How do I change my default search to Bing?
4) Does amazon instant video not have an Android app?
5) I've already disabled Google + (do not have an account). I would also like to disable Google Play Music, Movies, Books, Newstand, etc. These are all "stock" apps or whatever but I consider them bloatware. Basically I have zero google accounts (besdies a gmail I never use but had to set up) and don't want all this stuff. Will disabling all of these negatively impact my experience?
6) Any way I can set my default map software to Bing instead of Google?
7) Can I get internet explorer loaded and set as my default web browser as opposed to Chrome?
8) Why do I have 5 "homescreens"? I only have enough icons taking up 1, but can scroll left and right to empty screens.

I am a total rookie, but trying to learn, and am keeping an open mind. I realize it will be different from BB and I'll deal with it. Help on these items will be greatly appreciated.

Hi. Welcome to the forums. I had a Moto X and will try to answer your questions.
1. Try the 3 dot menu button at the top. There may be an option there.
2. Different launcher like Nova is required to do that.
3. I don't think you can. If there is a way it would be in settings in Chrome.
4. Probably not if it isn't in Play.
5. Settings>apps>swipe over to all apps>scroll down to each app and click on it. You will see a screen that will disable them. Uninstalling updates may need to be done first.
6. Map quest may have an app on Play.
7. I don't think so. MS does not have many apps on Play.
8. You can delete home screens with Nova.


From a Sprint Moto X using AC Forums app
 

B. Diddy

Senior Ambassador
Moderator
Mar 9, 2012
167,032
7,123
113
Visit site
Re: [GUIDE] Getting Started with Android 2014, Part I

1) How do I "mark prior read" in the e-mail app?

I have to admit that I don't use the stock email app, only Gmail, so I can't tell you exactly. On Gmail, there isn't a quick way to mark all read--I think you'd have to do that in Gmail on the desktop.

2) On my home screen, how do I get rid of the big box that says "google" with a microphone?

You usually can't remove that search bar on the stock user interface, although you can easily install a 3rd party alternative launcher like Nova Launcher, which allows you to customize your interface much more, including removing the search bar. Nova has a definite Jellybean/KitKat feel to it, but there are other launchers like Action Launcher which are significantly different from the usual Android launcher.

3) How do I change my default search to Bing?

Install the Bing app/widget. I don't know if there's a way to make that default for voice search.

4) Does amazon instant video not have an Android app?

There isn't an app unless you have a Kindle. I believe there are workarounds--here's a video describing one:
Watch Amazon Prime Instant Videos on Android (Without Kindle) - YouTube

I would also like to disable Google Play Music, Movies, Books, Newstand, etc

Disabling those store apps should be fine. I would leave Google Play Services alone, though, because that is becoming increasingly important in the operation of the system.

6) Any way I can set my default map software to Bing instead of Google?

What do you mean by default? Do you mean if you click on a map in the browser? There isn't a dedicated Bing Maps app for Android, so you wouldn't be able to open it as an app. I'm not sure if there's a way to open Bing Maps in your browser by default.

7) Can I get internet explorer loaded and set as my default web browser as opposed to Chrome?

Sorry, but no. Be very careful about apps that purport to be IE in the Google Play Store--the ones I saw have very few downloads and seem kind of fishy.

8) Why do I have 5 "homescreens"? I only have enough icons taking up 1, but can scroll left and right to empty screens.

Some versions or modification of Android allow you to delete empty homescreens or add an unlimited number of homescreens, although the basic Android interface usually doesn't. Again, you could install an alternative launcher like Nova Launcher, which lets you do that.
 

hondaf17

Member
Nov 5, 2013
14
0
0
Visit site
Re: [GUIDE] Getting Started with Android 2014, Part I

Thank you very much for your responses. I will keep replying here in hopes that 1) I continue to get good suggestions and 2) it might give you more ideas of what Android rookies are encountering, for future guides and to help more people.

1) I have not found a way to mark prior read with the Outlook app, or the default mail app. I don't understand why this is not a feature, but oh well.
2) One of the reasons I got a Moto X was that I understand it was close to vanilla android. However, Android is not as "open" or "customizable" as I was thinking it would be. I will consider downloading Nova Launcher. Are there any negatives to downloading Nova Launcher? Worse battery life?
3) I'm shocked Amazon doesn't have an instant video app for Android. They have one for iTunes. Everyone rips BB for lack of apps so maybe my expectations were too high that I thought a huge app/service like this would be available.
4) Thanks for the heads up about IE/shady programs. Kind of sticks as I prefer IE, as my bookmarks sync between my desktop, laptop, and hopefully my phone. Oh well, will live with Chrome.

New frustration / question:

1) Where the **** is a file explorer? I can download a file from the Skydrive app to my device, and open it in Quick Office. However, Quick Office can't delete any files??? I did some research and downloaded ASTRO File Manager. I have since found out how to delete files, but deleted files still show up in Quick Office. Quick Office doesn't have any settings at all, or a "refresh" button. Also, ASTRO File Manager can't download files from Skydrive? I need to open the Skydrive app, download them, then launch ASTRO to view/manage/delete. The document storage/filing process is woeful, unless I'm missing something obvious.


TYIA,
 

Golfdriver97

Trusted Member Team Leader
Moderator
Dec 4, 2012
35,522
419
83
Visit site
Re: [GUIDE] Getting Started with Android 2014, Part I

Thank you very much for your responses. I will keep replying here in hopes that 1) I continue to get good suggestions and 2) it might give you more ideas of what Android rookies are encountering, for future guides and to help more people.

1) I have not found a way to mark prior read with the Outlook app, or the default mail app. I don't understand why this is not a feature, but oh well.
2) One of the reasons I got a Moto X was that I understand it was close to vanilla android. However, Android is not as "open" or "customizable" as I was thinking it would be. I will consider downloading Nova Launcher. Are there any negatives to downloading Nova Launcher? Worse battery life?
3) I'm shocked Amazon doesn't have an instant video app for Android. They have one for iTunes. Everyone rips BB for lack of apps so maybe my expectations were too high that I thought a huge app/service like this would be available.
4) Thanks for the heads up about IE/shady programs. Kind of sticks as I prefer IE, as my bookmarks sync between my desktop, laptop, and hopefully my phone. Oh well, will live with Chrome.

New frustration / question:

1) Where the **** is a file explorer? I can download a file from the Skydrive app to my device, and open it in Quick Office. However, Quick Office can't delete any files??? I did some research and downloaded ASTRO File Manager. I have since found out how to delete files, but deleted files still show up in Quick Office. Quick Office doesn't have any settings at all, or a "refresh" button. Also, ASTRO File Manager can't download files from Skydrive? I need to open the Skydrive app, download them, then launch ASTRO to view/manage/delete. The document storage/filing process is woeful, unless I'm missing something obvious.


TYIA,

1. It might be a bug in that app. I am not sure as I do not use Outlook. I would consider emailing the developer and suggesting the feature.

2a. Android is very customizable. The fact that you can download a different launcher or a different keyboard is one of the defining characteristics of that.
2b. A second launcher like Nova should not drain the battery any more than not having it.

3. That is all up to the app developer.From what i understand it is very easy to create an app for Apple versus Android. Part of the reason is consider something simple like different screen resolutions. That has a factor in developing apps.

4. I used to like IE too, but as I got more and more accustomed to Chrome, especially, since many things you do are integrated. Say you search for Ice cream flavors on your desktop Chrome. Your history will show that search on your device as well. If you search it enough, it will show up on Google Now as a card. Bookmarks between Chrome and your X will be synced.

1a. File explorers versus Quickoffice: Quickoffice opens documents that are in Google Drive and other apps. Most of the time, cloud storage files need to be deleted on the desktop version of the site.

Hope that answered some of your questions.
 

B. Diddy

Senior Ambassador
Moderator
Mar 9, 2012
167,032
7,123
113
Visit site
Re: [GUIDE] Getting Started with Android 2014, Part I

3) I'm shocked Amazon doesn't have an instant video app for Android. They have one for iTunes. Everyone rips BB for lack of apps so maybe my expectations were too high that I thought a huge app/service like this would be available.

I suspect this is more of a way for Amazon to get people to buy a Kindle, as opposed to a Nexus 7. Just as with many issues on Android, there are ways of making it happen. Here's one way: How to stream Amazon Instant Videos | On Android Tablet TeleRead: News and views on e-books, libraries, publishing and related topics
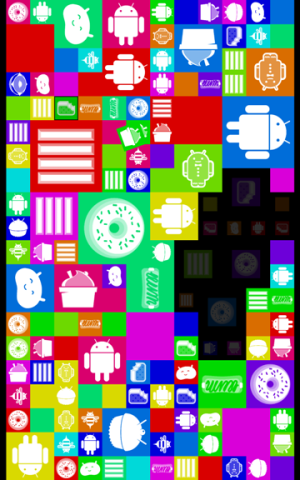
ES File Explorer and Total Commander are also good file manager apps.
 

Forum statistics

Threads
948,938
Messages
6,940,912
Members
3,161,290
Latest member
ronzie9