[GUIDE] Preparing your HTC Droid Incredible for the Gingerbread OTA

PvilleComp

Well-known member
Jun 13, 2010
4,146
603
0
Visit site
Preparing your HTC Droid Incredible for the Gingerbread OTA

[INFO]Credits:
Thanks to Brett and mclarryjr for their outstanding [GUIDE] How to Root, Unroot and ROM your Droid Incredible thread.
Thanks to Some Dude for use of his site as an excelent resource for software. [/INFO]
[WARN]WARNING: The information contained in this post could damage your phone beyond repair if instructions are not followed completely!
I bear no responsibility for any damage real or imagined that may occur.[/WARN]
[WARN]WARNING: Un-rooting and returning your phone to stock as described here will erase all data from your phone. The data on your SD Card will remain untouched. If you do not back up data stored on the phones internal memory it will be lost.[/WARN]
[WARN]WARNING: Make sure you have a full battery when un-rooting and returning to stock. Running out of power at the wrong time will result in a Brick for a phone.[/WARN]
With Gingerbread coming for our beloved DInc there will be many who will want to take advantage of the opportunity to load HTC’s Official Gingerbread. So, how should you prepare? There are three fundamental user types that I will address here: Rooted users who want to keep root, rooted users who don’t care if they keep root and Stock users.


Index:
Post 1...............Introduction
Post 2...............For Rooted Users Who Do Not Want to Lose Root
Post 3...............For Rooted Users Who Want to Un-root and Accept the OTA - Preperation
Post 4...............For Rooted Users Who Want to Un-root and Accept the OTA - Un-rooting
Post 5...............For Stock users
Post 6...............Reserved
 
Last edited:

PvilleComp

Well-known member
Jun 13, 2010
4,146
603
0
Visit site
For Rooted Users Who Do Not Want to Lose Root

For users who are rooted and do not want to lose root, your task is simple. Do not accept the OTA. A rooted version will be available shortly after the official version starts rolling out; so be patient and wait for a rooted version to come out. Rooted OTA ROMS will be posted in the ROMS and Hack’s forum as well as in the ROM’s and Mod’s HQ thread as they become available.

[TIP]To disable the OTA Notification Nag:
Use Root Explorer or another root compatible file explorer and rename /system/etc/security/otacerts.zip. to /system/etc/security/otacerts.zip.bak.
[/TIP]

Update 8/17/11 - The OTA has been Rooted by JoelZ9614 - Download here:
http://forum.xda-developers.com/showthread.php?t=1221972
 
Last edited:

PvilleComp

Well-known member
Jun 13, 2010
4,146
603
0
Visit site
For Rooted Users Who Want to Un-root and Accept the OTA

First and foremost, if you are rooted and you want the HTC Official Gingerbread OTA, you will need to un-root and return to stock. If you are rooted and running stock, you still need to un-root and return to stock. If you are running an AOSP ROM and you want the OTA you need to un-root and return to stock. If you are rooted and running a Sense based ROM you need to un-root and return to stock.

Just in case I was not clear. If you are rooted do not accept the Official OTA unless you have un-rooted and returned to stock!
[WARN]
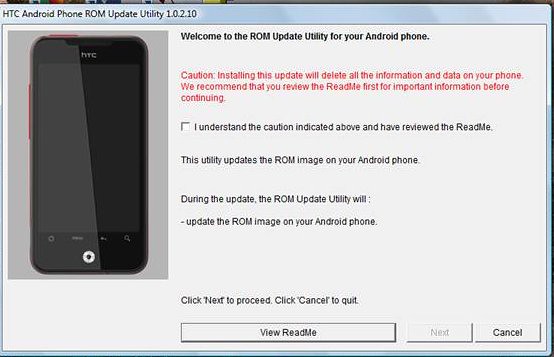
WARNING: Once you accept the OTA the odds are you will not be able to re-root your device unless/until a new rooting method is be found and the developers release a new rooting tool or procedure. If you do not want to lose root then the OTA is not for you. There will be plenty of rooted OTA ROM’s available shortly after the release, so be patient and wait for a rooted OTA.[/WARN]


Preperation:
For Windows users there is some prep work we need to do so that everyone is on the same page. These directions will work for XP, Vista and Windows 7.

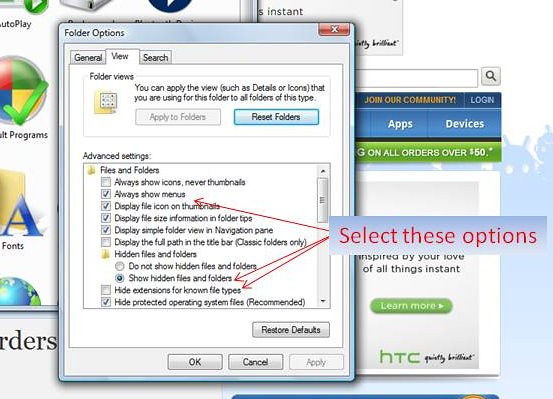
Step 1: Set Always show menus, Un-hide known file types and display hidden files.
  • Click on Start -> Control panel -> Folder Options
  • The Folder properties box will display. Then select the View tab in the properties box.
  • The second option under Files and Folders should be “Always show menus.” Select this box. (Not necessary for XP users)
  • Near the bottom of the options box you will see “Hide extensions for known file types,” if there is a check mark there, uncheck this option.
  • Just above “Hide extensions for known file types there is an option to “Show hidden files and folders.” Select Show Hidden files and folders.
  • Click OK. When we are done, you can go back and put these settings back if you like.
5813075637_cdc603bb58_z.jpg


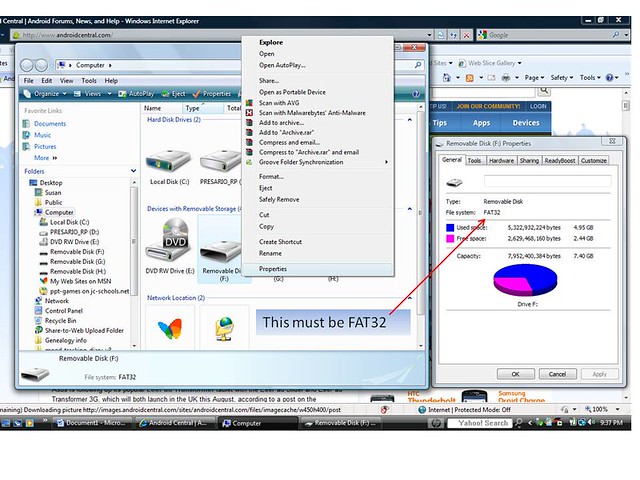
Step 2: Make sure your SD Card is formatted as FAT32.
  • Connect your phone to your PC and choose Disk mode.
  • When your SD card connects as a drive, open My Computer; Right click on the Drive for your SD Card and select Properties.
    5816468317_6d88cb111e_z.jpg
  • A window will pop up that will show you the Format type for the drive. If it says FAT32 you are OK, if not, continue.
  • Right click on your Desktop and create a new directory; name it SDBackup
  • In the My Computer window, open your SD Card directory
  • Click on the Edit menu of the SD Card directory and click “Select all”
  • Click on the Edit menu of the SD Card directory and select Copy. Then minimize the SD Card directory.
  • Open the SDBackup directory you made on the Desktop and click anywhere inside the white file listing area of the box.
  • Click on the Edit menu of the SDBackup Directory and select “Paste.” This will copy the contents of your SD Card to your PC.
  • When the copy is complete, close all open windows.
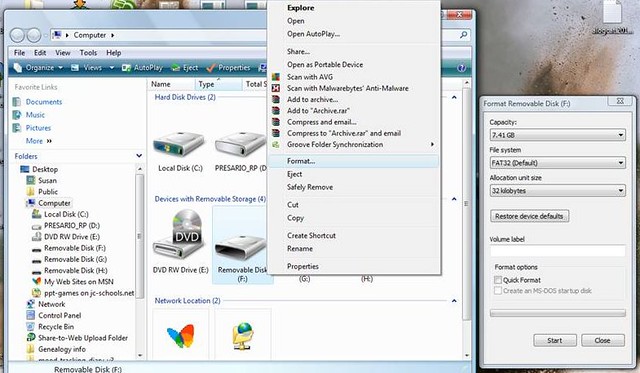
  • Open My Computer and Right click on your SD Card Drive and select “Format.”
    5813181037_99705e1c86_z.jpg

    [WARN]WARNING: This will format your SD Card and will erase all data on the card. Be sure you completed the backup steps above[/WARN]
  • In the Format Removable Disk Property Box, select “FAT32” as the File System.
  • Click Start. You may be prompted with warnings about formatting erasing all data, click OK and continue until the format is complete.
  • Now copy your data from the SDBackup directory on your desktop to your SD Card using the same procedure outlined in steps E –I in reverse.
Step 3: Backup your data
  • Download a file manager program from the market, there are many available and most are free, if you want to copy your data on the phone. Or you can connect your phone to your PC. One of the drives that will appear is your SD Card the other is you Internal Storage. You can use your PC to copy and paste data from one drive to another.
  • Under the /emcc directory you will find a DCIM folder copy the DCIM folder to a picture folder on your SD Card.
  • Copy over any music folders, ringtone folders, video folders or any other miscellaneous data you may have stored on the internal memory to your SD Card. Do not delete them, just copy them.
  • Download an SMS Backup program from the market, one called SMS Backup and Restore by Ritesh Sahu is a free app you can use. Backup to Gmail by cpedia Mobile is another app that will backup you calendar, SMS, MMS and Call log to Gmail, it is $1.99 in the market. SMS Backup + by Jan Berkel is another free app with good reviews.
  • Set up an appbrain.com account and download the appbrain app to your phone from the Market. Appbrain will sync a list of all your installed apps to its server. This way you have a complete listing of all the apps you have installed, not just the paid apps tracked by the market.
  • If you store your contacts locally on the phone rather than with Gmail, go into the People app and select Menu -> Import/Export. Follow the prompts to make a backup of your contacts to your SD Card.
  • If you are paranoid about losing, game data there are several Angry Birds backup programs in the market. For other game apps search and see if there is a backup app available.
  • Write down on a piece of paper what apps and widgets you have on each screen and put it in a safe spot. It's ol'skool but it works! ;)
[WARN]WARNING: Un-rooting and returning your phone to stock as described here will erase all data from your phone. The data on your SD Card will remain untouched. If you do not back up data stored on the phones internal memory it will be lost.[/WARN]
 
Last edited:

PvilleComp

Well-known member
Jun 13, 2010
4,146
603
0
Visit site
Un-rooting using the Phone:
To un-root your phone, download the following file:
HTC Froyo OTA
http://pvillecomp.com/wp/wp-content/uploads/Images/Froyo-Stock-recvery_PB31IMG.zip
MD5: 31BB1611A0FA8197D447C0438426717E

Check the MD5 for the downloaded RUU file. You can download MD5 checker software here:
MD5 Calculator
WinMD5Sum - Free software downloads and software reviews - CNET Downloads
MD5 for Mac - Free software downloads and software reviews - CNET Download.com For Mac.
[WARN]WARNING: Please check the MD5 before flashing the RUU zip. The RUU contains a radio image as well as the ROM. If the MD5 does not match that means you have a corrupt download and if you flash it you will soon have a Brick instead of a phone.[/WARN]
  1. Rename the Froyo OTA from Froyo-Stock-recvery_PB31IMG.zip to PB31IMG.zip
  2. Copy the PB31IMG.zip to the root of the SD Card.
  3. Reboot into HBOOT by turning the phone completely off, then hold down the Power and Down Volume button at the same time to start.
  4. HBOOT will see the PB31IMG.zip file and prompt you for confirmation to install. Press the Power button to select yes.
Once done you will be restored to Factory Stock Froyo with S-OFF.
Reboot and follow the setup procedure to login to google and any other accounts you have like a normal setup.
You are now ready for the Official Verizon OTA update.
[TIP]Be sure to remove the PB31IMG.zip files from the root of your SD Card when you are finished. You don't want these files to accidently install during an HBOOT at a later date.[/TIP]

Un-rooting with the RUU
If you can not seem to get the PB31IMG image to load properly, you can load the Verizon RUU program on your PC. This only works on PC’s, there is no Mac version.

Download the RUU executable file here:
http://pvillecomp.com/wp/wp-content...4k_NV_1.70_PRL58006_release_152016_signed.exe

Connect your Phone to your PC with the USB Cable and double click on the RUU executable you downloaded.

5813791224_5608c19771_z.jpg


On the first screen of the RUU program, you will see a “View ReadMe” button. Press this and read the entire document. Follow the directions exactly and do not deviate from them. I have attached a PDF copy of the document to this post so that you can download and read it in advance.
 
Last edited:

PvilleComp

Well-known member
Jun 13, 2010
4,146
603
0
Visit site
For Stock Users
Users who are running Stock software should follow these procedures to prepare.

Step 1: Backup your data
  • Download a file manager program from the market ? there are many available and most are free. Or you can connect your phone to your PC. One of the drives that will appear is your SD Card the other is you Internal Storage. You can use your PC to copy and paste data from one location to another.
  • Under the /emcc directory you will find a DCIM folder copy the DCIM folder to a picture folder on your SD Card.
  • Copy over any music folders, ringtone folders, video folders or any other miscellaneous data you may have stored on the internal memory to your SD Card. Do not delete them, just copy them.
  • Download an SMS Backup program from the market, one called SMS Backup and Restore by Ritesh Sahu is a free app you can use. Backup to Gmail by cpedia Mobile is another app that will backup you calendar, SMS, MMS and Call log to Gmail, it is $1.99 in the market. SMS Backup + by Jan Berkel is another free app with good reviews.
  • Set up an appbrain.com account and download the appbrain app to your phone from the Market. Appbrain will sync a list of all your installed apps to its server. This way you have a complete listing of all the apps you have installed, not just the paid apps tracked by the market.
  • If you store your contacts locally on the phone rather than with Gmail, go into the People app and select Menu -> Import/Export. Follow the prompts to make a backup of your contacts to your SD Card.
  • If you are paranoid about losing, game data there are several Angry Birds backup programs in the market. For other game apps search and see if there is a backup app available.
  • Go to Menu -> Settings -> Applications -> Manage applications and check your apps to see if any are on the SD card. If you have apps on your SD card move them to the phone before updating, then move them back after the update. The update will "break" apps installed on the SD Card.
  • Write down on a piece of paper what apps and widgets you have on each screen and put it in a safe spot. It's ol'skool but it works! ;)
Step 2: When prompted, accept the OTA and let it install. If you are low on battery you may want to find a charger to make sure you don?t lose power during the download and install.

Step 3: Your done.

[INFO]So why Step 1? Though Verizon and HTC have done everything they can to insure that the OTA will go smoothly, history has shown that sometimes a factory reset needs to be done after the OTA. Long story short ? it?s worth a few minutes of preparation before the OTA to make sure you are ready to do a factory reset then to start scrambling when your phone is not behaving correctly.[/INFO]
 
Last edited:

davidnc

Super Moderator
Moderator
Jun 8, 2010
8,905
517
113
Visit site
Yup Im not giving up root to get the official OTA Gingerbread either . Im rooted forever lol not looking back to unrooting thats forsure :cool:
 

rpz3.14

Well-known member
Nov 16, 2010
312
48
0
Visit site
I'm firmly in the "staying rooted" camp. I love Cyanogenmod too much to give it up, and even if I did want gingersense I would use a gingersense ROM with Sense 2 and no bloatwere instead of the official OTA.

Yea, that's the way I'm leaning, too. The only thing that sways me is the new radio. I have drawn a mental line at flashing radios, for whatever reason, and with them officially updating it for GB, I'd be tempted to take the update and try to get root back after.
 

zero neck

The Ever-Living
Jan 13, 2011
3,127
1,386
0
Visit site
Yea, that's the way I'm leaning, too. The only thing that sways me is the new radio. I have drawn a mental line at flashing radios, for whatever reason, and with them officially updating it for GB, I'd be tempted to take the update and try to get root back after.

I never flashed a radio until i got this thunderbolt, and since then i've flashed numerous radios. It's really not that scary as long as you calculate the checksum on your phone and make sure it's the right file etc.

I wouldnt take the ota for the dinc, but my dinc is deactivated so i dont think it will recieve the update anyway.
 

skaterboy13

Active member
Apr 11, 2011
28
0
0
Visit site
Re: [GUIDE] Preparing your HTC Droid Incredible for the Gingerbre

mine i am on inc rom 1.6 and i have the leaked gb radio 2.15.10.05.06
stock kernel wat do i do when will i need to be in htc sync mode
 

skaterboy13

Active member
Apr 11, 2011
28
0
0
Visit site
Re: [GUIDE] Preparing your HTC Droid Incredible for the Gingerbre

it gives me a usb error when its loading the bootloader wats next very new to unrooting
 

skaterboy13

Active member
Apr 11, 2011
28
0
0
Visit site
Re: [GUIDE] Preparing your HTC Droid Incredible for the Gingerbre

:)hey will flashing the thing i have hboot 0.92 if i flash the same thing will it brick my phone

specs leaked GB inc radio
rom incrom 1.6
kernel stock that came with the rom
please get back to me would be greatful will make me less scared to unroot my phone
 

Forum statistics

Threads
943,144
Messages
6,917,507
Members
3,158,841
Latest member
kirk781