
Introduction
Greetings and thank you for checking out my guide for the Galaxy Note 2 camera! This guide is targeted for beginner-to-intermediate level of experience with smartphone cameras and it will help you understand the limitations and the best possible ways to use your device. For this guide I will be focusing on the stock Samsung camera application, so even though most of the concepts can be applied to other camera applications, expect certain settings to vary between apps. I will be breaking down different topics on the important aspects to digital photography into laymen's terms and side-by-side comparison photos to show you not only what these settings mean by definition but also the impact they have on your photographs. So let's begin!
Part 1: Hardware
The Galaxy Note 2 camera uses the same sensor as the one found in the Galaxy S3, so expect images to be comparable between the two devices. We all know it is an 8MP camera, but I'm going to discuss some other important hardware related details that you might not know about the camera.
Aperture - The aperture of a camera is essentially the same as our eyes' pupil. It opens to let light in and closes to darken. Unfortunately the apertures on all or nearly all smartphone cameras are fixed. This means that we cannot work with this setting to adjust how exposed our photos are, we must look elsewhere. Our camera is fixed at f-2.6 which won't mean much to a beginner, but it has implications on our focus length and depth of field.

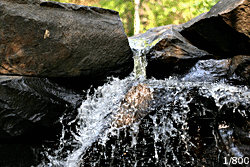
Shutter Speed - Shutter speed is an automated setting (on smartphone cameras) that determines how long the camera should be taking in light when you snap a picture. The longer the shutter is open, the brighter your image can get without bringing in any noise. However you open yourself up to the problem of motion blur. Long exposures require more than just steady hands, you will ideally need to have the camera fixed to a sturdy object if not a tripod than a piece of furniture or a wall etc. For fast motion photography you will need to use faster shutter speeds in order to avoid any blurring, but this limits our ability to properly expose our photos. Typical shutter speeds look like this: 1/2, 1/3, 1/15, 1/30, 1/60, 1/200 etc etc all the way up to around 1/1500. Take 1/30 for example, this means that for 1 30th of a second (or 0.0333 seconds) the shutter is open. If there is any motion in this time period, you will have blurring. This also means that you have less time to bring light into the sensor. The only way to make up for this is either through ISO adjustments, or by increasing the lighting of your scene.
Here's an example from Wikipedia on how shutter speed affects the blurriness of a photo. Please note the shutter speed at the bottom right corner:
ISO - ISO is the devil of digital photography. It can be used to boost the exposure of a photograph without requiring slow shutter speeds but it comes at a great cost: noise. The higher the number ISO setting you use, the more noise you can expect in your pictures. The goal is to have the minimum ISO you can while maintaining a proper level of exposure. This is where things get difficult as you are already down one setting (aperture) and must deal with increased shutter speeds to compromise for a properly exposed image, else face the wrath of the ugly ISO noise! ISO is almost always the reason behind low-light photo's looking generally poor.
In this image you can clearly see the difference in noise that higher ISO setting's bring into your photo:

So, now that you have a basic understanding of what these aspects of your camera are and what they mean to you, let's move on to the next topic.
Part 2: Software
The stock Samsung camera application that is pre-installed on your Galaxy Note 2 is powerful and capable of producing some excellent photos, even for a smartphone camera. It offers many different settings and shoot modes to help you get the best picture possible at any given moment. Most people are comfortable just leaving everything set to Auto and let the phone do the work, but unfortunately this often doesn't deliver the greatest results when compared to using the proper mode and setting for your situation. So for this part I am going to talk about some of the more important settings and modes and give my own personal comparison photos taken with my Galaxy Note 2.
None(Auto) - Not much to say here except that Auto settings should only be used in the most well lit scenes possible. For pretty much every single specific camera mode I feature in this guide, I will include a picture taken at the same time using Auto mode to compare and help you better understand why it's important to choose the right setting for the right moment.
Night - This setting can be found at the very bottom of the scene menu, and it will generally give you the best possible low-lighting shots this camera is capable of producing. The trick is it forces the camera to use extremely long exposure times, and this comes with a cost. You must keep the camera absolutely steady for up to half a second to get a properly detailed photo, and also there must be no motion in your scene. This is ideal for taking photos of architecture, family photos where everyone is still looking at the camera, and other no-motion settings. Typical shutter speeds for this mode are 1/2 and 1/3 but they will always produce photos with significantly lower ISO than if you used Auto scene mode.
Left is Auto mode, right is Night mode:


Pay particularly close attention to the noise present in the left image, and how smooth and bright the right image is.
HDR - A lot of people use HDR mode thinking it will just always give them an "HD" shot, not fully aware of what it does and when they should and should not use it. Well after reading this, you will know exactly when and how to use this excellent mode. HDR photos are photos that have a broad range of lighting, while maintaining good contrast levels across the whole image. An example of when to use HDR mode: you are capturing a sunset over a beautiful forest, the sun and sky are extremely bright and the ground is extremely dark. This is the ideal time to use HDR mode. The sky will be darkened and the ground will be brightened, leveling out the contrast making the image more pleasant to the eye and it will expose more details in areas that were either under or overexposed.
Please excuse my messy room (Christmas time is always a mess lol) but on the left side I used Auto, on the right I used HDR:


This is a dramatic difference. The left image is mostly underexposed. This is due to the extreme light difference of the bright window, and dark interior. Now on the right using HDR mode, the photo is leveled out. We can see significantly more detail inside the room, as well as through the window itself. This is the ideal place to use HDR mode. Do not use it for scenes where lighting is even and the contrast levels are balanced.
Metering Mode - Metering mode is a setting that tells the camera how to determine the best way to expose a photo. There are 3 modes available: Matrix, Center-weighted and Spot. In Matrix mode the camera is going to target various points around the image and average them out to come to the best possible exposure for the whole scene. This mode is my personal favorite and the one I recommend most of the time. The next mode is Center-weighted which essentially uses the middle of the picture as the exposure calculation point then expands outwards just slightly to affect the overall outcome. This mode will generally have slight overexposure when the target in the center of the shot is darker in color or lighting then other parts of the photo which are not directly in the center. The last mode is Spot, this mode takes the exposure calculations from a very small area in the center of the screen. This mode will have similar results to Center-weighted but expect the overexposure to be even worse.
Matrix:

Center-wieghted:

Spot:

The subject is my computers black case so in comparison to the white walls it would require higher exposure to lighten it up properly. When using Matrix mode for determining exposure we can see that it uses the white walls as a calculation point and this balances out the image to be overall a bit darker but much better to look at. In Center-weighted we can see the overexposure beginning and the walls become too bright to really make anything out, the PC also begins to show signs of washout and just doesn't look proper. In Spot mode the overexposure is completely out of control and the image is unusable. I strongly recommend using Matrix mode for nearly all photography as it typically yields the best results. However do not neglect the other modes as there will be times, depending on the scene, where using the other modes will yield better results.
I will continue to explore and investigate other default shooting modes to determine their significance, but for now these are the most important that I've discovered that will help you take better photos using your Galaxy Note 2.
Part 3: General tips
The following are general photography tips that can be applied to any camera to help you take better photos.
1. Always clean your camera lens with a microfiber cloth before shooting. Smudges will have noticeable impact on fuzziness and blur.
2. Use anything possible to hold your camera steady. Brace the camera against your own body or against a solid object to keep still.
3. Choose scenes with the most light possible. The darker the scenery, the more difficult it will be to properly capture a photo.
4. Always remember this is a smartphone camera! Do not expect miracles, but if you follow this guides tips and practice good photography skills you can and will take amazing photos right from your phone!
I hope this guide has been helpful to you, and I look forward to seeing whatever excellent shots you folks take! I will be updating the guide with more information as it comes to me. Thank you for reading!
Greetings and thank you for checking out my guide for the Galaxy Note 2 camera! This guide is targeted for beginner-to-intermediate level of experience with smartphone cameras and it will help you understand the limitations and the best possible ways to use your device. For this guide I will be focusing on the stock Samsung camera application, so even though most of the concepts can be applied to other camera applications, expect certain settings to vary between apps. I will be breaking down different topics on the important aspects to digital photography into laymen's terms and side-by-side comparison photos to show you not only what these settings mean by definition but also the impact they have on your photographs. So let's begin!
Part 1: Hardware
The Galaxy Note 2 camera uses the same sensor as the one found in the Galaxy S3, so expect images to be comparable between the two devices. We all know it is an 8MP camera, but I'm going to discuss some other important hardware related details that you might not know about the camera.
Aperture - The aperture of a camera is essentially the same as our eyes' pupil. It opens to let light in and closes to darken. Unfortunately the apertures on all or nearly all smartphone cameras are fixed. This means that we cannot work with this setting to adjust how exposed our photos are, we must look elsewhere. Our camera is fixed at f-2.6 which won't mean much to a beginner, but it has implications on our focus length and depth of field.
Shutter Speed - Shutter speed is an automated setting (on smartphone cameras) that determines how long the camera should be taking in light when you snap a picture. The longer the shutter is open, the brighter your image can get without bringing in any noise. However you open yourself up to the problem of motion blur. Long exposures require more than just steady hands, you will ideally need to have the camera fixed to a sturdy object if not a tripod than a piece of furniture or a wall etc. For fast motion photography you will need to use faster shutter speeds in order to avoid any blurring, but this limits our ability to properly expose our photos. Typical shutter speeds look like this: 1/2, 1/3, 1/15, 1/30, 1/60, 1/200 etc etc all the way up to around 1/1500. Take 1/30 for example, this means that for 1 30th of a second (or 0.0333 seconds) the shutter is open. If there is any motion in this time period, you will have blurring. This also means that you have less time to bring light into the sensor. The only way to make up for this is either through ISO adjustments, or by increasing the lighting of your scene.
Here's an example from Wikipedia on how shutter speed affects the blurriness of a photo. Please note the shutter speed at the bottom right corner:
ISO - ISO is the devil of digital photography. It can be used to boost the exposure of a photograph without requiring slow shutter speeds but it comes at a great cost: noise. The higher the number ISO setting you use, the more noise you can expect in your pictures. The goal is to have the minimum ISO you can while maintaining a proper level of exposure. This is where things get difficult as you are already down one setting (aperture) and must deal with increased shutter speeds to compromise for a properly exposed image, else face the wrath of the ugly ISO noise! ISO is almost always the reason behind low-light photo's looking generally poor.
In this image you can clearly see the difference in noise that higher ISO setting's bring into your photo:
So, now that you have a basic understanding of what these aspects of your camera are and what they mean to you, let's move on to the next topic.
Part 2: Software
The stock Samsung camera application that is pre-installed on your Galaxy Note 2 is powerful and capable of producing some excellent photos, even for a smartphone camera. It offers many different settings and shoot modes to help you get the best picture possible at any given moment. Most people are comfortable just leaving everything set to Auto and let the phone do the work, but unfortunately this often doesn't deliver the greatest results when compared to using the proper mode and setting for your situation. So for this part I am going to talk about some of the more important settings and modes and give my own personal comparison photos taken with my Galaxy Note 2.
None(Auto) - Not much to say here except that Auto settings should only be used in the most well lit scenes possible. For pretty much every single specific camera mode I feature in this guide, I will include a picture taken at the same time using Auto mode to compare and help you better understand why it's important to choose the right setting for the right moment.
Night - This setting can be found at the very bottom of the scene menu, and it will generally give you the best possible low-lighting shots this camera is capable of producing. The trick is it forces the camera to use extremely long exposure times, and this comes with a cost. You must keep the camera absolutely steady for up to half a second to get a properly detailed photo, and also there must be no motion in your scene. This is ideal for taking photos of architecture, family photos where everyone is still looking at the camera, and other no-motion settings. Typical shutter speeds for this mode are 1/2 and 1/3 but they will always produce photos with significantly lower ISO than if you used Auto scene mode.
Left is Auto mode, right is Night mode:
Pay particularly close attention to the noise present in the left image, and how smooth and bright the right image is.
HDR - A lot of people use HDR mode thinking it will just always give them an "HD" shot, not fully aware of what it does and when they should and should not use it. Well after reading this, you will know exactly when and how to use this excellent mode. HDR photos are photos that have a broad range of lighting, while maintaining good contrast levels across the whole image. An example of when to use HDR mode: you are capturing a sunset over a beautiful forest, the sun and sky are extremely bright and the ground is extremely dark. This is the ideal time to use HDR mode. The sky will be darkened and the ground will be brightened, leveling out the contrast making the image more pleasant to the eye and it will expose more details in areas that were either under or overexposed.
Please excuse my messy room (Christmas time is always a mess lol) but on the left side I used Auto, on the right I used HDR:
This is a dramatic difference. The left image is mostly underexposed. This is due to the extreme light difference of the bright window, and dark interior. Now on the right using HDR mode, the photo is leveled out. We can see significantly more detail inside the room, as well as through the window itself. This is the ideal place to use HDR mode. Do not use it for scenes where lighting is even and the contrast levels are balanced.
Metering Mode - Metering mode is a setting that tells the camera how to determine the best way to expose a photo. There are 3 modes available: Matrix, Center-weighted and Spot. In Matrix mode the camera is going to target various points around the image and average them out to come to the best possible exposure for the whole scene. This mode is my personal favorite and the one I recommend most of the time. The next mode is Center-weighted which essentially uses the middle of the picture as the exposure calculation point then expands outwards just slightly to affect the overall outcome. This mode will generally have slight overexposure when the target in the center of the shot is darker in color or lighting then other parts of the photo which are not directly in the center. The last mode is Spot, this mode takes the exposure calculations from a very small area in the center of the screen. This mode will have similar results to Center-weighted but expect the overexposure to be even worse.
Matrix:
Center-wieghted:
Spot:
The subject is my computers black case so in comparison to the white walls it would require higher exposure to lighten it up properly. When using Matrix mode for determining exposure we can see that it uses the white walls as a calculation point and this balances out the image to be overall a bit darker but much better to look at. In Center-weighted we can see the overexposure beginning and the walls become too bright to really make anything out, the PC also begins to show signs of washout and just doesn't look proper. In Spot mode the overexposure is completely out of control and the image is unusable. I strongly recommend using Matrix mode for nearly all photography as it typically yields the best results. However do not neglect the other modes as there will be times, depending on the scene, where using the other modes will yield better results.
I will continue to explore and investigate other default shooting modes to determine their significance, but for now these are the most important that I've discovered that will help you take better photos using your Galaxy Note 2.
Part 3: General tips
The following are general photography tips that can be applied to any camera to help you take better photos.
1. Always clean your camera lens with a microfiber cloth before shooting. Smudges will have noticeable impact on fuzziness and blur.
2. Use anything possible to hold your camera steady. Brace the camera against your own body or against a solid object to keep still.
3. Choose scenes with the most light possible. The darker the scenery, the more difficult it will be to properly capture a photo.
4. Always remember this is a smartphone camera! Do not expect miracles, but if you follow this guides tips and practice good photography skills you can and will take amazing photos right from your phone!
I hope this guide has been helpful to you, and I look forward to seeing whatever excellent shots you folks take! I will be updating the guide with more information as it comes to me. Thank you for reading!
Last edited:
")