- Nov 8, 2011
- 1,512
- 168
- 0
Many people want to root,flash roms, and do other stuff, but are afraid to do it. There is a wealth of information out there and sometimes people just need a little push. This thread will have many different sections, explaining what is what, and what to do. If you can follow directions, then this should be a breeze for you.
This forum has some good topics here
RAZR Rooting, ROMs, and Hacks - Android Forums at AndroidCentral.com
And there are a ton of people here that are more than willing to help those who have read, searched, and ask in a mature manner. no credit for this goes to me, it all goes to the guys over at DroidRzr.com,
XDA Developers, and some of our own community.
Rooting is basically gaining root access to the system files of your device, and unlocking the Superuser ability to make changes otherwise blocked by being unrooted. rooting itself does not change anything, other than allowing you to have access. With Root access you can back up your apps and settings, freeze bloatware, tweak your CPU, install custom ROMs, and a whole lot more.
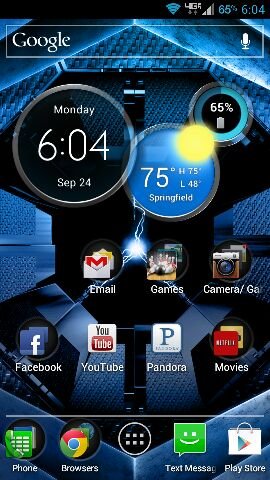
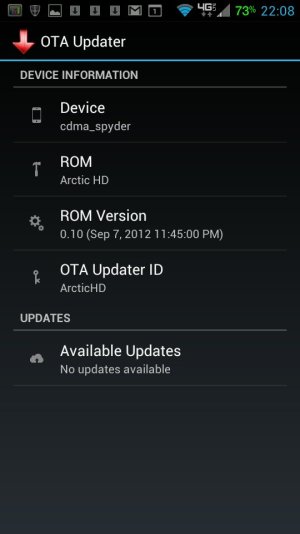
A custom "ROM" is basically a skinned version of Android that a developer has tweaked to his liking. some ROMs give overclocking abilities built into them. some even have early access software that hasnt been released to your phone yet. as in Arctic Hd, which has the Circles Widget built into it, just like on the new Razrs about to be released.
1. make sure your Drivers are up to date. The top two links are the drivers, 32 bit or 64 bit. Download whatever one you need for your operating system.
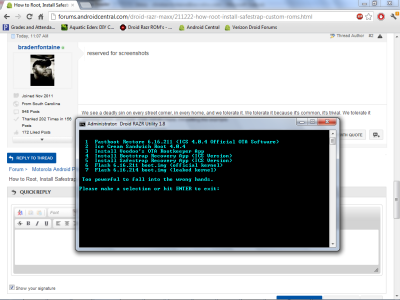
2. Download Matt?s Razr Utility 1.82 HERE and dont forget to buy him a beer.
Matt?s Utility, as I?ll call it from here on out, is a very powerful, and multifunctional tool.
Upon downloading to your PC, you will want to unzip the file to a folder. I recommend creating a new folder and just keeping these files in that folder. Once unzipped, navigate to that folder and find the .bat file named DroidRAZRUtility. Put a shortcut to this on your desktop if you?d like.
Keep this utility in a safe place, it will be your best friend from here on out.


1) If you ever brick your phone, or need to ship it back to Verizon, you will need to do this option. This will remove root, and put your phone back to the way it was when you first took it out of its pretty black box. To do this option, you will have to put your phone into AP Fastboot mode. It sounds scary, but it is not. AP Fastboot is the stock recovery program that is built deep inside by Motorola. Turn off your phone.
Press and hold the following buttons at the same time until the screen turns on
1. volume down
2.volume up
3.power
Press Volume down until you reach the AP fastboot in the list
Press Volume up to select.

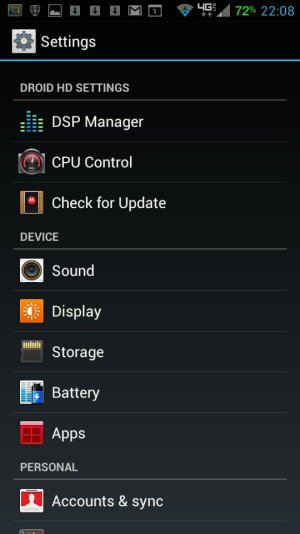
2) The Goods, this option is to root your Razr. Follow the onscreen prompts. Very simple and straight forward. You will have to have USB Debugging turned on. To do that, on your phone, go to System Settings. All the way at the bottom is Developer options. Check the box for USB Debugging.
3) Just an app to keep your root if you ever get pushed an update from Verizon.
4) Install safestrap. It just puts the app on your phone. You have to actually go into the app in your app drawer and install the recovery from there.
UPDATE: Some of you have been asking about Safestrap 3.0, it is still in beta phase. Once it has been released from beta, we will update this post with links. If you are feeling brave and have no concern for your phones safety, you can download it Here but be warned. If you mess anything up, do not and i repeat DO NOT COMPLAIN TO HASH, he will not respond. the most important thing you can do is read read read.
Download to your sd card, use a file exploer like ES FIle explorer to navigate to the file, install it, then open it and hit the install recovery button.
1. Go get your self a custom ROM. Droid Razr ROMs - DroidRzr.com
2. Download one of your choice and put it on your EXTERNAL SD CARD. I recommend creating a folder and naming it ROMs so it is easy to find.
3. Reboot your phone.
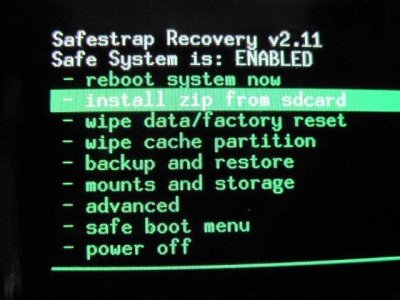
you will be prompted to hit either the menu key for safestrap recovery, or the search key to boot normally.
4. Lets hit the menu key.
Now at the top you should notice that it says safe system is off. We are going to turn it on.
But first, lets create a back up of our current system
5.Now that you have your current system backed up, lets install a custom ROM. Im going to plug Arctic HD ( Arctic HD) because it is very similar to our stock system and runs quite well. Each ROM will have its own set of instructions on how to install, so follow them closely.
Make sure you have the ROM you want to install on your SD card BEFORE you switch to safe side. If you switch to safe side with out installing a ROM, your phone will not boot up it will just go to a black screen.
6. Navigate to Safe Boot Menu.
DO NOT use the fast toggle, it will skip the backup of your current system and you wont be able to restore it if something happens
7. Select Toggle safe system
8. Select Yes- Enable safe system, let it do its thing.
1) Wipe Data.
2) Wipe Cache.
3) Advanced -> Wipe Dalvik Cache (you will get an error message, all is normal)
4) Mounts and storage -> Format /system
5) Install the zip you downloaded and placed on your SD card
6) After first boot (which can sometimes take upwards of 10 minutes), reboot your device for best results.
7) Enjoy!

if i have made anything unclear or hard to understand/follow please do no hesitate to let me know, i will make any changes anyone sees fit. i will try to keep this up to date as changes are made.
this could not have been possible without the help from carracerz14 and everyone else on this forum.
all credit of layout and design goes to carracerz14
If I help you in anyway remember to hit that thanks button.
Also if you find an interesting rom setup, feel free to post links, screen shots, and experiences for the rest of us.
We are NOT responsible if you brick your device.
You should read this entire guide before attempting any of the following.
You should read this entire guide before attempting any of the following.
This forum has some good topics here
RAZR Rooting, ROMs, and Hacks - Android Forums at AndroidCentral.com
And there are a ton of people here that are more than willing to help those who have read, searched, and ask in a mature manner. no credit for this goes to me, it all goes to the guys over at DroidRzr.com,
XDA Developers, and some of our own community.
What is Root?
Rooting is basically gaining root access to the system files of your device, and unlocking the Superuser ability to make changes otherwise blocked by being unrooted. rooting itself does not change anything, other than allowing you to have access. With Root access you can back up your apps and settings, freeze bloatware, tweak your CPU, install custom ROMs, and a whole lot more.
What is a ROM?
A custom "ROM" is basically a skinned version of Android that a developer has tweaked to his liking. some ROMs give overclocking abilities built into them. some even have early access software that hasnt been released to your phone yet. as in Arctic Hd, which has the Circles Widget built into it, just like on the new Razrs about to be released.
First steps
1. make sure your Drivers are up to date. The top two links are the drivers, 32 bit or 64 bit. Download whatever one you need for your operating system.
2. Download Matt?s Razr Utility 1.82 HERE and dont forget to buy him a beer.
Matt?s Utility, as I?ll call it from here on out, is a very powerful, and multifunctional tool.
Upon downloading to your PC, you will want to unzip the file to a folder. I recommend creating a new folder and just keeping these files in that folder. Once unzipped, navigate to that folder and find the .bat file named DroidRAZRUtility. Put a shortcut to this on your desktop if you?d like.
Keep this utility in a safe place, it will be your best friend from here on out.
1) If you ever brick your phone, or need to ship it back to Verizon, you will need to do this option. This will remove root, and put your phone back to the way it was when you first took it out of its pretty black box. To do this option, you will have to put your phone into AP Fastboot mode. It sounds scary, but it is not. AP Fastboot is the stock recovery program that is built deep inside by Motorola. Turn off your phone.
Press and hold the following buttons at the same time until the screen turns on
1. volume down
2.volume up
3.power
Press Volume down until you reach the AP fastboot in the list
Press Volume up to select.
2) The Goods, this option is to root your Razr. Follow the onscreen prompts. Very simple and straight forward. You will have to have USB Debugging turned on. To do that, on your phone, go to System Settings. All the way at the bottom is Developer options. Check the box for USB Debugging.
3) Just an app to keep your root if you ever get pushed an update from Verizon.
4) Install safestrap. It just puts the app on your phone. You have to actually go into the app in your app drawer and install the recovery from there.
UPDATE: Some of you have been asking about Safestrap 3.0, it is still in beta phase. Once it has been released from beta, we will update this post with links. If you are feeling brave and have no concern for your phones safety, you can download it Here but be warned. If you mess anything up, do not and i repeat DO NOT COMPLAIN TO HASH, he will not respond. the most important thing you can do is read read read.
Download to your sd card, use a file exploer like ES FIle explorer to navigate to the file, install it, then open it and hit the install recovery button.
Installing a custom ROM
1. Go get your self a custom ROM. Droid Razr ROMs - DroidRzr.com
2. Download one of your choice and put it on your EXTERNAL SD CARD. I recommend creating a folder and naming it ROMs so it is easy to find.
3. Reboot your phone.
you will be prompted to hit either the menu key for safestrap recovery, or the search key to boot normally.
4. Lets hit the menu key.
Now at the top you should notice that it says safe system is off. We are going to turn it on.
But first, lets create a back up of our current system
1. Use the volume keys to scroll down to the backup and restore line,use power to select
2. Hit backup
3. choose external SD card
4. Hit yes for the next two screens and the backup will begin. It will take 10-15 mins to complete
2. Hit backup
3. choose external SD card
4. Hit yes for the next two screens and the backup will begin. It will take 10-15 mins to complete
5.Now that you have your current system backed up, lets install a custom ROM. Im going to plug Arctic HD ( Arctic HD) because it is very similar to our stock system and runs quite well. Each ROM will have its own set of instructions on how to install, so follow them closely.
Make sure you have the ROM you want to install on your SD card BEFORE you switch to safe side. If you switch to safe side with out installing a ROM, your phone will not boot up it will just go to a black screen.
6. Navigate to Safe Boot Menu.
DO NOT use the fast toggle, it will skip the backup of your current system and you wont be able to restore it if something happens
7. Select Toggle safe system
8. Select Yes- Enable safe system, let it do its thing.
Installing the ROM
Return back to the main screen of safestrap1) Wipe Data.
2) Wipe Cache.
3) Advanced -> Wipe Dalvik Cache (you will get an error message, all is normal)
4) Mounts and storage -> Format /system
5) Install the zip you downloaded and placed on your SD card
6) After first boot (which can sometimes take upwards of 10 minutes), reboot your device for best results.
7) Enjoy!
if i have made anything unclear or hard to understand/follow please do no hesitate to let me know, i will make any changes anyone sees fit. i will try to keep this up to date as changes are made.
this could not have been possible without the help from carracerz14 and everyone else on this forum.
all credit of layout and design goes to carracerz14
If I help you in anyway remember to hit that thanks button.
Also if you find an interesting rom setup, feel free to post links, screen shots, and experiences for the rest of us.
Attachments
Last edited:
 :thumbup:
")
") .
.


 Twitter