
I know some of you were disappointed when the apps thread was removed. I am also aware that some of you may not want to root your devices, but you do want the ability to add apps to the multi-window.
This post is meant to assist users with modifying an apk file for use with the Multi-window feature on the Galaxy Note II.
Root is not needed.
Credit goes to the folks over in the Galaxy Note 10.1 forums.
ianbbaa
JustFlesh
Leppin
[Tutorial] Add additional apps to Multi Window without needing root [Verizon] - xda-developers
Special thanks also goes to our very own DroidXcon who was extremely patient and helpful in making the original apps thread, and who also asked me to put this together for all of you.
The first section describes how to modify the apps using the apk multi-tool.
The second section describes how to modify the apps manually from the command prompt using the files from the apk multi-tool.
This will not work with all apps, some will not recompile.
What you'll need.
1. apk multi tool - APK-Multi-Tool Windows Version 1.0.10
2. Java - http://javadl.sun.com/webapps/download/AutoDL?BundleId=69485
3. A zip program - Download
4. A file explorer - https://forums.androidcentral.com/e...com.estrongs.android.pop&hl=en&token=SX8W5noF
You may receive a java not found error when running the script the first time. If you have correctly installed java the error means you will have put java in your path.
Setting Path on Windows.
Ex: C:\Program Files\Java\jdk1.7.0_02\bin
Windows 7
1. Select Computer from the Start menu
2. Choose System Properties from the context menu
3. Click Advanced system settings > Advanced tab
4. Click on Environment Variables, under System Variables, find PATH, and click on it.
5. In the Edit windows, modify PATH by adding the location of the class to the value for PATH. If you do not have the item PATH, you may select to add a new variable and add PATH as the name and the location of the class as the value.
6. Reopen Command prompt window, and run your java code.
Windows XP
1. Start -> Control Panel -> System -> Advanced
2. Click on Environment Variables, under System Variables, find PATH, and click on it.
3. In the Edit windows, modify PATH by adding the location of the class to the value for PATH. If you do not have the item PATH, you may select to add a new variable and add PATH as the name and the location of the class as the value.
4. Close the window.
5. Reopen Command prompt window, and run your java code.
Windows Vista
1. Right click My Computer icon
2. Choose Properties from the context menu
3. Click Advanced tab (Advanced system settings link in Vista)
4. In the Edit windows, modify PATH by adding the location of the class to the value for PATH. If you do not have the item PATH, you may select to add a new variable and add PATH as the name and the location of the class as the value.
5. Reopen Command prompt window, and run your java code.
Section 1 - Script method.
Put the apk tool zip file onto your desktop. Right click on the zip file, choose the zip program, and extract to "apk-multi-toolv1.0.10".
It will create the folder apk-multi-toolv1.0.10 on your desktop.
Using explorer, go into the apk-multi-toolv1.0.10 folder, double click the setup command and choose option 3 to setup directories.
After the folders have been created, type 00 to quit the setup program.

Before you can edit an app you have to get the apk file from the app. You can do this on your device with ES file explorer.
Launch ES file explorer, hit menu - manager - app manager. Press and hold the app you want and select backup. There will be a short message stating the location of the backup.


Transfer the apk file to your PC using your preferred method.
Place the apk file in the folder "place-apk-here-for modding" folder which is inside the folder that you created on your desktop.

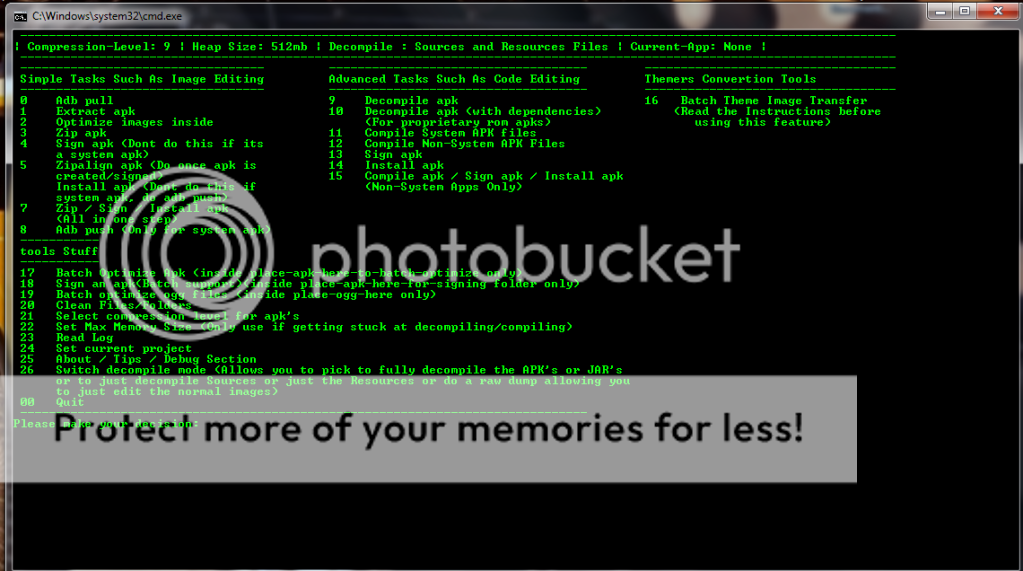
Double click "script" and press any key to continue.
Choose option 9 to decompile the apk file. (If the screen immediately closes skip to the manual section of this document).
When the decompile finishes, type 00 and press enter, or press the control key and c together, then answer Y and hit enter.
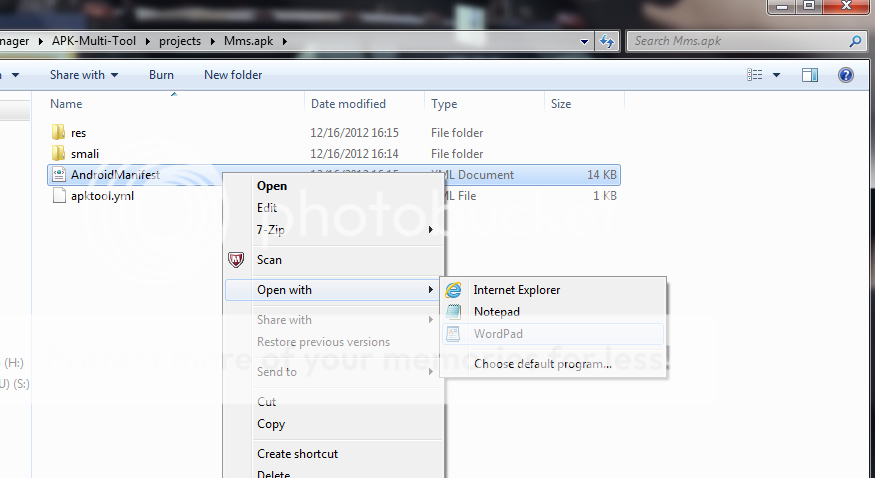
Using windows explorer, go into the "projects" folder, then into the folder of the app you decompiled.
Right click on AndroidManifest, choose open with, choose wordpad.
Select find. In the find what box type "category.launcher".
Add the following underneath the category.launcher line.You can simply Cut and paste the code from the box below.

Search for /application.
Add the following lines BEFORE the /application line.You can simply Cut and paste the code from the box below.

Save the document. If you get the popup about the format, click yes, close the document.
Launch the script again, this time choose option 15, and press enter. Press the control key and c together, and answer y.

Press the control, alt, and delete keys together, choose start task manager, select adb.exe, select end process.

Go into the "place-apk-here-for-modding" folder.
Transfer the signed apk file to your device. Using a file explorer, navigate to the location of the signed apk file, tap the file and install.
Section 2 - Manual method.
Move the apk file to the "other" folder which you'll as a sub folder in the "apk-multi-toolv1.0.10" folder you created on your desktop.
Start the command line on your PC.

cd desktop\apk-multi-toolv1.0.10\apk-multi-tool\other
List the contents of the folder by typing dir
You should see the apk file you placed in this folder as well as the executables installed with you extracted the zip file.
In this example I will use the name mms.apk, you of course will use the name of the apk file you're modifying. If the file name has spaces you will need to put the file name in double quotes. Example: "mms 2.apk"
To decompile the apk type:
apktool d -s --no-src mms.apk (mms is the file name used in this example).
When the app has been decompiled it will look like the following:
I: Copying raw classes.dex file...
I: Loading resource table...
I: Loaded.
I: Decoding AndroidManifest.xml with resources...
I: Loading resource table from file: C:\Users\js\apktool\framework\1.apk
I: Loaded.
I: Decoding file-resources...
I: Decoding values */* XMLs...
I: Done.
I: Copying assets and libs...
You will now have a folder with the named mms (mms is the apk file used in this example) inside "desktop\apk-multi-toolv1.0.10\apk-multi-tool\other".
Now you can perform the same steps as above to modify the xml file.
After saving the xml file, go back to the command line and recompile the apk by typing the following:
apktool b mms (mms is just the example used here).
If the app compiles successfully you will see the following:
I: Copying classes.dex file...
I: Checking whether resources has changed...
I: Building resources...
I: Building apk file...
If the app does not recompile successfully this app cannot be used.
After successfully compiling the app, you now have to sign the apk file in order to install it onto your device.
The apk you'll need to sign is located in the "desktop\apk-multi-toolv1.0.10\apk-multi-tool\other\mms\dist" folder. mms is only the file name used in this example.
You can move this file up to the "other" folder.
To sign the apk file, type the following:
java -jar SignApk.jar -w testkey.x509.pem testkey.pk8 "mms.apk" signed.mms.apk (mms is only the file name used in this example).
You should now have a properly signed apk modified to work with multi-view.
You can now transfer the signed_.apk file to your device to be installed. The previous version of the app must be uninstalled first.
This post is meant to assist users with modifying an apk file for use with the Multi-window feature on the Galaxy Note II.
Root is not needed.
Credit goes to the folks over in the Galaxy Note 10.1 forums.
ianbbaa
JustFlesh
Leppin
[Tutorial] Add additional apps to Multi Window without needing root [Verizon] - xda-developers
Special thanks also goes to our very own DroidXcon who was extremely patient and helpful in making the original apps thread, and who also asked me to put this together for all of you.
The first section describes how to modify the apps using the apk multi-tool.
The second section describes how to modify the apps manually from the command prompt using the files from the apk multi-tool.
This will not work with all apps, some will not recompile.
What you'll need.
1. apk multi tool - APK-Multi-Tool Windows Version 1.0.10
2. Java - http://javadl.sun.com/webapps/download/AutoDL?BundleId=69485
3. A zip program - Download
4. A file explorer - https://forums.androidcentral.com/e...com.estrongs.android.pop&hl=en&token=SX8W5noF
You may receive a java not found error when running the script the first time. If you have correctly installed java the error means you will have put java in your path.
Setting Path on Windows.
Ex: C:\Program Files\Java\jdk1.7.0_02\bin
Windows 7
1. Select Computer from the Start menu
2. Choose System Properties from the context menu
3. Click Advanced system settings > Advanced tab
4. Click on Environment Variables, under System Variables, find PATH, and click on it.
5. In the Edit windows, modify PATH by adding the location of the class to the value for PATH. If you do not have the item PATH, you may select to add a new variable and add PATH as the name and the location of the class as the value.
6. Reopen Command prompt window, and run your java code.
Windows XP
1. Start -> Control Panel -> System -> Advanced
2. Click on Environment Variables, under System Variables, find PATH, and click on it.
3. In the Edit windows, modify PATH by adding the location of the class to the value for PATH. If you do not have the item PATH, you may select to add a new variable and add PATH as the name and the location of the class as the value.
4. Close the window.
5. Reopen Command prompt window, and run your java code.
Windows Vista
1. Right click My Computer icon
2. Choose Properties from the context menu
3. Click Advanced tab (Advanced system settings link in Vista)
4. In the Edit windows, modify PATH by adding the location of the class to the value for PATH. If you do not have the item PATH, you may select to add a new variable and add PATH as the name and the location of the class as the value.
5. Reopen Command prompt window, and run your java code.
Section 1 - Script method.
Put the apk tool zip file onto your desktop. Right click on the zip file, choose the zip program, and extract to "apk-multi-toolv1.0.10".
It will create the folder apk-multi-toolv1.0.10 on your desktop.
Using explorer, go into the apk-multi-toolv1.0.10 folder, double click the setup command and choose option 3 to setup directories.
After the folders have been created, type 00 to quit the setup program.
Before you can edit an app you have to get the apk file from the app. You can do this on your device with ES file explorer.
Launch ES file explorer, hit menu - manager - app manager. Press and hold the app you want and select backup. There will be a short message stating the location of the backup.
Transfer the apk file to your PC using your preferred method.
Place the apk file in the folder "place-apk-here-for modding" folder which is inside the folder that you created on your desktop.
Double click "script" and press any key to continue.
Choose option 9 to decompile the apk file. (If the screen immediately closes skip to the manual section of this document).
When the decompile finishes, type 00 and press enter, or press the control key and c together, then answer Y and hit enter.
Using windows explorer, go into the "projects" folder, then into the folder of the app you decompiled.
Right click on AndroidManifest, choose open with, choose wordpad.
Select find. In the find what box type "category.launcher".
Add the following underneath the category.launcher line.You can simply Cut and paste the code from the box below.
Code:
<category android:name="android.intent.category.MULTIWINDOW_LAUNCHER" />Search for /application.
Add the following lines BEFORE the /application line.You can simply Cut and paste the code from the box below.
Code:
<uses-library required="false" name="com.sec.android.app.multiwindow" />
<meta-data android:name="com.sec.android.support.multiwindow" android:value="true" />
<meta-data android:name="com.sec.android.multiwindow.DEFAULT_SIZE_W" android:value="632.0dip" />
<meta-data android:name="com.sec.android.multiwindow.DEFAULT_SIZE_H" android:value="598.0dip" />
<meta-data android:name="com.sec.android.multiwindow.MINIMUM_SIZE_W" android:value="632.0dip" />
<meta-data android:name="com.sec.android.multiwindow.MINIMUM_SIZE_H" android:value="598.0dip" />
Save the document. If you get the popup about the format, click yes, close the document.
Launch the script again, this time choose option 15, and press enter. Press the control key and c together, and answer y.
Press the control, alt, and delete keys together, choose start task manager, select adb.exe, select end process.
Go into the "place-apk-here-for-modding" folder.
Transfer the signed apk file to your device. Using a file explorer, navigate to the location of the signed apk file, tap the file and install.
Section 2 - Manual method.
Move the apk file to the "other" folder which you'll as a sub folder in the "apk-multi-toolv1.0.10" folder you created on your desktop.
Start the command line on your PC.
cd desktop\apk-multi-toolv1.0.10\apk-multi-tool\other
List the contents of the folder by typing dir
You should see the apk file you placed in this folder as well as the executables installed with you extracted the zip file.
In this example I will use the name mms.apk, you of course will use the name of the apk file you're modifying. If the file name has spaces you will need to put the file name in double quotes. Example: "mms 2.apk"
To decompile the apk type:
apktool d -s --no-src mms.apk (mms is the file name used in this example).
When the app has been decompiled it will look like the following:
I: Copying raw classes.dex file...
I: Loading resource table...
I: Loaded.
I: Decoding AndroidManifest.xml with resources...
I: Loading resource table from file: C:\Users\js\apktool\framework\1.apk
I: Loaded.
I: Decoding file-resources...
I: Decoding values */* XMLs...
I: Done.
I: Copying assets and libs...
You will now have a folder with the named mms (mms is the apk file used in this example) inside "desktop\apk-multi-toolv1.0.10\apk-multi-tool\other".
Now you can perform the same steps as above to modify the xml file.
After saving the xml file, go back to the command line and recompile the apk by typing the following:
apktool b mms (mms is just the example used here).
If the app compiles successfully you will see the following:
I: Copying classes.dex file...
I: Checking whether resources has changed...
I: Building resources...
I: Building apk file...
If the app does not recompile successfully this app cannot be used.
After successfully compiling the app, you now have to sign the apk file in order to install it onto your device.
The apk you'll need to sign is located in the "desktop\apk-multi-toolv1.0.10\apk-multi-tool\other\mms\dist" folder. mms is only the file name used in this example.
You can move this file up to the "other" folder.
To sign the apk file, type the following:
java -jar SignApk.jar -w testkey.x509.pem testkey.pk8 "mms.apk" signed.mms.apk (mms is only the file name used in this example).
You should now have a properly signed apk modified to work with multi-view.
You can now transfer the signed_.apk file to your device to be installed. The previous version of the app must be uninstalled first.
Last edited: