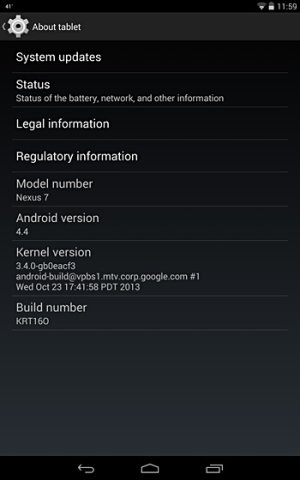
I got KitKat successfully sideloaded on my 2013 Nexus 7 last night, using my Windows 7 computer, and I'm pretty much a Newb when it comes to these things. This thread is my attempt to elaborate on instructions found elsewhere to make the process easier for other newbs. The process took me maybe an hour and a half and required several attempts (which didn't seem to harm anything) and some amount of frustration. Hopefully my tips will make it much quicker and easier for others who, like me, can really use detailed instructions.

First, I used instructions here on Android Central by Jerry Hilldebrand: How to manually update your Nexus tablet to KitKat [updated] | Android Central
And I also used instructions from Android Authority ("AA"), which have screenshots and are more detailed than the ones above, but have a couple of flaws, IMO: How to manually install Android 4.4 KitKat - Nexus 7 (2012/2013) WiFi, Nexus 10
Reading through both of these sets of instructions first might be a good idea. But now I'll just elaborate on Jerry Hildenbrand's instructions, shown below in italic followed by my comments.
The prerequisites
First download from his link and install the correct version of Android SDK. I created a folder, c:\android, downloaded it there, and then clicked on the zip file to install it there.
The process
1. Place the update .zip package from Google in the Android SDK/platform-tools folder on your computer, but do not unzip it.
Download from Jerry's link the correct kitkat updater file, and be sure to save it to the "platform-tools" subfolder where you installed Android SDK. You have to drill down a bit to find it. In my case, the full path was: c:\android\adt-bundle-windows-x86_64-20131030\adt-bundle-windows-x86_64-20131030\sdk\platform-tools
Now, the kitkat updater zip file that you just saved there has a very long name. Right-click on it and rename it to something simple, like kitkat.zip
2. On your Nexus, go to Settings > Development options and switch the toggle on. Then enable USB debugging under the "Debugging" menu group.
When I went into Settings, I did not have any menu item for Developer Options. You have to first enable that. To do that, follow instruction #2 from the Android Authority instructions: "Go to Settings>About Phone>Click on build number seven times until the message ?You are now a developer? appears. Exit from ?About phone? and scroll down and find the ?Developer Options? setting. Click on this and then enable USB debugging."
Notice step 2(b) on the Android Authority instructions: "Connect your tablet to your computer and a warning should pop up with the computers unique RSA number asking if you want to connect to the computer. Click ?Always connect to computer? and accept. Then disconnect the USB cable from the computer. Now turn off your device."
I did not do this on my first go-round (it wasn't until I had problems and searched for more instructions that I found AA's instructions), and I don't know if things would have worked more smoothly if I had. I ended up having to install/reinstall drivers on my computer using the PdaNet app that is mentioned in the Troubleshoot section of Android Authority's instructions, and then I got this warning message and completed this step.
3. Power down your tablet
4. Start up the bootloader by holding down volume up, volume down and power on your tablet.
This seems a bit scrambled to me. Start the bootloader by pressing and holding both the power and volume down buttons (not the volume up button). Look at the screenshot on AA's instructions, step #5, to see what you should get to.
5. When the menu loads, plug your Nexus into your computer.
I'll just note that Jerry's instructions and AA's instructions differ slightly on when to plug the Nexus into your computer. I'm not sure it matters.
6. Use the volume up/down keys to navigate to "Recovery mode", then press the power button.
7. When the Android with the red exclamation point appears, hold down power first, followed quickly by volume up. You should now see the recovery menu.
Both Jerry's and AA's instructions seem to suggest that you have to HOLD both the power button and the volume up button. That didn't work for me. HOLD the power button first, and while holding it just press and release the volume up button, while continuing to hold the power button.
8. Use the volume up/down keys to select "apply update from ADB," then press power to select it.
Look at AA's instructions for a screenshot of this.
9. On your computer, open up a command prompt or terminal window.
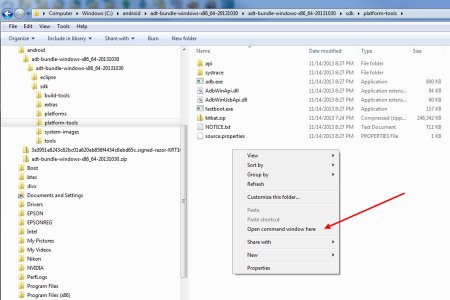
Instruction #9 on AA's site is a much simpler replacement for Jerry's steps 9 and 10. Basically, open Windows Explorer, and navigate to the platform-tools folder in which you placed the kitkat updater file, as discussed above. When you've got that folder open, "hold shift and then right click on any empty space. You?ll see the option ?Open command window here?." Screenshot:

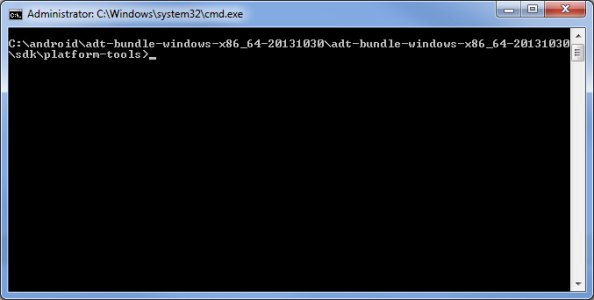
Click on "Open Command window here" and you should then get a command prompt window open up that is already drilled down to the correct folder, so you don't need to know how to do that. Screenshot:

10. Using the command line, navigate to the Android SDK/platform-tools folder
You can ignore this step if you follow what I said above in #9
11. On Windows, type:
adb.exe sideload <the complete name of the OTA zip file you want to flash>
... or on Mac, type:
./adb-mac sideload <the complete name of the OTA zip file you want to flash>
... or on Linux, type:
./adb sideload <the complete name of the OTA zip file you want to flash>
This step will be much easier if you've renamed the OTA zip file to something like kitkat.zip You just type "adb.exe sideload kitkat.zip" in to the command prompt window and then hit enter. Screenshot:

12. The update should begin installing. When it's done, select "reboot system now."
Look at the screenshot in AA's step #11 to see what it looks like when it's done. When you see that screen with the bottom entry of "Install from ADB complete," that is when you reboot the tablet. When it restarts, there will then be an install process that takes a while and shows percentage of completion (AA's instructions seem to suggest that happens before rebooting, nope)
13. Enjoy some delicious KitKat
Cool, thanks!

First, I used instructions here on Android Central by Jerry Hilldebrand: How to manually update your Nexus tablet to KitKat [updated] | Android Central
And I also used instructions from Android Authority ("AA"), which have screenshots and are more detailed than the ones above, but have a couple of flaws, IMO: How to manually install Android 4.4 KitKat - Nexus 7 (2012/2013) WiFi, Nexus 10
Reading through both of these sets of instructions first might be a good idea. But now I'll just elaborate on Jerry Hildenbrand's instructions, shown below in italic followed by my comments.
The prerequisites
First download from his link and install the correct version of Android SDK. I created a folder, c:\android, downloaded it there, and then clicked on the zip file to install it there.
The process
1. Place the update .zip package from Google in the Android SDK/platform-tools folder on your computer, but do not unzip it.
Download from Jerry's link the correct kitkat updater file, and be sure to save it to the "platform-tools" subfolder where you installed Android SDK. You have to drill down a bit to find it. In my case, the full path was: c:\android\adt-bundle-windows-x86_64-20131030\adt-bundle-windows-x86_64-20131030\sdk\platform-tools
Now, the kitkat updater zip file that you just saved there has a very long name. Right-click on it and rename it to something simple, like kitkat.zip
2. On your Nexus, go to Settings > Development options and switch the toggle on. Then enable USB debugging under the "Debugging" menu group.
When I went into Settings, I did not have any menu item for Developer Options. You have to first enable that. To do that, follow instruction #2 from the Android Authority instructions: "Go to Settings>About Phone>Click on build number seven times until the message ?You are now a developer? appears. Exit from ?About phone? and scroll down and find the ?Developer Options? setting. Click on this and then enable USB debugging."
Notice step 2(b) on the Android Authority instructions: "Connect your tablet to your computer and a warning should pop up with the computers unique RSA number asking if you want to connect to the computer. Click ?Always connect to computer? and accept. Then disconnect the USB cable from the computer. Now turn off your device."
I did not do this on my first go-round (it wasn't until I had problems and searched for more instructions that I found AA's instructions), and I don't know if things would have worked more smoothly if I had. I ended up having to install/reinstall drivers on my computer using the PdaNet app that is mentioned in the Troubleshoot section of Android Authority's instructions, and then I got this warning message and completed this step.
3. Power down your tablet
4. Start up the bootloader by holding down volume up, volume down and power on your tablet.
This seems a bit scrambled to me. Start the bootloader by pressing and holding both the power and volume down buttons (not the volume up button). Look at the screenshot on AA's instructions, step #5, to see what you should get to.
5. When the menu loads, plug your Nexus into your computer.
I'll just note that Jerry's instructions and AA's instructions differ slightly on when to plug the Nexus into your computer. I'm not sure it matters.
6. Use the volume up/down keys to navigate to "Recovery mode", then press the power button.
7. When the Android with the red exclamation point appears, hold down power first, followed quickly by volume up. You should now see the recovery menu.
Both Jerry's and AA's instructions seem to suggest that you have to HOLD both the power button and the volume up button. That didn't work for me. HOLD the power button first, and while holding it just press and release the volume up button, while continuing to hold the power button.
8. Use the volume up/down keys to select "apply update from ADB," then press power to select it.
Look at AA's instructions for a screenshot of this.
9. On your computer, open up a command prompt or terminal window.
Instruction #9 on AA's site is a much simpler replacement for Jerry's steps 9 and 10. Basically, open Windows Explorer, and navigate to the platform-tools folder in which you placed the kitkat updater file, as discussed above. When you've got that folder open, "hold shift and then right click on any empty space. You?ll see the option ?Open command window here?." Screenshot:

Click on "Open Command window here" and you should then get a command prompt window open up that is already drilled down to the correct folder, so you don't need to know how to do that. Screenshot:

10. Using the command line, navigate to the Android SDK/platform-tools folder
You can ignore this step if you follow what I said above in #9
11. On Windows, type:
adb.exe sideload <the complete name of the OTA zip file you want to flash>
... or on Mac, type:
./adb-mac sideload <the complete name of the OTA zip file you want to flash>
... or on Linux, type:
./adb sideload <the complete name of the OTA zip file you want to flash>
This step will be much easier if you've renamed the OTA zip file to something like kitkat.zip You just type "adb.exe sideload kitkat.zip" in to the command prompt window and then hit enter. Screenshot:

12. The update should begin installing. When it's done, select "reboot system now."
Look at the screenshot in AA's step #11 to see what it looks like when it's done. When you see that screen with the bottom entry of "Install from ADB complete," that is when you reboot the tablet. When it restarts, there will then be an install process that takes a while and shows percentage of completion (AA's instructions seem to suggest that happens before rebooting, nope)
13. Enjoy some delicious KitKat
Cool, thanks!

