
[NOTE]:: Rooting stock/official EI22 Gingerbread ::
I will walk your through the rooting process for those who are on stock Gingerbread EI22 received either OTA or manual update. This requires the use of Odin 2 times and CWM (ClockWorkMod) recovery to complete the process. Its very straight forward and can be completed in a very short time. You must do all three steps as instructed or you will NOT be successful.
Some credits and thanks in order because I had nothing to do with any of this except making the tutorial..
ACS Syndicate
qbking77
mkasick
chris41g
XDA developers and anyone else involved I may have forgotten.
Before starting here is a handy video to aid you in installation, by qbking77
How to root the Samsung Epic 4G on Froyo and Gingerbread - YouTube
[/NOTE]
[INFO]:: Files to Download ::
Odin 1.85 (After downloading extract the contents of this zip to a place on your computer using WinRAR or 7Zip)
kernel-GB-3.tar.md5 (Go to thread and look for that exact filename at very end (bottom) of the first post)
ACSRecovery1.0.0.5.tar.md5 (See this post for new download link, UPDATED LINKS)
su-3.0-efgh-signed.zip (See this post for new download link, UPDATED LINKS) Place this file on your SDCARD[/INFO]
[INFO]:: Step by Step Procedure Part 1 (custom kernel needed to make CWM stick perminately) ::
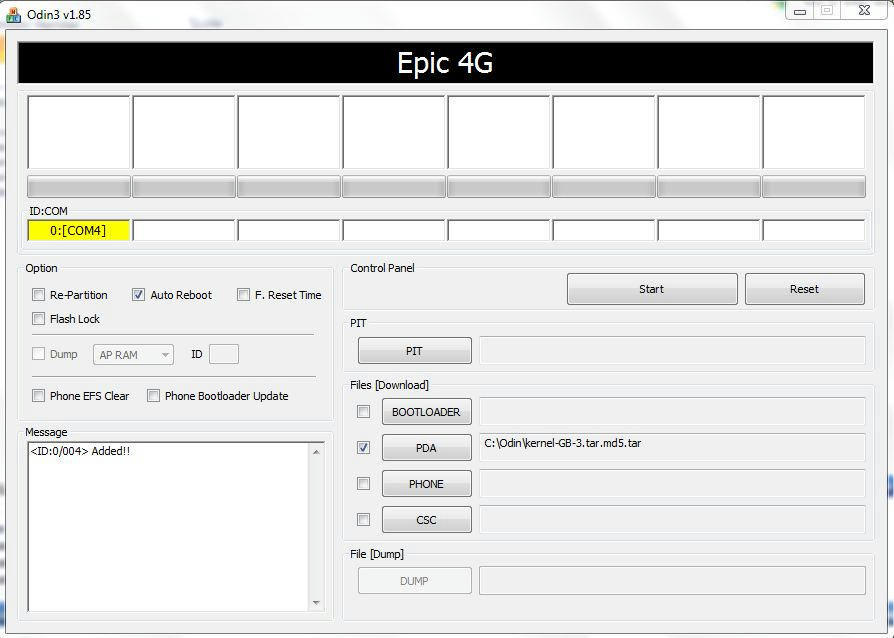
1. Open Odin 1.85
2. Check only Auto Reboot as show in the screenshot below.
3. Goto the PDA box on the right side. Click the PDA button and navigate to kernel-GB-3.tar.md5 file on your hard drive and select it. Check the PDA box (check box) (Shown below)
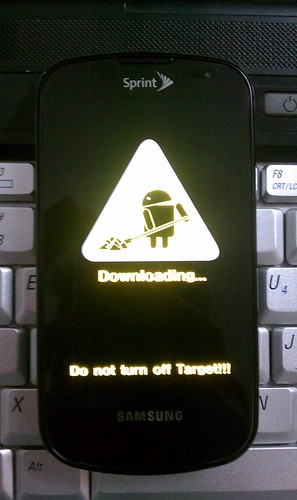
4. Power off your Epic 4g, once it is completely off open your physical keyboard and press and hold the " 1 " key and continue to hold while pressing POWER. This will boot you into Download Mode within a few seconds. Black screen with yellow graphics/print of Android guy shoveling...
5. Now take your USB cable and connect it to your computer and then plug it into your device.
6. You should see a YELLOW box light up on the upper left hand side of Odin that says COM:XXX. Ignore the number it varies, this signals you have made a connection to Odin and are ready to go. Problems connecting see trouble shooting at end of this tutorial.
7. Double check in Odin you have only Auto Reboot checked, and the kernel-GB-3.tar.md5 file in the PDA SLOT.
8. Press START.
9. This will flash a custom kernel to your device and should only take about 10 seconds or so... Your device will automatically reboot when finished.
[/INFO]
[INFO]:: Step by Step Procedure Part 2 (Flashing CWM "ClockWorkMod" Recovery) ::
1. Power off your device, and boot into Download Mode as we did in Part 1, step 4.
2. Open Odin and make sure only Auto Reboot is checked/selected.
3.Goto the PDA box on the right side. Click the PDA button and navigate to ACSRecovery1.0.0.5.tar.md5 file in the PDA SLOT and check PDA box next to it.
4. Connect your device once again via USB cable and verify your connected to Odin by looking for the YELLOW COM box lite up.
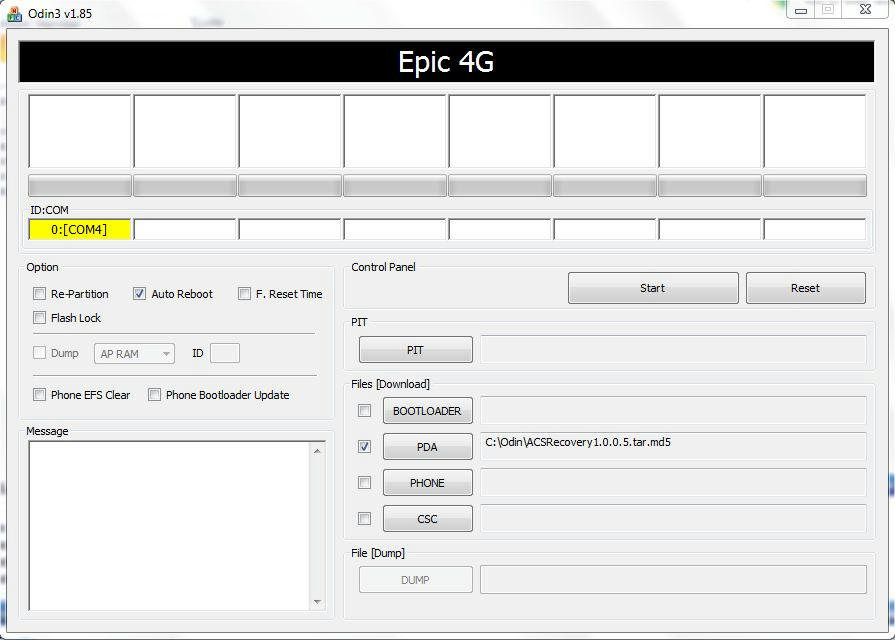
5. Everything above is good then press START
6. This will take less than a minute to complete and automatically reboot. This will place CWM (ClockWorkMod) recovery on your device in place of the stock recovery.[/INFO]
[INFO]:: Step by Step Procedure Part #3 (Flashing SU "SuperUser or Root" access in CWM) ::
1. Power off your device.
2. Press and hold Volume Down+Camera+Power all together for about 5 seconds or until you boot into CWM recovery.
3. You navigate CWM recovery with your Volume Up/Down buttons and make selections with the Camera button.
4. Scroll down to Install Zip from SDCARD and select
5. Navigate on your sdcard to the su-3.0.-efgh-signed.zip and press select
6. Then again select YES to install the file
7. This will take a few seconds to install the SU access file.
8. When complete hit your BACK button on the bottom of your phone this will take you back to the main CWM menu
9. Press AUTO REBOOT.
10. Your device will reboot and you will boot up into official GB, rooted with CWM. You can verify this by going to your app list and finding the SU icon/app. You can double check this by downloading any root access required app from the Market like Titanium Backup and starting the application and it will ask you to allow root access the first time you use it.[/INFO]
[TIP]:: Trouble shooting ::
Make sure you have the Samsung drivers installed. 32-bit drivers | 64-bit drivers
Download them and install the drivers on your computer first, then once that is complete place your device into debug mod (Settings/Applications/Development/Select USB Debugging) then plug your device in via USB cable and allow the drivers to finish installing.
If your phone is not being recognized by Odin, try the following.
- Use a different USB computer port
- Use a different USB cable
If for some reason Odin does ever give you a FAIL or the process hangs up for more than 5 minutes in one spot then do the following.
- Pull your battery out of your device and leave it out.
- Plug in your device via USB cable and connect it to your computer.
- Then boot into Download Mode (hold 1 on physical keyboard and press power).
- Run the Odin package.
- When completed and you get the Green PASS, you can pop your battery back in and then reboot the phone and you should be good to go.
Note: Some devices have given some trouble and you have to attempt this twice to get it to work. Also make sure all anti virus software is off/disabled. One last option is remove your sdcard if everything else fails. [/TIP]
I will walk your through the rooting process for those who are on stock Gingerbread EI22 received either OTA or manual update. This requires the use of Odin 2 times and CWM (ClockWorkMod) recovery to complete the process. Its very straight forward and can be completed in a very short time. You must do all three steps as instructed or you will NOT be successful.
Some credits and thanks in order because I had nothing to do with any of this except making the tutorial..
ACS Syndicate
qbking77
mkasick
chris41g
XDA developers and anyone else involved I may have forgotten.
Before starting here is a handy video to aid you in installation, by qbking77
How to root the Samsung Epic 4G on Froyo and Gingerbread - YouTube
[/NOTE]
[INFO]:: Files to Download ::
Odin 1.85 (After downloading extract the contents of this zip to a place on your computer using WinRAR or 7Zip)
kernel-GB-3.tar.md5 (Go to thread and look for that exact filename at very end (bottom) of the first post)
ACSRecovery1.0.0.5.tar.md5 (See this post for new download link, UPDATED LINKS)
su-3.0-efgh-signed.zip (See this post for new download link, UPDATED LINKS) Place this file on your SDCARD[/INFO]
[INFO]:: Step by Step Procedure Part 1 (custom kernel needed to make CWM stick perminately) ::
1. Open Odin 1.85
2. Check only Auto Reboot as show in the screenshot below.
3. Goto the PDA box on the right side. Click the PDA button and navigate to kernel-GB-3.tar.md5 file on your hard drive and select it. Check the PDA box (check box) (Shown below)
4. Power off your Epic 4g, once it is completely off open your physical keyboard and press and hold the " 1 " key and continue to hold while pressing POWER. This will boot you into Download Mode within a few seconds. Black screen with yellow graphics/print of Android guy shoveling...
5. Now take your USB cable and connect it to your computer and then plug it into your device.
6. You should see a YELLOW box light up on the upper left hand side of Odin that says COM:XXX. Ignore the number it varies, this signals you have made a connection to Odin and are ready to go. Problems connecting see trouble shooting at end of this tutorial.
7. Double check in Odin you have only Auto Reboot checked, and the kernel-GB-3.tar.md5 file in the PDA SLOT.
8. Press START.
9. This will flash a custom kernel to your device and should only take about 10 seconds or so... Your device will automatically reboot when finished.
[/INFO]
[INFO]:: Step by Step Procedure Part 2 (Flashing CWM "ClockWorkMod" Recovery) ::
1. Power off your device, and boot into Download Mode as we did in Part 1, step 4.
2. Open Odin and make sure only Auto Reboot is checked/selected.
3.Goto the PDA box on the right side. Click the PDA button and navigate to ACSRecovery1.0.0.5.tar.md5 file in the PDA SLOT and check PDA box next to it.
4. Connect your device once again via USB cable and verify your connected to Odin by looking for the YELLOW COM box lite up.
5. Everything above is good then press START
6. This will take less than a minute to complete and automatically reboot. This will place CWM (ClockWorkMod) recovery on your device in place of the stock recovery.[/INFO]
[INFO]:: Step by Step Procedure Part #3 (Flashing SU "SuperUser or Root" access in CWM) ::
1. Power off your device.
2. Press and hold Volume Down+Camera+Power all together for about 5 seconds or until you boot into CWM recovery.
3. You navigate CWM recovery with your Volume Up/Down buttons and make selections with the Camera button.
4. Scroll down to Install Zip from SDCARD and select
5. Navigate on your sdcard to the su-3.0.-efgh-signed.zip and press select
6. Then again select YES to install the file
7. This will take a few seconds to install the SU access file.
8. When complete hit your BACK button on the bottom of your phone this will take you back to the main CWM menu
9. Press AUTO REBOOT.
10. Your device will reboot and you will boot up into official GB, rooted with CWM. You can verify this by going to your app list and finding the SU icon/app. You can double check this by downloading any root access required app from the Market like Titanium Backup and starting the application and it will ask you to allow root access the first time you use it.[/INFO]
[TIP]:: Trouble shooting ::
Make sure you have the Samsung drivers installed. 32-bit drivers | 64-bit drivers
Download them and install the drivers on your computer first, then once that is complete place your device into debug mod (Settings/Applications/Development/Select USB Debugging) then plug your device in via USB cable and allow the drivers to finish installing.
*** Trouble Shoot for all Odin Packages... Read below... ***
Make sure your battery is fully charged before attempting anything in this thread. *** NEVER PULL YOUR CABLE WHILE ODIN IS FLASHING ***
Make sure your battery is fully charged before attempting anything in this thread. *** NEVER PULL YOUR CABLE WHILE ODIN IS FLASHING ***
If your phone is not being recognized by Odin, try the following.
- Use a different USB computer port
- Use a different USB cable
If for some reason Odin does ever give you a FAIL or the process hangs up for more than 5 minutes in one spot then do the following.
- Pull your battery out of your device and leave it out.
- Plug in your device via USB cable and connect it to your computer.
- Then boot into Download Mode (hold 1 on physical keyboard and press power).
- Run the Odin package.
- When completed and you get the Green PASS, you can pop your battery back in and then reboot the phone and you should be good to go.
Note: Some devices have given some trouble and you have to attempt this twice to get it to work. Also make sure all anti virus software is off/disabled. One last option is remove your sdcard if everything else fails. [/TIP]
Last edited:

