[Automated] Wug's Nexus Root Toolkit v1.6.3 (Updated 02/24/13)
Unlocking, rooting, relocking and unrooting simplified! (and much more!)
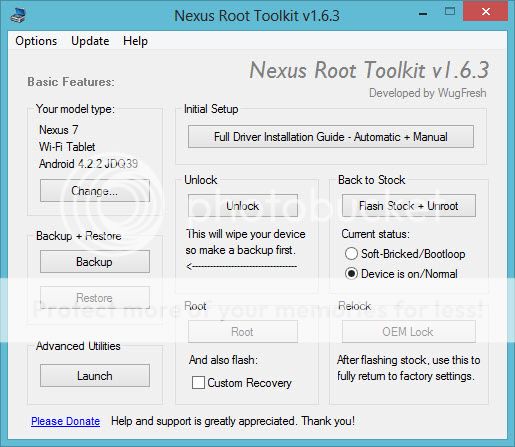
VERSION 1.6.3 - This program will automatically bring together all the files you need to unlock and root your device in a few clicks, or flash it back to stock and re-lock it. You can also use this program to backup/restore all your important data, flash zips, set file permissions, push and pull files, install apps, generate logcats/bugreports, and much more! With the included file association options, you can perform tasks like flashing zips, installing apps, restoring android backup files, and flashing/booting img files with just a double click! The program includes a full featured interface for automating tasks in TWRP, enhanced restore features, an in-built auto-updater/notification system, ?any build? mode, and quick tools utilities. All the latest Android builds and Nexus devices are now officially supported with full 4.2.2 support. The program intelligently and selectively downloads the files it needs for your device and makes sure you are using the latest files available. The main changes in this release are some new features in the advanced utilities gui (like a logcat/bugreport generation interface, adb sideload button, and restore stock kernel script), dynamic informational tooltips throughout the entire program, major changes to the in-built updater system plus the option to check for multiple devices/builds on startup. Check out the updated changelog for a more comprehensive breakdown of the feature set in this release.
~ my goal for this project is make the entire process as smooth and simple as possible ~
Nexus Root Toolkit v1.6.3 | WugFresh
{{ WugFresh }}
Unlocking, rooting, relocking and unrooting simplified! (and much more!)
VERSION 1.6.3 - This program will automatically bring together all the files you need to unlock and root your device in a few clicks, or flash it back to stock and re-lock it. You can also use this program to backup/restore all your important data, flash zips, set file permissions, push and pull files, install apps, generate logcats/bugreports, and much more! With the included file association options, you can perform tasks like flashing zips, installing apps, restoring android backup files, and flashing/booting img files with just a double click! The program includes a full featured interface for automating tasks in TWRP, enhanced restore features, an in-built auto-updater/notification system, ?any build? mode, and quick tools utilities. All the latest Android builds and Nexus devices are now officially supported with full 4.2.2 support. The program intelligently and selectively downloads the files it needs for your device and makes sure you are using the latest files available. The main changes in this release are some new features in the advanced utilities gui (like a logcat/bugreport generation interface, adb sideload button, and restore stock kernel script), dynamic informational tooltips throughout the entire program, major changes to the in-built updater system plus the option to check for multiple devices/builds on startup. Check out the updated changelog for a more comprehensive breakdown of the feature set in this release.
~ my goal for this project is make the entire process as smooth and simple as possible ~
Nexus Root Toolkit v1.6.3 | WugFresh
{{ WugFresh }}
Last edited:

") )
) Twitter