Obviously one of the biggest aspects of the Evo 3D is the 3D capabilities. Some love it, some hate it, some just don't care, and some enjoy it but just don't use it often. Whichever side you're on, I think we can all agree that sometimes the 3D content can strain your eyes a bit. Some people it's more than just a strain, it can flat out cause a serious headache. From my personal experience, most 3D content on Youtube looks great and doesn't bother me at all. Watching actual 3D movies looks incredible. Most of the 3D videos I've taken look great too and don't bother me at all. However, the pictures can be a different story. I notice the pictures don't align too well. When they don't align right, that's when the eyes start to strain. The more unaligned they are, the more your eyes will strain. Want to test it out? Take a picture in 3D, and move the Evo left to right, you'll see the alignment of the two pictures. You'll notice the closer together the pictures are aligned, the easier it is on your eyes...
WELL.. there's an option with the 3D pictures that a LOT of people don't know about ----
Adjust 3D alignment
I can tell you how much better it is on your eyes after adjusting (huge difference), but nothing is better than seeing for yourself first hand. So here's a quick guide. It's extremely easy,
1) Open up your camera (in 3D of course ) and take a picture..
2) Go to the gallery on the bottom left of the camera app
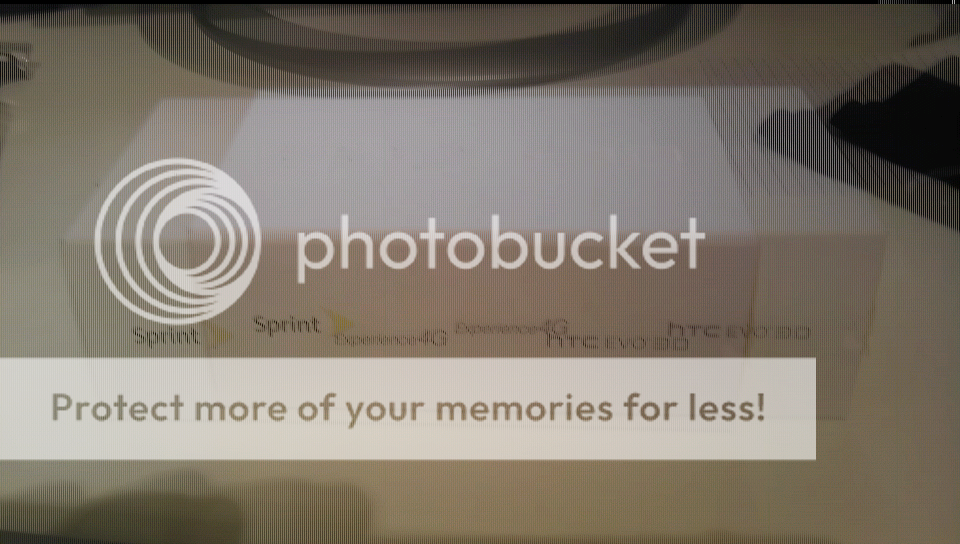
Here's the demo picture I'm going to use: Notice how insanely unaligned the two picture are. This is the type of picture that REALLY strains the eyes bad. I can't look at it for more than 2 seconds...
3) Tap the screen and select the icon that looks like a wand with sparkels:
(btw, I think the image tearing is because of the 3D effect)

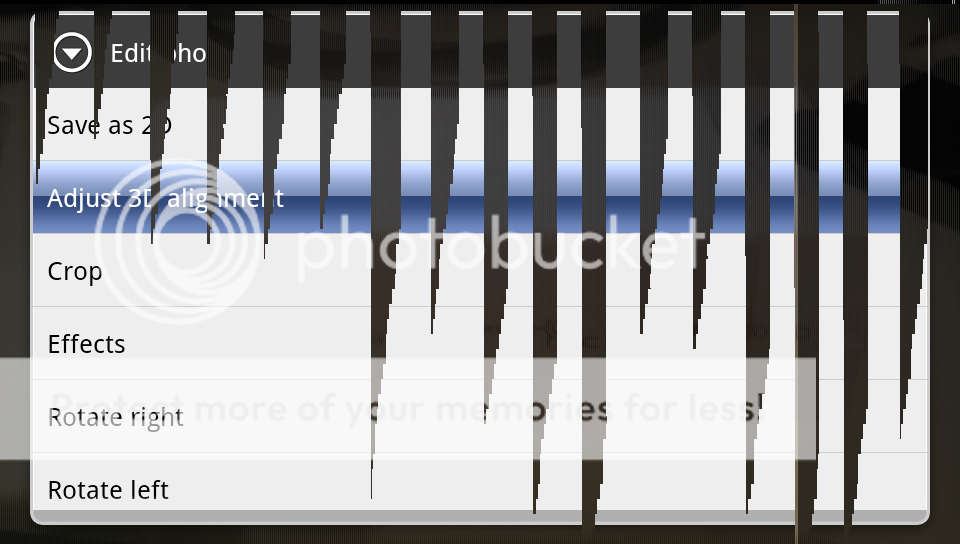
4) You'll get this popup and select Adjust 3D alignment
5) Now you'll get this screen:
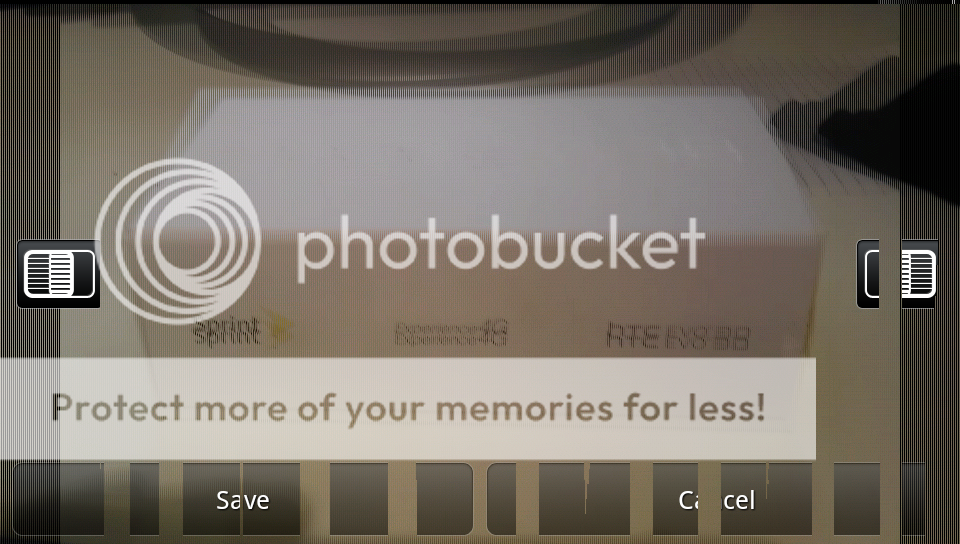
The left and right tabs is what allows you to adjust the two images taken. If you tilt the screen over you'll be able to see both the images. Now here's the trick. I'll try and explain this without being confusing.. Because of how the images are taken, its impossible to get everything on both images to align perfect. So the key is to figure out whats your focus point of the picture. In my demo picture, its the box. So you adjust the image until the two images are aligned as best you can on the focus point, the box. You'll notice outside of the focus point, like the monitor base and the black rag to the right, aren't aligned that well compared to the box. But that's fine, because again the focus point of the image is the box. So as long as you align the focus point the image will not only look much better, but it will be a million times better on your eyes
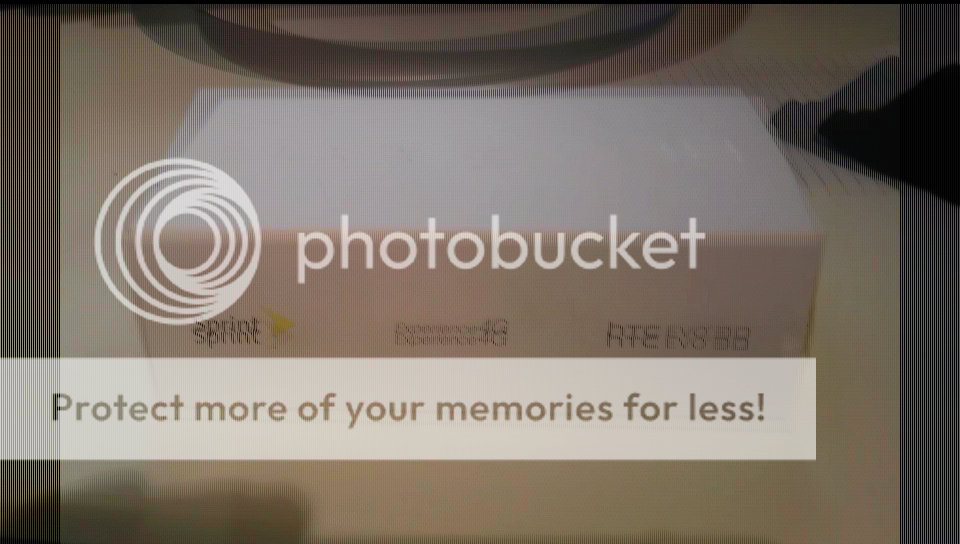
Here's how my demo picture looked before the adjustment, then after..
WELL.. there's an option with the 3D pictures that a LOT of people don't know about ----
Adjust 3D alignment
I can tell you how much better it is on your eyes after adjusting (huge difference), but nothing is better than seeing for yourself first hand. So here's a quick guide. It's extremely easy,
1) Open up your camera (in 3D of course
) and take a picture..2) Go to the gallery on the bottom left of the camera app
Here's the demo picture I'm going to use: Notice how insanely unaligned the two picture are. This is the type of picture that REALLY strains the eyes bad. I can't look at it for more than 2 seconds...
3) Tap the screen and select the icon that looks like a wand with sparkels:
(btw, I think the image tearing is because of the 3D effect)
4) You'll get this popup and select Adjust 3D alignment
5) Now you'll get this screen:
The left and right tabs is what allows you to adjust the two images taken. If you tilt the screen over you'll be able to see both the images. Now here's the trick. I'll try and explain this without being confusing.. Because of how the images are taken, its impossible to get everything on both images to align perfect. So the key is to figure out whats your focus point of the picture. In my demo picture, its the box. So you adjust the image until the two images are aligned as best you can on the focus point, the box. You'll notice outside of the focus point, like the monitor base and the black rag to the right, aren't aligned that well compared to the box. But that's fine, because again the focus point of the image is the box. So as long as you align the focus point the image will not only look much better, but it will be a million times better on your eyes
Here's how my demo picture looked before the adjustment, then after..
Last edited:

")
 Twitter