- Mar 9, 2012
- 169,484
- 10,838
- 113
If any device starts to behave oddly or slowly, there's a decent chance that wiping the system cache partition can help. The system cache partition is a storage area for system data such as logfiles, frequently accessed app data that has been temporarily cached there, and downloaded apk installer files from Google Play. Over time, this temporary data can build up and potentially contribute to system slowdowns or even misbehavior. Clearing this cache partition can potentially help, and should never be harmful, because no personal data will be lost.
[NOTE]The system cache partition is different from individual app caches that can be cleared in the Settings/Apps menu, or by using apps like App Cache Cleaner. Clearing the individual app caches can free up storage memory, but won't necessary address any system issues.[/NOTE]
In order to wipe the cache partition, you need to access the device's Recovery Menu. Many devices allow you to access the stock Recovery Menu by executing a certain pattern of button presses, but certain devices lock you out of the Recovery Menu. You can get around this by installing a custom recovery, but that's beyond the scope of my experience. Trying to find out how to access the Recovery Menu for a given device can sometimes be frustrating, even with a Google search. You may need to use search terms like recovery, cache partition, or reset, along with the name of your device.
The steps for accessing the Recovery Menu on the 2012 and 2013 Nexus 7 can be found here (https://support.google.com/nexus/answer/2668187?hl=en), but the directions are specifically for a Hard Reset (i.e., a complete device wipe). The following instructions are a slight modification, in order to wipe the cache partition. Apologies for the suboptimal picture quality--you can't take screenshots in the Recovery Menu, and I don't have a professional setup to take photos of a screen!
1. Power the tablet down.
2. Now press and hold Power. As soon as you see the Google logo appear, immediately press and hold Vol Down (while still holding Power).
3. Keep holding Power and Vol Down until you see this screen:
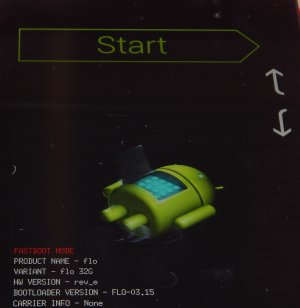
4. Use the Volume keys to select Recovery (press Vol Down twice), and then press Power.
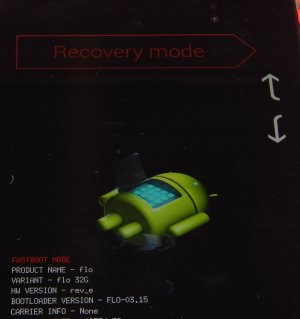
5. You'll see the Google logo appear for about 5-10 seconds, then our little friend will show up looking a little piqued.
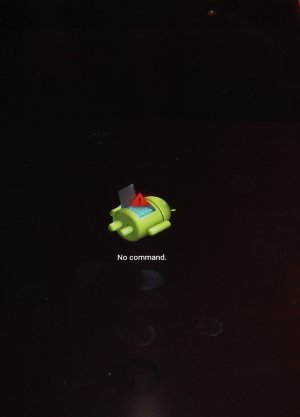
6. While pressing and holding Power, press the Vol Up button, then release both buttons. You don't have to hold either button down for very long. The Recovery Menu will now appear:

7. Once again, use the Volume buttons to move the cursor up or down. Press Vol Down 3 times to highlight "wipe cache partition," then press Power to execute.
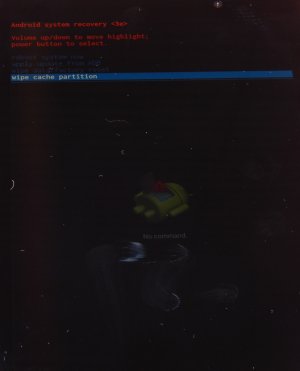
8. You'll see some notifications about the progress at the bottom of the screen--it shouldn't take any longer than 10 seconds or so to complete. When done, the Recovery Menu will appear again, with "reboot system now" already highlighted.

9. Press the Power button, and your Nexus 7 will reboot, hopefully with a little faster and smoother performance!
[NOTE]The system cache partition is different from individual app caches that can be cleared in the Settings/Apps menu, or by using apps like App Cache Cleaner. Clearing the individual app caches can free up storage memory, but won't necessary address any system issues.[/NOTE]
In order to wipe the cache partition, you need to access the device's Recovery Menu. Many devices allow you to access the stock Recovery Menu by executing a certain pattern of button presses, but certain devices lock you out of the Recovery Menu. You can get around this by installing a custom recovery, but that's beyond the scope of my experience. Trying to find out how to access the Recovery Menu for a given device can sometimes be frustrating, even with a Google search. You may need to use search terms like recovery, cache partition, or reset, along with the name of your device.
The steps for accessing the Recovery Menu on the 2012 and 2013 Nexus 7 can be found here (https://support.google.com/nexus/answer/2668187?hl=en), but the directions are specifically for a Hard Reset (i.e., a complete device wipe). The following instructions are a slight modification, in order to wipe the cache partition. Apologies for the suboptimal picture quality--you can't take screenshots in the Recovery Menu, and I don't have a professional setup to take photos of a screen!
1. Power the tablet down.
2. Now press and hold Power. As soon as you see the Google logo appear, immediately press and hold Vol Down (while still holding Power).
3. Keep holding Power and Vol Down until you see this screen:

4. Use the Volume keys to select Recovery (press Vol Down twice), and then press Power.

5. You'll see the Google logo appear for about 5-10 seconds, then our little friend will show up looking a little piqued.

6. While pressing and holding Power, press the Vol Up button, then release both buttons. You don't have to hold either button down for very long. The Recovery Menu will now appear:

7. Once again, use the Volume buttons to move the cursor up or down. Press Vol Down 3 times to highlight "wipe cache partition," then press Power to execute.

8. You'll see some notifications about the progress at the bottom of the screen--it shouldn't take any longer than 10 seconds or so to complete. When done, the Recovery Menu will appear again, with "reboot system now" already highlighted.

9. Press the Power button, and your Nexus 7 will reboot, hopefully with a little faster and smoother performance!
Last edited:

