- Nov 9, 2011
- 1,813
- 2
- 0
Some of you will notice unless you have a tethering plan, it may no longer work with KitKat, this only affect certain carriers, such as T-Mobile. PS. On my Nexus 4, tethering is working again with KitKat 4.4.2 on T-Mobile without extra modifications, but if it doesn't work for you, try the methods below.
TETHERING WITHOUT REQUIRING ROOT:
1. (T-Mobile) MODIFY THE APN: I have not fully tested this method on all phones, but all you have to do is use the APN: fast.t-mobile.com, then in the "APN type" field, add the value: "dun". Also in the "APN protocal" field, made sure the value is "IPv4". Thank you to user "cq1125" for posting this method, visit his thread for more info: http://forums.androidcentral.com/moto-x/361831-unrestricted-tether-t-mobile-no-root.html
Detailed instructions:
-In order to get to the APN menu, go to Settings -> More... -> Mobile networks -> Access Point Names.
-You will see a list of APNs similar to screenshot below. Tap on one of the T-Mobile title in the list to edit it's APN settings.
-While in the "Edit access point" window, in the field "APN", make sure you change the value from "epc.tmobile.com" to: fast.t-mobile.com
-Scroll down to the field "APN type", do not delete any of it's existing values, but add a comma "," and the value "dun".
-Also make sure the field "APN protocol" is set with the value "IPv4", as IPv6 doesn't work with tethering yet.
-Lastly, tap on the three dots menu button on the top right and select Save. Now you can exit.

2. TETHERING USING USB CABLE: If you don't have root or unable to root, you can use an app like ClockworkMod's Tether, it required it's companion PC program, you also need to download the USB drivers for your phone. You need to make an in app purchase to allow unlimited quota. This method is using USB connection to your PC only, not wireless.
METHODS TO ENABLE TETHERING WITH ROOT:
1. EASY METHOD, USING GUI: These steps to re-enable tethering will require root and I'll be using a paid app to achieve the purpose (there might be other free apps as alternative). This is courtesy of another XDA member who originally posted the instruction from here.
2. USING COMMAND LINES and ADB: Same as above, but using command lines, recommended for more advance users, but it's free.
EASY METHOD, USING GUI


USING COMMAND LINES and ADB
TETHERING WITHOUT REQUIRING ROOT:
1. (T-Mobile) MODIFY THE APN: I have not fully tested this method on all phones, but all you have to do is use the APN: fast.t-mobile.com, then in the "APN type" field, add the value: "dun". Also in the "APN protocal" field, made sure the value is "IPv4". Thank you to user "cq1125" for posting this method, visit his thread for more info: http://forums.androidcentral.com/moto-x/361831-unrestricted-tether-t-mobile-no-root.html
Detailed instructions:
-In order to get to the APN menu, go to Settings -> More... -> Mobile networks -> Access Point Names.
-You will see a list of APNs similar to screenshot below. Tap on one of the T-Mobile title in the list to edit it's APN settings.
-While in the "Edit access point" window, in the field "APN", make sure you change the value from "epc.tmobile.com" to: fast.t-mobile.com
-Scroll down to the field "APN type", do not delete any of it's existing values, but add a comma "," and the value "dun".
-Also make sure the field "APN protocol" is set with the value "IPv4", as IPv6 doesn't work with tethering yet.
-Lastly, tap on the three dots menu button on the top right and select Save. Now you can exit.

2. TETHERING USING USB CABLE: If you don't have root or unable to root, you can use an app like ClockworkMod's Tether, it required it's companion PC program, you also need to download the USB drivers for your phone. You need to make an in app purchase to allow unlimited quota. This method is using USB connection to your PC only, not wireless.
METHODS TO ENABLE TETHERING WITH ROOT:
1. EASY METHOD, USING GUI: These steps to re-enable tethering will require root and I'll be using a paid app to achieve the purpose (there might be other free apps as alternative). This is courtesy of another XDA member who originally posted the instruction from here.
2. USING COMMAND LINES and ADB: Same as above, but using command lines, recommended for more advance users, but it's free.
If tethering is still working for you then you don't have to perform these steps.
I am not reponsible for any damages to your phone if you perform these steps, it's your choice, backup first.
Rooting your phone will result in Over The Air updates no longer working.
EASY METHOD, USING GUI
Hint: See the accompanied screenshots attached below.
0. First you need root (instruction),
1. Backup. I have no problems whatsoever with these steps, but if you have custom recoveries you might want to make a nandroid backup first.
(Optional): Using a root file explorer, go to the directory: /data/data/com.android.providers.settings/databases/. Make a copy of the file settings.db to your sdcard for backup incase you need to restore it, we will be editing this file.
2. Buy this SQLite Editor. (There are other sqlite editors, but this one is the easiest to use. It's up to you.)
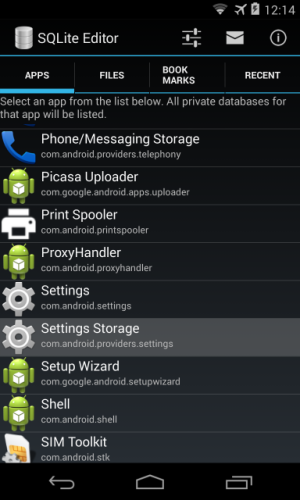
3. Open SQLite Editor, grant root for it, then under the APPS list, scroll down and tap on "Settings Storage".
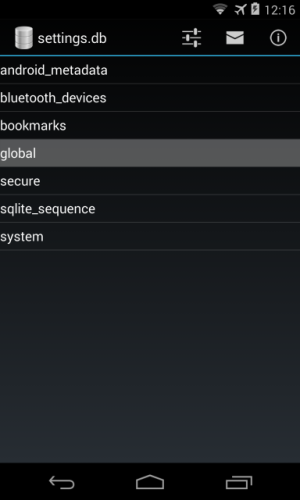
4. It will search for databases and find "settings.db", tap on it.
5. While in "settings.db", select "global" from the list.
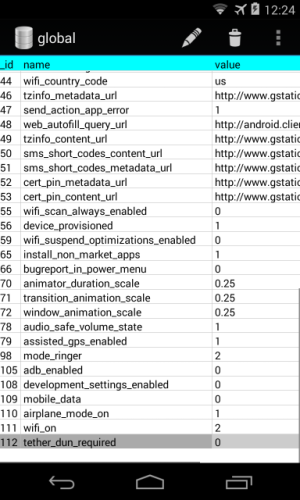
6. You will see a table with "id, name and value" columns. Tap on the + sign on the top right to add a new entry.
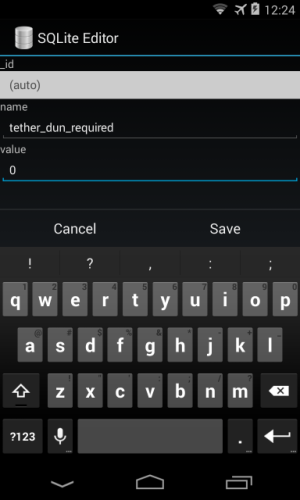
In the name field, name it: tether_dun_required. In the value field, write: 0
Tap on Save to save the entry, then exit the app.
8. Make sure you use the correct APN. If you have T-Mobile US, use the "fast.t-mobile.com" APN with IPv4, since tether isn't working with IPv6 yet.
9. Reboot.


USING COMMAND LINES and ADB
This method is for advance users only, it does the samething as the steps above. We will be using the "sqlite3" binary to manually edit the "Settings Storage" database file through command lines.
0. Make sure you're rooted, have adb installed and working with your device.
1. You need to get the "sqlite3" binary file for your Android. It's not available in stock Android, but you can get it from a CyanogenMod rom. Download a CyanogenMod11 rom from here, extract the file "sqlite3" from the folder "/system/xbin".
2. Copy "sqlite3" file to your Android device into the folder /system/xbin. Make sure to fix the file permission, set it's permission to rwx | r-x | r-x (aka 755).
3. Now we will be using adb shell. So go into "Developer options" and turn on USB debugging and connect the phone to your computer.
-The steps onward will be performed on the computer through command lines.-
4. Get into your phone typing: adb shell
Give yourself root by typing: su
Check to see if sqlite3 is installed correctly by typing: sqlite3
It should give you it's version number, then press CTRL + D to exit sqlite3.
5. Make sure you exit from sqlite3 from the last step. Copy and enter the line below exactly:
sqlite3 "/data/data/com.android.providers.settings/databases/settings.db" "INSERT INTO global(name,value) VALUES('tether_dun_required',0)"
Note: If you get "Permission denied", it means you did not use root or set the correct file permission for the sqlite3 file.
What this does is insert the name "tether_dun_required" with the value of "0" into the table called "global". Since the table is smart enough to automatically assign ID numbers and prevent duplicates, it doesn't matter if the name "tether_dun_required" already existed.
7. Verify. Type this to list the "global" table by name to see if "tether_dun_required" has been entered correctly:
sqlite3 "/data/data/com.android.providers.settings/databases/settings.db" "SELECT * FROM global ORDER BY name"
8. Type CTRL+D twice to exit out, then type 'adb reboot' to reboot the phone.
Last edited:

