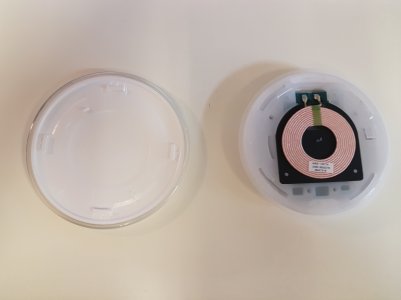
S6's New Circular Wireless Charging Pad: Always ON LED! Not good for bedside!

Dominik Gass

New member
Mar 9, 2016
1
0
0
Visit site
Ja, kann man!

Wenn Du Handwerklich ein wenig begabt bist und auf die Garantie verzichten kannst geht das super!

Du öffnest das Teil, in dem Du den Charger auf eine glatte Oberfläche legst (fester halt) und Du mit der offenen Handfläche den Oberen Teil wie ein Bajonettverschluss gegen den Uhrzeigersinn drehst. (geht schwer!). Nachdem Du geöffnet hast,brauchst Du einen kleinen Kreuz-Schraubendreher für 4 ersichtliche Schrauben zu lösen. Halte nun einen Lötkolben parat und löte die zwei Drähte der Spule ab, klicke die Leiterplatte aus und klebe die zwei LED`s ab! Jetzt bastelst Du alles wieder zusammen !!
Funktioniert tip top! Wenn geladen wird, zeigt dir das Handy an.

Gruss Dominik
 

ben Coull

New member
Jun 14, 2016
1
0
0
Visit site
I had the same issue in that the wireless charger (not the fast charger) didn't have any screws under the foam ring - after lots of poking and prodding i found out how to fix the annoying LED issue:

Opening the charger:
The wireless charger isn't held together with screws, it has small clips on the inside that locate into recesses - so it opens like a jam jar:

20160614_124240.jpg
20160614_124251.jpg

Hold the base in one hand (with the top of the charger facing upward) and rotate the bottom section clockwise and the top section anti-clockwise and it will twist apart. NB: this took quite a while because both parts are difficult to get a grip on!

Once you have separated the two halves you'll see 4 small hex screws holding the charging element in the base - unscrew these to remove the middle section:

20160614_124441.jpg

middle section close up:

20160614_124541.jpg

The annoying LEDs are on the PCB at each outside edge of the solder points:

20160614_1245412.jpg

Turn the board over and gently prise the PCB upward and using a small craft knife cut the LED lights off the board:

20160614_125254.jpg

Then reassemble the charger and relocate the top and bottom parts together screwing them in opposite directions to lock them back in to place... making sure you align the Samsung logo to the top!

And that's it - you should now have a charger without those annoying LEDs lighting up your bedroom like a cheap 90's night club!
 

A0425A

Well-known member
Nov 28, 2013
61
0
0
Visit site
Ok. Either I'm pretty weak or they've changed the design. I've twisted it as hard as I can (bottom in left hand turning clockwise and top in right hand turning counter clockwise) and it just won't open. Any tips? I'm not loosing my grip and I'm certain strength isn't the issue.
 

Liljohn777

New member
Jun 29, 2017
1
0
0
Visit site
Black nail polish is the easy way !!! Just had the idea last night and work perfectly !! Dont know how To post picture on this forum but even a jeweler wouldnt notice !!!! My sleep s gona be so much better tonight. ......
 
Last edited:

Trending Posts

Forum statistics

Threads
943,175
Messages
6,917,641
Members
3,158,860
Latest member
smokedog87