[Auto] Root and Unroot (Windows)**Updated**5/20** w/MR1 update
- Thread starter DroidXcon
- Start date
You are using an out of date browser. It may not display this or other websites correctly.
You should upgrade or use an alternative browser.
You should upgrade or use an alternative browser.
- Status
- Not open for further replies.
slim delgado
New member
- Jun 15, 2011
- 1
- 0
- 0
worked like a carm on my TH, running the stock first released version. had a run out in the begginning, kept saying adb was out of date, but after a batt removal and restart it ran and unrooted like nothing. thanks to the uploaderSpecial thanks to jcase and Team AndIRC for all their work and for streamlining the manual adb process
[warn]The method of rooting your Android device as described in the article herein is solely for enthusiasts and not for the faint of heart.
IT WILL WIPE YOUR DATA. IT WILL WIPE YOUR DATA. IT WILL WIPE YOUR DATA.
Android Police, Android Central, Team AndIRC and myself disclaim all liability for any harm that may befall your device, including, but not limited to: bricked phones, voided manufacturer warranties, exploding batteries, etc.
Download times maybe rather long, root includes OS downgrade and upgrade images.
I have created this to make the process easier but as a user you should know and understand the use of adb.
If for some reason the process should fail there may be need to manually troubleshoot and proceed using adb commands
under the tips area of this thread i will supply references to familiarize yourself with adb[/warn]
[INFO][info]USB driver download (All are the same):
Tip: For best results use USB ports in the back of the computer. [/info]
[/INFO]
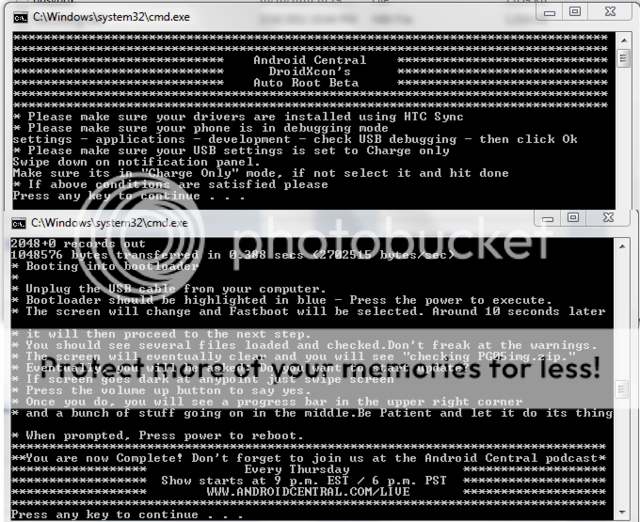
- This Version includes the most recent rooted update.
- i also have added auto checksum. so that if the proper files have not been written to the phone it will not let you proceed into bootloader
Auto Root MR1
- Download Auto root
- Unzip to anywhere on computer
- Activate debugging mode and stay awake (below USB debugging)
- Set the phone to Charge only
- Open TB_Auto_root Folder
- Double click Start_Root MR1
- Follow prompted directions carefully
Download here:
Video Demonstration thanks to DanSan
YouTube - How to Root: HTC Thunderbolt One Click App
[tip]
Remember the following:
- HTC sync installed
- Use USB ports in the back of the computer(adb only officially supports the first primary USB port -- these are all in the back of the computer, and slower/older computers often have problems using a different one)
- Activate debugging mode and stay awake (below USB debugging)
- Phone in charge only mode
- When the process looks like its hanging its actually writing the file to your sd card so be patient
- READ the directions carefully.
- After root is done restart the phone.
Familiarize yourself with ADB
[/tip]
- http://forum.androidcentral.com/general-help-how/56697-how-quick-adb.html
- Android Debug Bridge | Android Developers
- ADB - Android Wiki
- Android SDK | Android Developers
- http://forum.androidcentral.com/hacking/18588-adb-basics-windows-only.html
- [GUIDE] ADB for "Dummies"
*******************************************************************************************
[warn]When using automated methods carefully read all instruction provided by prompt before proceeding. This method will unroot you and return you to stock with S-on. Neither Android Central or I are responsible for anything that you do to your phone.[/warn]
Auto Unroot
- Download Auto unroot
- Unzip to anywhere on computer
- Activate debugging mode and stay awake (below USB debugging)
- Set the phone to Charge only
- Open TB_Auto_unroot Folder
- Double click Start unroot
- Follow prompted directions carefully
Auto Unroot:
USE this thread for now [HOWTO] Restore to stock for root users and non-root users UPDATED 5/17/2011 - xda-developers
Pulled for modifications
*****************************************************************************************
CreditsScotty2, jamezelle, jcase, and all of Team AndIRC Cory Streater for his walk through dsb9938 for the tutorial cleanup Testers, especially ProTekk and Trident Thanks to scotty2 for WPThis Busybox was pulled from a CyanogenMod ROM, source should be available here psneuter was pulled from somewhere, credit to scotty2, source here All firmware credit goes to 911sniper Jaroslav from Android Police for editorial help If I missed anyone in the credits, it was unintentional and I will fix it as soon as Jcase lets me know who else should be added. Lots of people had their hands in on this project. Modeled and adapted after the original method here.


DanSan
Well-known member
- Apr 24, 2011
- 131
- 14
- 0
if you guys are new to it and are thinking about doing a rom.. little, how to here..
YouTube - How to ROM: HTC Thunderbolt Das Bamf 2.0-5
YouTube - How to ROM: HTC Thunderbolt Das Bamf 2.0-5

Partial Unroot?
I recently decided to try das BAMF 2.0 but after hearing about the potential bricking, I decided I'd revert back to 1.6.3. Anyways, before I flashed the GB radio, there was already a PG05IMG.zip file on my sdcard, so I assumed that it was a file for the Froyo radio (since I'm a noob). Since I thought this was the Froyo radio, I flashed it in bootloader to start my revert. After doing so, I no longer have root access (but it still says I have s-off in hboot). I say I don't have root access because things like Titanium backup and ROM manager say I don't have root access, even after installing superuser. This made me realize that that PG05IMG.zip was the one that was left on my phone after rooting my phone using this auto-root method. So with this info, can anyone help me figure out what's going on with my phone? How can I get root access back? Will I need to completely un-root my phone first? If so, can I just use this auto-unroot method? Any help would be great!
I recently decided to try das BAMF 2.0 but after hearing about the potential bricking, I decided I'd revert back to 1.6.3. Anyways, before I flashed the GB radio, there was already a PG05IMG.zip file on my sdcard, so I assumed that it was a file for the Froyo radio (since I'm a noob). Since I thought this was the Froyo radio, I flashed it in bootloader to start my revert. After doing so, I no longer have root access (but it still says I have s-off in hboot). I say I don't have root access because things like Titanium backup and ROM manager say I don't have root access, even after installing superuser. This made me realize that that PG05IMG.zip was the one that was left on my phone after rooting my phone using this auto-root method. So with this info, can anyone help me figure out what's going on with my phone? How can I get root access back? Will I need to completely un-root my phone first? If so, can I just use this auto-unroot method? Any help would be great!
Cyber Warrior
Robots Will Kill
- Nov 28, 2010
- 7,239
- 2,519
- 0
I recently decided to try das BAMF 2.0 but after hearing about the potential bricking, I decided I'd revert back to 1.6.3. Anyways, before I flashed the GB radio, there was already a PG05IMG.zip file on my sdcard, so I assumed that it was a file for the Froyo radio (since I'm a noob). Since I thought this was the Froyo radio, I flashed it in bootloader to start my revert. After doing so, I no longer have root access (but it still says I have s-off in hboot). I say I don't have root access because things like Titanium backup and ROM manager say I don't have root access, even after installing superuser. This made me realize that that PG05IMG.zip was the one that was left on my phone after rooting my phone using this auto-root method. So with this info, can anyone help me figure out what's going on with my phone? How can I get root access back? Will I need to completely un-root my phone first? If so, can I just use this auto-unroot method? Any help would be great!
Try going into Titanium.. hit the problems button and download Busy Box when it prompts you to. Should fix things.
when i click problems, the only options I get are "see wiki" "Preferences" and "upgrade superuser"Try going into Titanium.. hit the problems button and download Busy Box when it prompts you to. Should fix things.
I decided to try re-rooting using this auto method. I started from step 2 and it worked! Back to root again!Try going into Titanium.. hit the problems button and download Busy Box when it prompts you to. Should fix things.
Noob here trying root, after downgrade get message
rm failed for /sdcard/PG05IMO.zip, no such file or directory
then root failes tried pulling battery and starting from step 2 3 times error still keeps coming up
what is the problem thank you in advance.
rm failed for /sdcard/PG05IMO.zip, no such file or directory
then root failes tried pulling battery and starting from step 2 3 times error still keeps coming up
what is the problem thank you in advance.
Cyber Warrior
Robots Will Kill
- Nov 28, 2010
- 7,239
- 2,519
- 0
Noob here trying root, after downgrade get message
rm failed for /sdcard/PG05IMO.zip, no such file or directory
then root failes tried pulling battery and starting from step 2 3 times error still keeps coming up
what is the problem thank you in advance.
File should be named PG05IMG.zip (PG zero five img)
Ok, this may be a stupid question but, I do not see PGO5IMG.zip on the SDFile should be named PG05IMG.zip (PG zero five img)
card from the downgrade. Also when I start from step 2 and it tries to push
Ruu I get a protocol error. Am I having a problem with the image on the SD
card or a communications error. I am using the same usb port with debugging
On, charge only mode with fast boot off.
Thanks
Last edited:
droidhackzor
New member
- Jun 18, 2011
- 3
- 0
- 0
software version compatability?
i recently had to change out my thunderbolt due to a faulty radio chip ( i beleave it just got to hot while on in the car.lol. anyhow, when i changed it out i noticed the software version is "1.13.605.7" will this rooting method work with this version or no?
i recently had to change out my thunderbolt due to a faulty radio chip ( i beleave it just got to hot while on in the car.lol. anyhow, when i changed it out i noticed the software version is "1.13.605.7" will this rooting method work with this version or no?
Last edited:
Cyber Warrior
Robots Will Kill
- Nov 28, 2010
- 7,239
- 2,519
- 0
Ok, this may be a stupid question but do I need to rename the downgrade file
file on the SD card to .zip or in the auto root folder on the computer.
Download the file.. do not extract the files.. leave the folder zipped as it is. Make sure the file is named PG05IMG. If its not.. right click on the file and rename it. Drag the file and place it directly on the SD Card of the phone... Do not place it in any sub-folders.
Cyber Warrior
Robots Will Kill
- Nov 28, 2010
- 7,239
- 2,519
- 0
i recently had to change out my thunderbolt due to a faulty radio chip ( i beleave it just got to hot while on in the care.lol. anyhow, when i changed it out i noticed the software version is "1.13.605.7" will this rooting method work with this version or no?
Yes.. it will work.
Cyber Warrior
Robots Will Kill
- Nov 28, 2010
- 7,239
- 2,519
- 0
There's also a video demonstration that member DanSan was nice enough to make for everyone showing the auto root process being done step by step.
Here's the link, its also in the first post of this thread: YouTube - How to Root: HTC Thunderbolt One Click App
Here's the link, its also in the first post of this thread: YouTube - How to Root: HTC Thunderbolt One Click App
I'm still stuck on step 2 of root, after i copy PG05IMG.zip to the sd card i no longer get errorDownload the file.. do not extract the files.. leave the folder zipped as it is. Make sure the file is named PG05IMG. If its not.. right click on the file and rename it. Drag the file and place it directly on the SD Card of the phone... Do not place it in any sub-folders.
rm failed for /sdcard/PG05IMO.zip, no such file or directory, but then get a protocol error when
pushing RUU. is this a comunications error i am still using the same usb port, debugging on, charge
mode only, and fast boot off. Any ideas of the problem
Thanks
I'm still stuck on step 2 of root, after i copy PG05IMG.zip to the sd card i no longer get error
rm failed for /sdcard/PG05IMO.zip, no such file or directory, but then get a protocol error when
pushing RUU. is this a comunications error i am still using the same usb port, debugging on, charge
mode only, and fast boot off. Any ideas of the problem
Thanks
are you using a laptop? sounds like you are suffering from a poor connections, try a different USB port or a different computer. the reason you get the error failure to rm PG05img.zip is because its not there, which is fine, i thought i wrote in to ignore that error if it comes up but i guess i didnt
I flashed to the MR2 RUU full leak... (non rooted)... if I go through this process on MR2 will it brick my device?
Or will it downgrade it successfully? I can't simply flash any files because it keeps telling me the MAIN IMAGE IS OLDER. UPDATE FAILED! Press power to reboot.
EDIT: Looks like the autoroot process works for the MR2 RUU full leak. Took me back to stock rooted.")
Or will it downgrade it successfully? I can't simply flash any files because it keeps telling me the MAIN IMAGE IS OLDER. UPDATE FAILED! Press power to reboot.
EDIT: Looks like the autoroot process works for the MR2 RUU full leak. Took me back to stock rooted.
Last edited:
First I want to say thank you DroidX for creating this program works great. This is a great forum its amazing how helpful everyone here is, not to many like this.
The only thing I had available is a laptop, since I'm at work, i was getting communication errors i found that if you restart your computer with your phone still plugged in, it will communicate long enough to root. Hopefully this will help someone.
Again Thank You
Now its time to choose which rom to use.
chevyman29
Well-known member
- Jun 20, 2011
- 826
- 39
- 28
ok after i made it all the way to the last step i dont get the option to start the update it just goes back to a screen that says fastboot highlighted in blue . according to the instuctions after it loads up i would be asked to reboot then i would be done and delet the file from the sd card . now im at a stand still and dont no were to go from here . any help would be greatly appreciated thanks
- Status
- Not open for further replies.
Similar threads
- Replies
- 1
- Views
- 3K
- Replies
- 2
- Views
- 1K
- Replies
- 4
- Views
- 3K
- Replies
- 0
- Views
- 1K
- Question
- Replies
- 10
- Views
- 3K
Trending Posts
-
 What did you think of the live event and Jimmy Fallon?
- Started by Snareman
- Replies: 15
-
 This might be my favorite foldable phone.
- Started by TheAngryToaster
- Replies: 2
-

-
Question Samsung Galaxy S 22 Ultra Battery dies at %5
- Started by Taslim Dude 786
- Replies: 11
-
Members online
Total: 4,649 (members: 11, guests: 4,638)
Forum statistics
Space.com is part of Future plc, an international media group and leading digital publisher. Visit our corporate site.
© Future Publishing Limited Quay House, The Ambury, Bath BA1 1UA. All rights reserved. England and Wales company registration number 2008885.
 Twitter